Kibosh Support Center
Find Answers, Troubleshoot Issues,
Or Contact Our Support Team
How to Activate your Kibosh Router (pre-setup):
Getting Started with your Kibosh Router (post-setup):

3-Steps to install your Kibosh MT6000 WiFi Router:
NEW: Go here if you’re installing your Kibosh for the first time.
See the MT6000 Quick Setup Visual
- Plug an Ethernet Cable into the MT6000 WAN port
- Plug the other end of the same cable into your Internet Service Providers (ISP) modem/router LAN port
- Reboot Kibosh MT6000 & ISP Modem/Router
Verify Kibosh is online:
- Wait 3-5 min
- Join the ‘Kibosh‘ WiFi network – pw: abcd0001
- Go test.kibosh.com
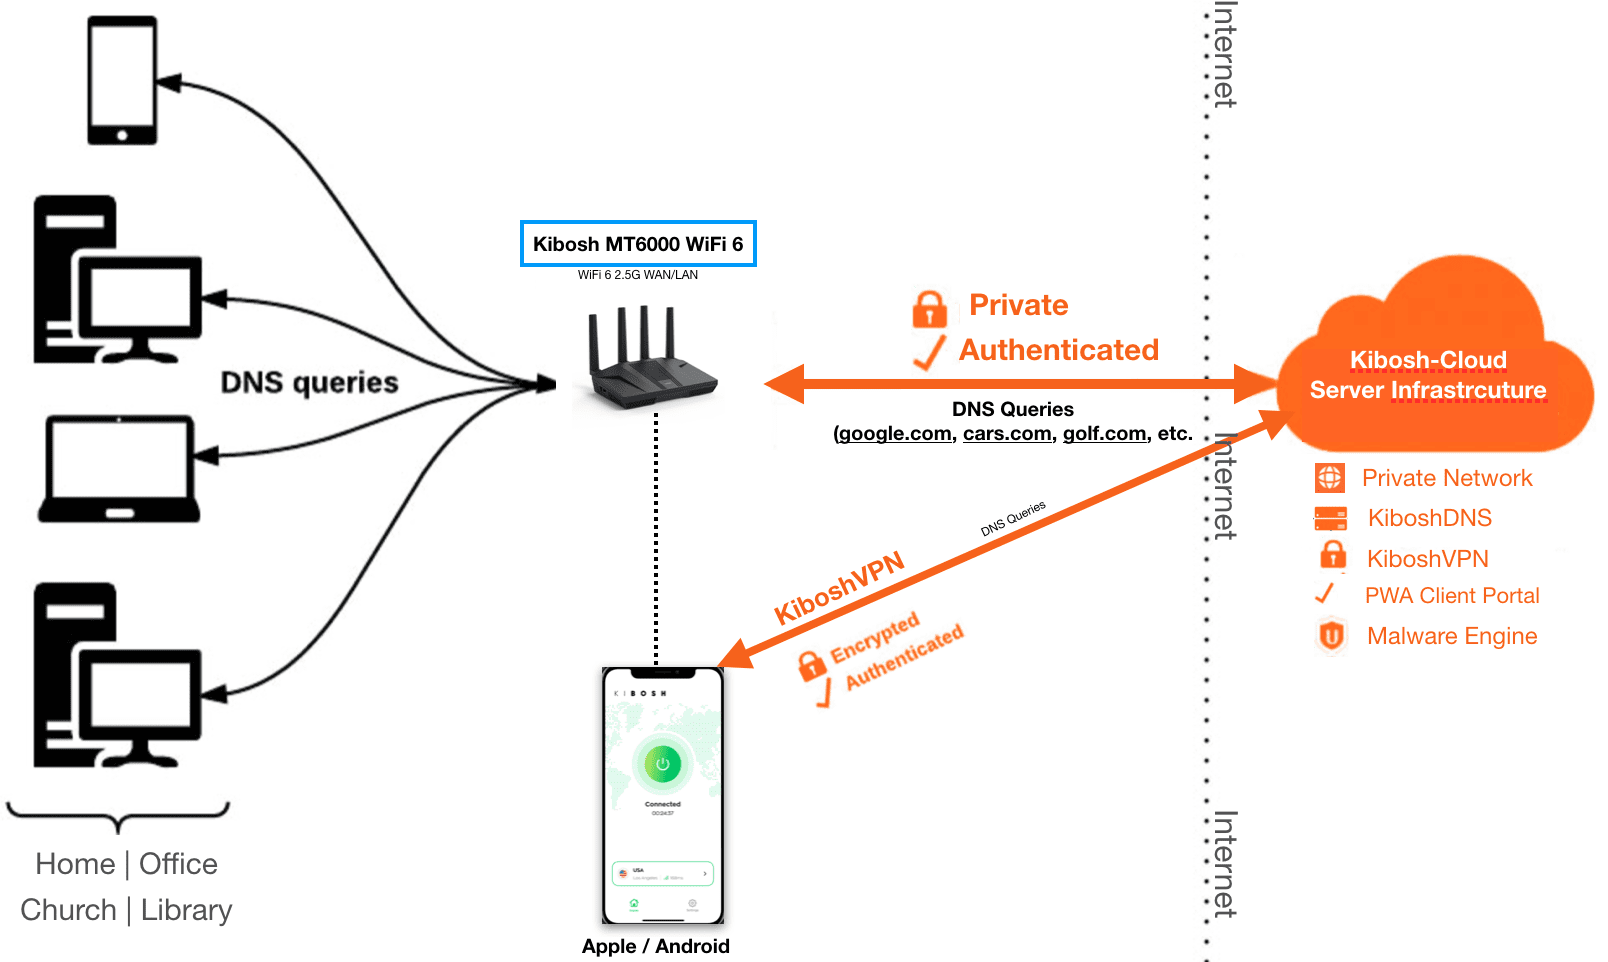
Basic Network Design for you to follow:
[PC]—> [WiFi |:Kibosh MT6000:|WAN port] —->[LAN Port:|Modem/Router]—>WWW
Detailed Installation & Troubleshooting Guide:
Follow this guide if the Quick Setup above did not work for you or if you have a more complex network setup (with range extenders).
TIP: If you’re having issues with existing range-extenders, skip to the bottom > Specific Issues > #5 range-extenders.
Phase 1: Step-by-step general Kibosh MT6000 setup
Summary: Phase 1 we will install the Kibosh MT6000 and make sure it’s working with your ISP equipment. Turn off all other WiFi equipment.
- Turn off all range extenders & extra wireless routers (if you have any)
- Unplug all Ethernet cables (to network devices) you may have connected into any of the Kibosh Router’s LAN ports (we’ll put them back later)
- Make sure there is only one Ethernet patch cable – one end plugged into Kibosh Router WAN port, the other end plugged into one of your Internet Service Providers (ISP) router/modem LAN ports.
- Power-cycle the modem/router & Kibosh Router (reboot them)
- Wait 3-5 minutes.
- You should now see the Kibosh Router’s WiFi – join this
- The default password is abcd0001
- Now, can you get to test.kibosh.com?
- Success! = you’re all set.
- No = please continue…
- Connect your PC to the Kibosh WiFi
- Open a browser (Chrome, FireFox, Brave, etc) and browse to 192.168.10.1 = your Kibosh MT6000 Status Page.
- ! If you cannot connect to 192.168.10.1 – you are NOT connected to the Kibosh Router. Double-check it’s powered on and that your PC is connected by LAN or WiFi.
- Log in at 192.168.10.1 using the exact same password you use to log into your Client Portal App (Kibosh.com/login).
- Once logged into your Kibosh Status Page you should see something like this:
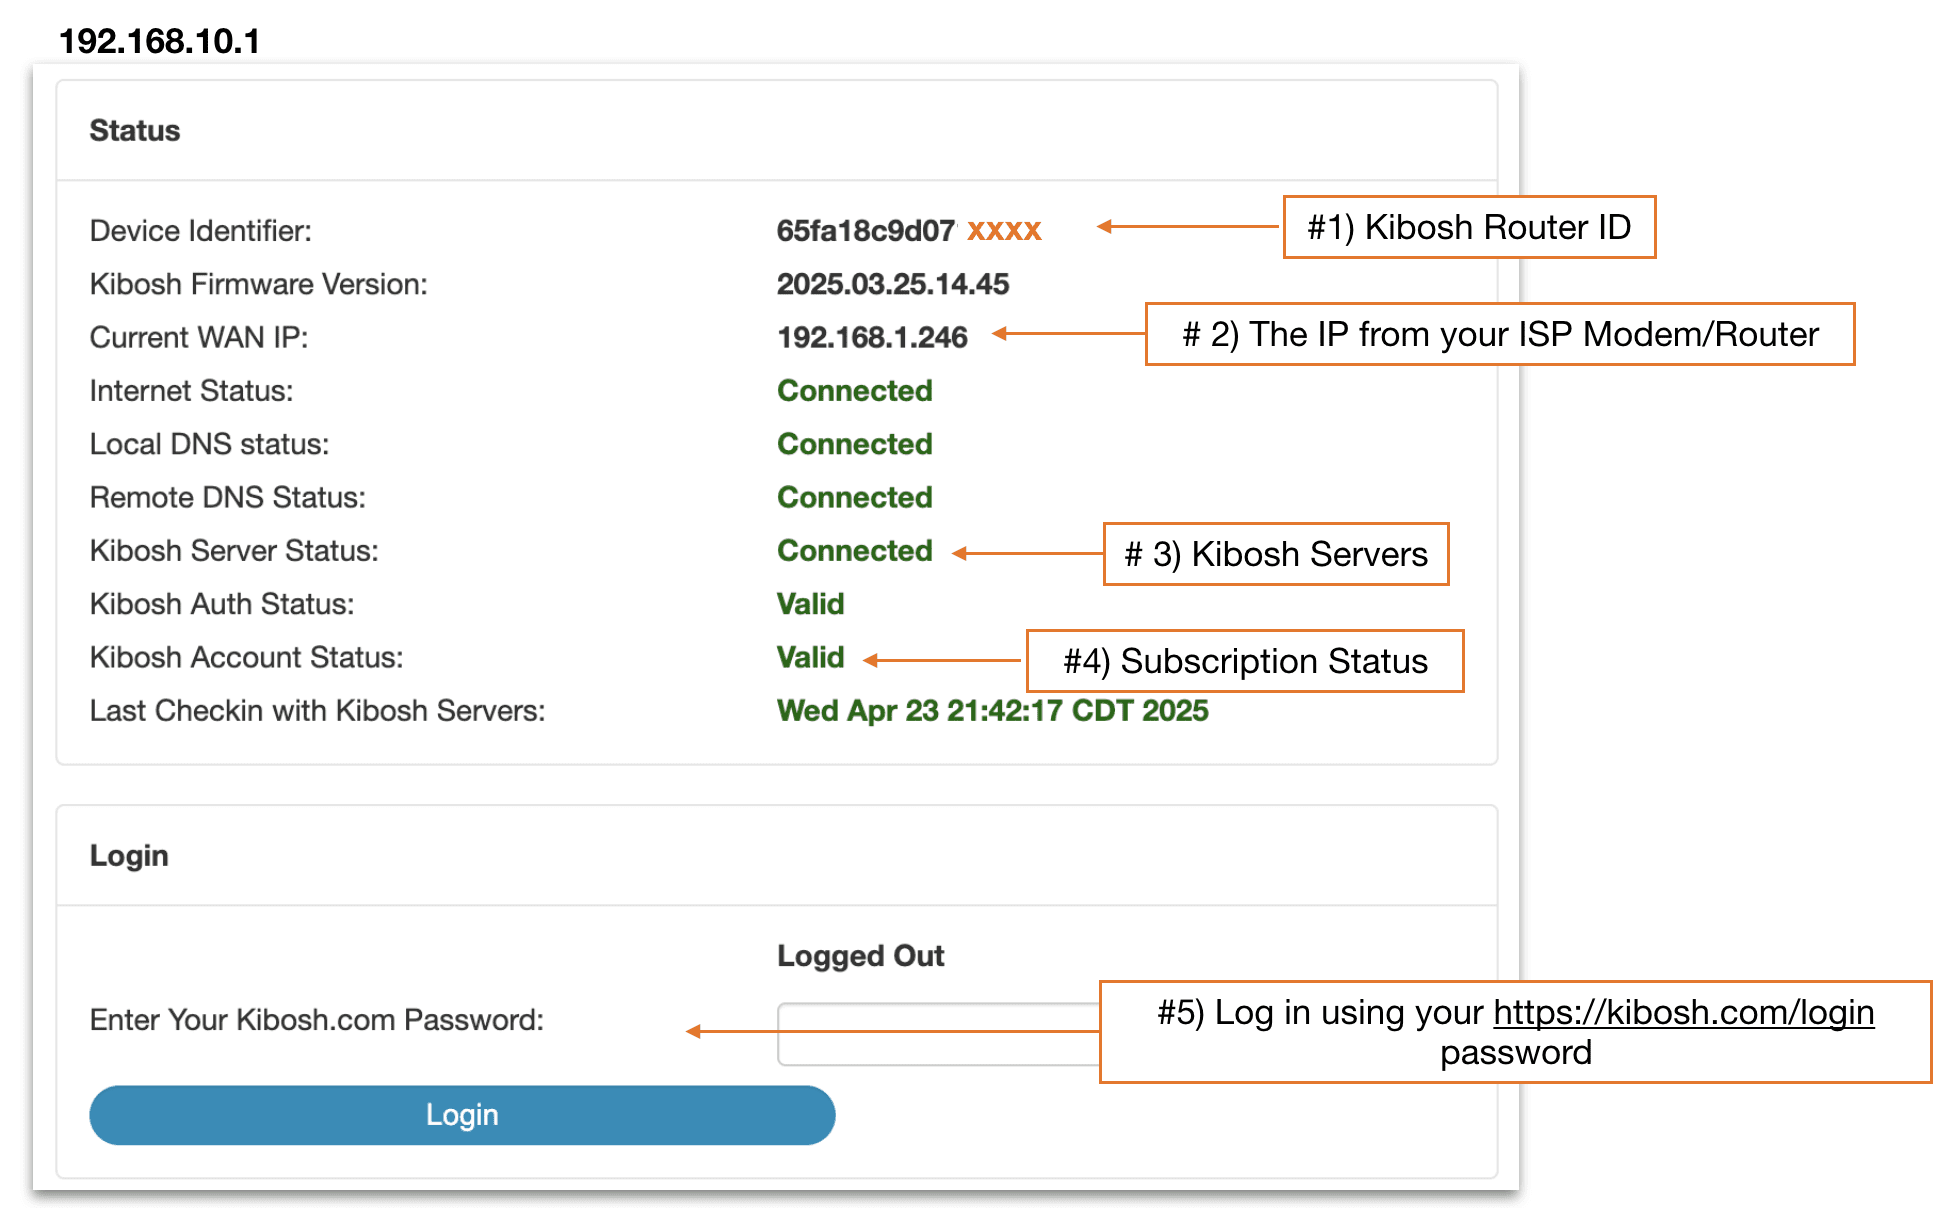
- #1 – this is your Kibosh Router ID, also listed under your MT6000 and in your Client Portal.
- #2 – this is the IP address given to your Kibosh MT6000 from your ISP modem/router.
- !! If there is no IP Address here – your Kibosh Router will not work.
- Repeat steps 1 – 8 above in Phase 1.
- #3 – this will tell you if Kibosh is working.
- #4 – your Internet Security and Parental Controls subscription. NOTE – the MT6000 router will still work if this is non-valid.
- #5 – for more advanced networking features log in using the same password you use to log in at Kibosh.com/login.
- If your WAN IP field is blank – the problem is between the Kibosh Router and ISP modem/router. Try another WiFi router and if it works either replace the ISP modem/router with one of your own, or consider switching to KiboshDNS.
- NOTE: when kids are involved we always recommend the Kibosh Router.
- Open a ticket in your Client Portal > Help Desk – drop a screenshot of your Kibosh Router’s Status Page (192.168.10.1).
Phase 2 : Still having issues?
Please complete Phase 1 first – it’s important to follow each step.
- Reboot MT6000 + Modem + PC (again)
- Double-check you have Ethernet cable fully plugged into correct Ethernet ports (modem LAN –> Kibosh WAN)
- Wait 3-5 minutes
- Connect to Kibosh WiFi
- Go to test.kibosh.com
- Success! = Enjoy, you’re all set.
- Still no internet?
- Reboot again, wait five minutes…
- Still no internet?
- Call your Internet Service Provider (ISP) (you’ll need your bill on hand) and ask them to ‘reset your modem’ which they will do remotely (do not ask them to help you troubleshoot or you’ll end up with more problems).
- Still no internet?
- Plug another Wi-Fi router in – if this works then the issue is again with your ISP equipment not talking to the MT6000 for some reason.
- Solution 1: purchase your own modem (and save money each month) to replace your ISP modem
- Solution 2: switch to KiboshDNS
- NOTE: We do not recommend KiboshDNS if kids are involved – the Kibosh Router’s security and parental controls is what you want).
- Open a Help Desk ticket with Kibosh Support.
- Still no internet?
- Call your Internet Service Provider (ISP) (you’ll need your bill on hand) and ask them to ‘reset your modem’ which they will do remotely (do not ask them to help you troubleshoot or you’ll end up with more problems).
Phase 3: intermittent problems you can’t put your finger on – some devices work fine, some are slow, some websites work, some do not, etc.
- NOTE: there should be only three internet devices in play right now:
- your ISP Modem/router
- Kibosh MT6000 WiFi router
- The PC device(s) you’re testing from
- Turn off all range extenders & extra wireless routers (if you have any)
- Reboot your PC
- Wait 5 min
- Ensure your PC is connected to Kibosh WiFi
- Log into your Client Portal app
- Go to Dash > Settings > Firmware Upgrade
- Choose Reset to Factory Clearing All Settings
- Wait 5 min and reconnect to Kibosh WiFi
- Go to test.kibosh.com – you should be all set.
Advanced Troubleshooting:
Start here:
- Reboot everything including your PC devices.
- Unplug all networking devices except the MT6000 and your ISP modem/router (and your PC).
- Always run your internet tests from multiple devices.
- How to confirm Kibosh is online from any device, go to: test.kibosh.com
- Patience when rebooting hardware…give the devices time to link up.
Specific Issues –
#1) Speed / performance issues:
The MT6000 WiFi router is one of the most powerful WiFi routers available today – with 2.5GB WAN / LAN ports for high-speed fiber.
Kibosh Pro produces the family safe internet and is literally powered by cloud-servers, and has been protecting schools, libraries, churches and homes around the world for over 10 years.
If you’re experiencing unusual slowness A) this is not normal and therefor can be resolved, and B) it’s most likely a bad link between your Kibosh and ISP equipment.
Did you know you can replace your ISP modem with your own? Yes you can, plus you will save money each month because your ISP is charging you for the use of that Modem.
In many scenarios upgrading your modem will improve your overall Internet speeds and Kibosh Router compatibility.
SPEED / LATENCY TROUBLESHOOTING:
- Reboot EVERYTHING: your PC, Kibosh, Modem – there should be no other routers.
- Wait 3-5 minutes and let everything link up (post reboot).
-
Remember, you are introducing a new gateway router to all your devices – but they will want to keep checking for the old gateway router.
That’s why rebooting everything, post Kibosh Router install, is so important – a reboot forces a PC to re-connect to the gateway router.
Usually after a few minutes speed / latency issues clear up.
-
- Log into your Kibosh locally at 192.168.10.1 – ensure everything is GREEN:
- Double-check the Ethernet cable is A) in the correct port, and B) is clicked all the way in (fully seated).
- Now, browse the web.
- Still having speed issues?
- Log into your Kibosh Client Portal > Dash > Settings > Firmware Upgrade > Reset to Factory Clearing All Settings
- Also reboot your Modem
- Wait about 3 minutes
- Now, browse the web.
- Do your speed issues persist?
- Call your ISP and tell them you’ve installed a new WiFi router and ask them to reset the Modem – they will know what to do.
- This will be more common with Fiber links.
- Now, browse the web.
- Still having speed issues?
- Switch to Kibosh Light (14 day free trial, easy cancel) and use your old WiFi router.
- Still having speed issues?
- Unfortunately Kibosh might not work in your area. Please let us know as this would be rare.
#2) Some devices are able to connect to the Internet and some are not –
- On a PC/Server that is not connecting to the internet…
- Check Ethernet cable is seated properly and / or ensure it’s connected to the Kibosh WiFi
- Reboot PC
- Still no internet?
- Can you browse to 192.168.10.1 on this PC?
- Yes = check your Client Portal policies because you’ve created a rule that is blocking
- You can re-confirm this by going to Dash > Settings > Raw Internet.
- No = the issue is on this PC/Server and related to the Network Interface (NIC).
- Yes = check your Client Portal policies because you’ve created a rule that is blocking
- Can you browse to 192.168.10.1 on this PC?
#3) Some devices are filtered and some are not:
NOTE: it’s technically impossible for any device to be connected to the Kibosh and NOT be filtered.
- On a PC/Server that is not being filtered…
- Ensure it is connected to the Kibosh WiFi or directly via Ethernet port
- Reboot the device
- Remove all VPN, or “Safe Browser” apps like McAfee
- Check Dash > Settings > Raw Internet – make sure you did not exclude this device and forget about it.
- Now go to 192.168.10.1 — Kibosh Auth Status should say Valid
- Now go to test.kibosh.com — if Success you’re all set.
- Ensure it is connected to the Kibosh WiFi or directly via Ethernet port
- Still having issues? Open a live chat session at Kibosh.com and / or open a Help Desk ticket from your Client Portal
#4) 192.168.10.1 > Kibosh Auth Status = Failed
If your Kibosh Client Portal is showing no activity, browse to http://192.168.10.1 – this is your MT6000 Advanced Admin:
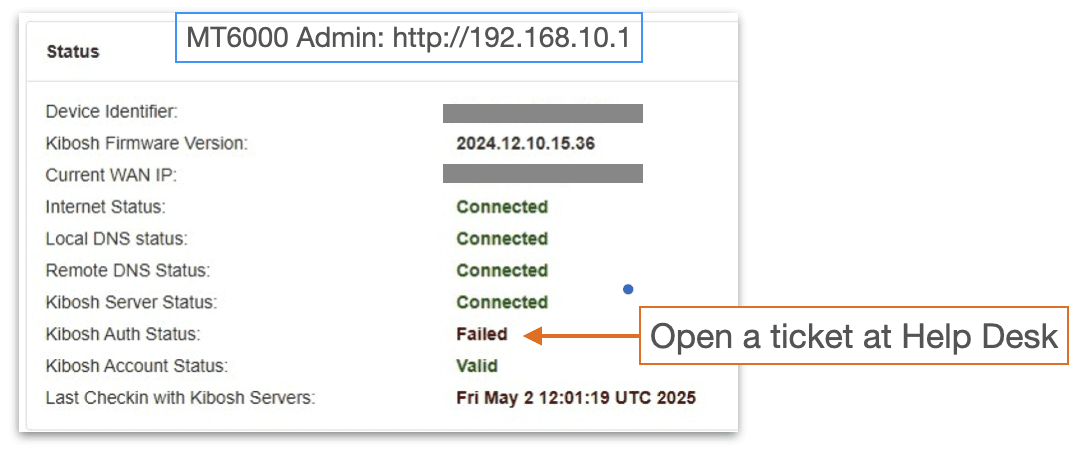
Kibosh Auth Status can only be resolved by Kibosh Support > Help Desk ticket – it’s a quick fix (on our side).
# 5) How to link up existing range-extenders to your new Kibosh MT6000
Summary: all range extenders should have a diff WiFi name than the original / source WiFi network (or you WILL have issues).
- Example: your WiFi network name is ath0me and you have 1 range extender named ath0me_ex.
- Your Kibosh Router should be online and you’re logged into your Client Portal (if not see Phase 1 above)
- While logged into your Client Portal go to Dash > Settings > WiFi Settings
- Under 2.5Ghz WiFi and 5Ghz WiFi > change the WiFi name from ‘Kibosh’ to your old WiFi name
- Save Changes
- Now, on your PC device look for available WiFi networks > you should NOT see ‘Kibosh’ WiFi network anymore…but now you see your old WiFi network name
- Once you have changed the WiFi name to the old / original one (i.e., the one all the range extenders were connected to)…
- Reboot (power cycle) all the range-extenders
- Wait 3-5 min
- Now, from your PC you should be able to join a range-extender WiFi and go to test.kibosh.com
#6) How to link up network printers to your new Kibosh MT6000 WiFi
Summary: we are going to 1. connect the printer to Kibosh WiFi, 2. make note of the printers new IP address, 3. connect to the printer using the new IP address
- Your Kibosh Router should be online and you’re logged into your Client Portal (if not see Phase 1 above)
- While logged into your Client Portal go to Dash > Settings > WiFi Settings
- Under 2.5Ghz WiFi and 5Ghz WiFi > change the WiFi name from ‘Kibosh’ to your old WiFi name
- Save Changes
- Reboot your printer(s) – they should automatically join the WiFi now
- From your Client Portal > Dash > Devices – look for one of these devices that should be your printer – make note of the IP address.
- Form your PC’s that need to print:
- Add a new printer using the IP address from step 6.
Kibosh Router / Pro FAQ
Does the Kibosh automatically block access to bad websites and images?
Yes:
- SafeSearch always enforced on Google, Bing, DuckDuckGo, Yandex and Brave search engines.
- Non-SafeSearch search engines removed.
- Bad websites continually categorized and removed from your internet.
- Malware sites continually updated and blocked.
The end result is a very clean, fast and error free Internet experience.
Will the Kibosh Router work without a Kibosh Pro subscription?
Yes, you can easily (once you know how to do it) enable / disable Kibosh Pro from your Portal.
Cancel Pro Subscription -
From your Kibosh Portal > Account > Subscriptions > and cancel your Pro subscription.
NOTE: This will turn off your all Internet Filtering and Parental Controls - your Portal will show no activity.
But, you will always have access to Portal > Dash > Settings (firewall, wifi, etc).
Re-activate a cancelled Pro Subscription:
From your Portal > Account > Activation
From the Kibosh Device drop down - choose your Kibosh Router ID
Save & Next
Complete Checkout and you will be back online with Pro.
Does Kibosh's Internet Security work even when incognito mode or tor is being used?
Yes, and Pro blocks TOR, DNS over HTTPS bypass, Apple's Private Relay, and DNS Bypass.
This is a constant battle and part of the firmware updates.
The WiFi signal seems weak - are WiFi boosters available?
The MT6000 is one of the more powerful WiFi routers on the market today.
If you are struggling with WiFi range issues we recommend WiFi range extenders:
Netgear WiFi range extender ($40)
TP-Link WiFi range extender ($90)
These are easy to install and troubleshoot.
How does Malware protection work?
Kibosh Pro will:
- Block Malware infected websites
- Show you that a Malware site has been blocked
- Your Kibosh Portal HUD will show that Malware has been detected & blocked
- You can drill into the Device > Settings and go to Malware to see exactly what site was blocked
- Most of the time it's ad tracking - look up the domain to find the source.
You do not need to take any action, Kibosh has already blocked it.
However, if you feel a particular device has a Malware infection, then you'll want to take some action.
For example, we all have devices that get Malware hits here and there for mostly ad related trackers being blocked. No big deal and in fact the ad trackers being blocked will tell you a lot about where the user has been browsing.
But let's say you have a device with a hundred malware blocks in a 24 hour period - this device most likely has a Malware infection, and if you do not address this ASAP it might spread to other devices - which your Kibosh Portal HUD will show you.
Go to the Support-Center > Malware for handling detailed instructions.
I'm having trouble shutting WiFi off on certain mobile devices...
Any mobile device with Cellular Data must have the KiboshVPN installed in order to control it from your Kibosh Portal.
Otherwise it will just switch to Cellular data if WiFi get's turned off.
Is there a log / history of attempts to access bad websites?
On a Kibosh-internet:
- one cannot search for bad content because bad terms are not allowed (SafeSearch enforced)
- there are no bad images in image search results (SafeSearch enforced)
- if one tries to go directly to a bad website it's blocked (Web Filtering Engine)
The end result is that 'searching' for bad content on a Kibosh-internet is impossible, so one could only go directly to a bad website, assuming it's not blocked which is rare.
If a bad website has not been pre-detected by Kibosh, and is accessed - that website will be listed in the history of a device, and all other websites.
Go to Dash > Devices > [device] > History.
How to turn off MAC Randomization - visual guide.
Why do some devices periodically show up in Portal / Devices with a different IP address?
Because of MAC Randomization by apple, google, microsoft.
Solution: disable Private WiFi on each device having this issue.
You only have to do it once.
How To turn off Wi-Fi MAC address randomization
Jump to:
Settings > Wi-Fi, tapping the "i" icon next to the network, and toggling off "Private Address".


And say Yes to the Tracking Warning.
NOTE: The Kibosh infrastructure is actually private and secure - and Apple can't see what you're doing which is why they use the "privacy warning" scare tactic.
macOS: System Settings > Wi-Fi > Kibosh's WiFi (or whatever you have re-named it to be) > Details > Private WiFi Address = Off

Apple will then show a 'privacy warning'

A privacy warning from Apple? Hilarious, and can be disregarded.
Android: Settings > Network & Internet > WiFi Settings (#1) > Privacy (#2) > Set: Use device MAC (#3)

Updated: 10-5-25
Please explain how does Kibosh Mobile work?
Kibosh Mobile is VPN-layer technology that extends the same family-safe internet and basic parental controls to any Apple or Android device.
This is accomplished by installing a Kibosh developed VPN onto the mobile device, which you do from your Kibosh Portal > VPNs landing page.
Q: Why a VPN?
A: For a few reasons, the main two being 1. it's the only technology available to us today where we can enforce a Family Safe Internet on mobile devices across all sources of Internet: WiFi, Cellular Data, and across all browsers (Chrome, Safari, FireFox, etc), and 2. the inherent data security of the VPN technology ( blocks tracking and hacking).
Once the Kibosh VPN has been installed from your Portal, a family-safe Internet is enforced at all times on this device. Period.
The only way the user can access the Internet is A. through the family safe VPN, or B. they turn off the VPN.
And it is mostly for B that you can monitor from your Portal:

How it works:
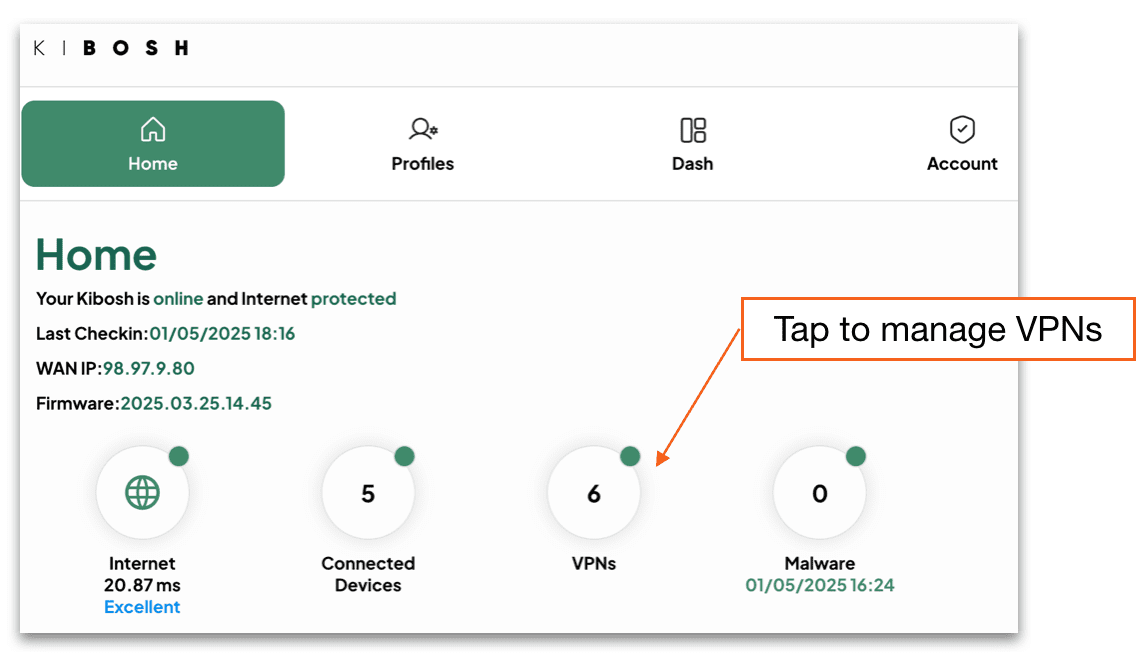
- Assuming you've already setup your Kibosh Router...go to Dash > VPNs in your Kibosh Portal
- Add a new VPN ($1.95 mo.)
- You will now have a new VPN Slot
- VPN Slots are perpetual in that you can rotate devices in and out, but the VPN Slot (aka license) remains.
- Now - log into your Kibosh Portal from the mobile device you want to install the VPN on
- Open the new VPN Slot and Assign this mobile device
- Choose your devices model O/S
- Follow the prompts and viola - the KiboshVPN is installed, and this devices internet is secure
- Note that once the KiboshVPN is installed - the internet on this device will not work unless the VPN is connected. So, the only way the user can access a raw unfiltered internet is to first Turn Off the KiboshVPN.
- You can monitor the VPN ON / OFF status from your Kibosh Portal
- Once you have the KiboshVPN in place, then you can monitor this device from your Kibosh Portal and layer on Parental Controls
A high-level overview of how it works:
Do I need to use 5G?
Not really, we recommend turning it off as it tends to cause more trouble than it solves.
5G is supposed to be faster - maybe it is in a LAB environment, but in every day general usage we've never noticed a difference between 5G and 2.4G.
5G's WiFi is much stronger than 2.5G...so if WiFi radiation is a concern, turn it off.
5G's range is much smaller than 2.4G. So, what happens is that you have two WiFi networks (2.4G and 5G) - when your device is out of range of the 5G, which is most of the time, said device will need to auto-switch to 2.4G, but if it doesn't you'll need to manually do it.
In summary - you can turn it off without causing any problems.
When my internet schedules are applied - will the user be kicked off YouTube or Netflix if they are in the middle of a stream?
Yes.
When an Internet Schedule triggers - all internet activity will stop working on the Device or Profile.
TIP: always give a 3-5 minute cushion for an Internet Schedule to take affect on the Device / Profile.
How can I tell when someone has been using the internet for that day?
Go to Dash > Bandwidth.
Choose the device.
Pick the day.
Look at the Total bandwidth usage chart - this will tell when there was Internet activity for that day.

So, we know the user of MBP-Darling(N) was active on the Internet starting around 15.30 Military Time (which translates to 3.30 pm) on 7-29-25.
We can also know what they were doing by going to History and looking at the sites being accessed during the active times.
When I search for 'porn' it's not blocked by Google - why not?
Q: When I search for 'porn' on Google it still works - why?
A: On a Kibosh-internet Google, Bing, DuckDuckGo, Brave, Yandex and SwissCow are always in SafeSearch ON mode - no matter what device.
SafeSearch ON = no porn related content will be returned: web, images, videos, search terms.
Note however, Google's SafeSearch will still allow searches for terms like 'porn', or 'nude' - for research purposes.
But, on a Kibosh-internet Google will never return pornography for any query. Go ahead and test it.
Google SafeSearch will not allow 'porn nude xxx' for example:

Why do my devices keep showing up multiple times, and stop working in Profiles (MAC Randomization)?
It's because of Apple / Microsoft Wi-Fi MAC Randomization.
Another useless 'feature' for our protection.
Solution: Simple - you will need to disable Private WiFi on each device having this issue.
You only have to do it once.
How To turn off Wi-Fi MAC address randomization -
On iOS: iPhone / iPad
Settings > Wi-Fi, tapping the "i" icon next to the network, and toggling off "Private Address".
And say Yes to the Tracking Warning.
macOS: System Settings > Wi-Fi > Kibosh's WiFi (or whatever you have re-named it to be) > Details > Private WiFi Address = Off
Apple will then show a 'privacy warning'
A privacy warning from Apple? Hilarious, and can be disregarded.
FYI: The Kibosh infrastructure is private and secure - and Apple can't see what you're doing.
Windows -
How to track down Internet issues using Ping.
How to troubleshoot Internet issues with ping.
Ping is a wonderful, free, tool that you can use to easily troubleshoot various Internet related issues.
Ping operates by sending Internet Control Message Protocol (ICMP) echo request packets to the target host and waiting for an ICMP echo reply. It measures the round-trip time (i.e. Internet Speed ) from transmission to reception, reporting errors and packet loss.
How to open ping:
- Windows
- Navigate to the desktop (minimize all other windows) and hit the Windows key + R on your keyboard to open Run, and then type CMD in the Open: box, and then hit enter. This will open a DOS shell in which you simply type ‘ping [IP or domain]’.
- MAC OS
- Open Applications > Utility > Terminal. Then type ‘ping [IP or domain]’
- IOS & Android
- You’ll need to install a free Ping utility from the app store.
You will want to run 3 ping sessions:
- Ping your router – this will tell you if the issues are in your home / office.
- For Kibosh owners this is: ping 192.168.10.1
- Ping 8.8.8.8 – this will tell you if your ISP is working.
- 8.8.8.8 = Google Public DNS
- Ping test.kibosh.net – this will tell you if Kibosh is working.
⇒ TIP: Start each ping, and leave them running all the time. Whenever you detect or suspect an issue, look at these pings.
1. Ping your router which is 192.168.10.1 (see how to find your router IP if using a non-Kibosh router)

If you receive a Reply from … then your internal network is good, and that is not the issue.
If you receive Request timed out ... then your issue is with your router.
2. Ping 8.8.8.8

If you receive Reply from … then your Internet is up, and your ISP is working correctly.
If you receive Request timed … out then call your ISP because they are having issues.
3. Ping test.kibosh.net

If you receive a Reply from … then your Internet and Kibosh are working fine. Try rebooting your PC, and all routers.
If you receive a Request timed … out then Kibosh is the issue. Reboot your ISPs equipment, the Kibosh router and your PC device and repeat the test. If ping to kiboshdns.com fails please submit a support ticket or call 888-727-3018.
Google DNS to run pings against:
- 8.8.8.8
- 8.8.4.4
Note that any public DNS IP would work.
TIP: note that the ping time=# is your Internet speed. The # should be steady, and low – the lower the faster your Internet is. Anything under 40ms is imperceptible to the human eye, anything over 40ms and you’ll notice the slowness. To see it in action, run a ping session, and then start downloading a large file – you’ll see the time=# go up during the download, then down when completed.
How to turn off WiFi Mac Randomization (step-by-step).
Q: Why do some devices show up as a new device (and losing all filter / schedule settings)?
A: Because of MAC Randomization - you'll want to turn this off on iOS / Android for the Kibosh WiFi only. When you turn it off - the original device will show back in your Portal, along with all the filters and schedules.
----
WiFi Mac address randomization is a, to date, dubious "privacy feature" recently implemented by our friends at Google, Apple, Microsoft.
This new "feature" will cause mobile devices to show up in your Portal with a new IP every 14 days or so, until you turn it off.
-
- Open the Settings app and tap Wi-Fi.
- Tap the information button next to the Kibosh WiFi (or whatever you renamed it too)
- Toggle the Private Wi-Fi Address setting to Off.
-
- Open the Settings app and go to Network & internet > Internet.
- Tap the gear icon next to the Kibosh WiFi (or whatever you renamed it too)
- Tap Advanced > Privacy.
- Select Use device MAC instead of "Use randomized MAC".
-
- Go to Settings > Network & Internet > Wi-Fi.
- Select Manage known networks, and choose Kibosh WiFi (or whatever you renamed it too)
- Click Properties, and turn off the Use random hardware addresses setting.
- Open System Settings and click Wi-Fi in the sidebar.
- Find the Kibosh WiFi (or whatever you renamed it too) and click the three dots or Details button next to it.
- Set the Private Wi-Fi Address option to Off.
Updated: 10-5-25
What is Kibosh Mobile pricing?
1 x VPN = $1.95 / mo
3 x VPN = $3.95 / mo
10 x VPN = $8.00 /mo
Each VPN is perpetual and can be re-assigned, uninstalled, re-installed as needed.
You can add & remove Kibosh VPN as needed from your Portal > Account > Activation section:
- When you add a new VPN Subscription, a new VPN Slot will appear in your Portal > Mobile which you can then assign & install.
- When you cancel a VPN Subscription, that VPN Slot will go away and the VPN will terminate (if it's being used).
- If you change your mind - you can re-enable that VPN Slot by going to Account > Activation and choose that VPN from drop-down, and complete checkout.
Why does it take so long for new devices to show up in my Portal?
There is a default 15 minute MT6000 > Portal update cycle.
So, worse case scenario, it takes 15 minutes before your Portal shows a change to your Devices page.
However, you can force immediate updates by logging into your MT6000 Admin: http://192.168.10.1 > Do Full Sync With Server.
New changes will show in your Portal in under 2 min.
Safari does not work right and it's very slow...
Issue: Safari on mobile defaults to using Apple's Private Relay which is essentially a back-door raw internet tor service.
Kibosh blocks Apple's Private relay globally (for everyone) by default (along tor and other back-door raw internet services like Google's DNS over HTTPS) otherwise anyone using an iPhone / iPad would have zero filtering.
Solution(s):
- You can re-enable the Apple Private Relay on any iPhone / iPad by going to Devices > Filters > Other > enable Apple's Private Relay.
- Use a different browser like Chrome, FireFox, Edge or Brave.
Google WiFi work with Kibosh Router?
Yes - if you connect the Google router downstream from the Kibosh MT6000 (Kibosh LAN to Google WAN), your existing Google mesh setup will work like it always has.
Your Kibosh Portal will see the Google Mesh router as a single device that you can manage.
Google's Mesh devices aren't traditional range-extenders. They are tied intimately with your Google Account and will only work with other Google WiFi / Routers.
See Supported Mesh Access Points in this FAQ
Updated: 11-15-25
How can I block YouTube?
To block YouTube you would need to block all of Google, because once you're logged into any Google service, like gmail, you have access to all Google services, like YouTube, without having to log in again. And blocking Google is impractical.
What we can do is enforce YouTube's Moderate or Strict Mode, per device or Profile:
- YouTube Moderate Mode is good at blocking explicit content, and turns off Comments.
- YouTube Strict Mode is very good at blocking explicit content, and tends to overblock.
- Use this if you want to turn YouTube off.
How to enforce YouTube Strict / Moderate Mode:
From Portal > Devices > [pick device] > Filters > Social > YouTube:

Example Scenario: How to schedule YouTube to shut off (i.e., go into Strict Mode)
- Log into your Portal
- Go to Filters > [choose device] > Social > YouTube Strict Mode -> choose Schedules
- Set the Schedule
NOTE: schedules do not work on mobile devices with VPN.
Kibosh Security
Bypassing the Kibosh -
PC/ Mobile:
We take much time and effort to research, and block back-door methods of easily bypassing the Kibosh's Internet security: tor is blocked, DNS over HTTPS is blocked, Apple's private relay is blocked, search proxies are blocked, etc.
The end result is that anyone who wants to access bad content is not going to use the Kibosh, it's too difficult.
This includes mobile devices with the Kibosh VPN installed.
Physical Security:
If you are concerned about physical security (i.e., the kids can simply plug into the ISP modem/router LAN port) your options are:
- Put the ISP modem/router into a lock box
- Use these ethernet port blockers to secure all open LAN ports
- These are very effective
Mobile Security:
- As long as the Kibosh VPN is ON - the internet is safe and cannot be bypassed
- You can easily monitor the ON/OFF status from your Kibosh Portal
- You can sign up for email alerts
The Kibosh VPN will secure the internet no matter what browser, or what Internet is being used.
The Kibosh VPN will prevent another VPN from being used.
For an even more family safe mobile environment, we recommend layering on additional parental controls provided by Apple / Google - mainly to monitor / approve what apps can be installed.
Follow this guide to apply an additional layer of Parental Controls on iOS / Android.
How to setup a WiFi range extender with your Kibosh.
NOTE: Most WiFi range extenders support bridge mode, allowing them to connect to your Kibosh via an Ethernet cable and create an extended WiFi network managed from your Kibosh Portal.
Range extender / Mesh AP Setup - two options:
- WiFi range extender / mesh Access Point (AP) systems in their standard setup will work fine with your Kibosh, but you cannot see or manage any of the devices using the APs for internet access.
- You can however monitor, manage and control the WiFi range extender / Mesh AP (just not each device using said AP).
- The same WiFi range extender / mesh Access Point (AP)s can be put into Bridge Mode and attached to your Kibosh via Ethernet cable or Wireless Bridge (point to point).
- Each WiFi range extender / Mesh AP must be connected to the Kibosh via Ethernet cable or Wireless Bridge
- Each WiFi range extender / Mesh AP will have it's own WiFi SSID: (Kibosh, Kibosh_ex1, Kibosh_ex2, etc).
- In this setup you will be able to monitor, manage and control every device from your Kibosh Portal
Question: I'm unable to run an Ethernet cable to the WiFi range extender / Mesh AP - what can I do?
Answer: For those runs where an Ethernet cable is not possible, use a Point to Point Wireless Bridge (we use this one) - they are very stable and can be placed outdoors.
Step-by-step (updated as we test each mesh system):
How to setup TP-Link Deco (10/25):
- Attach your Deco AP (example) to the Kibosh LAN via Ethernet cable
- power cycle both Deco & Kibosh
- Install the Deco app from App Store
- Follow the standard Deco setup guide to connect the app to the Deco AP
- Once you have the Deco working...
- From the app go to Advanced and set the following:
- Operation Mode: Access Point
- Smart DHCP: Disabled
- Fast Roaming: Disabled
- Beamforming: Disabled
- From the app go to Advanced and set the following:
Now, you will have the Deco WiFi, whatever name you set it to in the Deco App, and you will have the Kibosh WiFi (configured in Portal > Advanced > Settings > WiFi Settings) - but you will still see all devices (+ the deco AP) and be able to manage them.
So you will still have two WiFi (Kibosh + Kibosh-2 for example):
Kibosh = MT6000
Kibosh-2 = Deco AP
Final Step: be sure to turn off MAC Randomization (rotating MAC) settings on the Kibosh-2 WiFi (see FAQ for instructions).
------
Google Mesh: coming soon
Updated: 10-26-25
How to turn off the old WiFi network
Once you have your Kibosh up and running - the final step is to disable the old WiFi network.
If you're replacing a privately owned WiFi router with the Kibosh MT6000 - then you're all set.
If you were using your ISP modem/router for WiFi - then you DO need to complete this step.
How to turn off the old WiFi on ISP modem/router:
There are 2 ways to do this:
-
- Easy: put the Modem into Bridge Mode
- Call your ISP's tech support and ask them to put your (their) modem into Bridge Mode
- This is a common request and they will know what to do
- They need to put the modem into Bridge Mode, you cannot do this
- When they are done, reboot the Modem and the Kibosh
- Call your ISP's tech support and ask them to put your (their) modem into Bridge Mode
- Moderate: Manually log into the ISP's Modem/Router and disable WiFi
- GENERAL STEPS:
- TIP: Search DuckDuckGo for 'how to turn off WiFi [modem model & isp name]' to find specific instructions
- Connect your PC to your old WiFi (just like you've always done).
- Go into your PC's WiFi network settings and locate the IP address - and write down the gateway / router IP
- Usually one of these: 192.168.1.1 / 192.168.0.1 / 10.0.0.1 / 192.168.254.254
- TIP: Search DuckDuckGo for 'how to find my ip address ios' for example, you'll find many guides
- Enter this Gateway IP into your browser (ex: http://192.168.1.1) and you will get your ISP modem/router login page
- Now you need to login
- Look under the ISP modem/router for the login ID and password
- You may need to call your ISP support # and ask then for it
- Now you need to login
- Once logged in, look for WiFi settings - and there will be an option to disable
- Save changes.
- (optional) Log to your Kibosh Portal
- Rename 2.4Ghz WiFi to be same as the old one
- Save Changes
- GENERAL STEPS:
- Easy: put the Modem into Bridge Mode
ISP Guides -----------
Updated: 12-8-25
How to setup Starlink with Kibosh
You will need the Starlink ethernet adapter.
- Log into your Starlink app
- Go to Main Router
- Go to Settings
- Choose Router (not Starlink)
- Go to Bypass Mode
- Slide to Bypass
- Run Ethernet cable: 1 end into the Starlink ethernet adapter, the other end into the Kibosh MT6000 WAN port
- Power-cycle reboot (pull power chord) on BOTH the Starlink router and the Kibosh router.
- In about 2-4 minutes you should be online - the Kibosh MT6000 is now your main WiFi router.
How to factory reset by router (i.e., restore to normal) your Starlink Router.
Updated: 10-14-25
How to block Top Level Domains (TLD)
How to block TLD globally:
- Log into your Portal
- Go to Filters
- Choose All
- Choose Custom
- Enter the TLD as follows - one per line:
- .ru
- .es
- .online

Eero mesh bridge mode
By putting your eero AP(s) into bridge mode you will be able to see and manage your network through your Kibosh Portal.
The only caveat is that bridge mode requires that one eero remain hard-wired into a Kibosh MT6000 LAN port.
How to bridge your eero’s
- Create your eero network: Follow the setup flow in the eero app.
- Connect the main eero to an open Kibosh MT6000 LAN port.
- If you already have an eero network, open the eero App and tap the Settings tab.
- Tap Network settings.
- Under Network services, select DHCP & NAT.
- Switch your selection from Automatic to Bridge.
Portal says No Active Subscription - but I've already activated Pro
You need to re-link your MT6000 to your Portal:
- Connect to your Kibosh
- Go to http://192.168.10.1
- Log in using the same Kibosh.com/login password
- Click 'Reset to Factory Defaults'
- Wait about 3 min.
- Now your Portal should be correct.
Updated: 10-16-25
My internet seems slower now.
The first thing to check - what does your Portal > Home page say your Internet speed is?

If it's Excellent or Good you should be all set.
Questions to answer:
- How are you coming to the slow conclusion?
- How is it impacting your Internet experience?
- Can you replicate it on every device?
As per the Kibosh Router Setup Guide - did you reboot your PC + the ISP modem/router + Kibosh?
Still need help - Kibosh Support Options
How can you reliably ascertain if Kibosh is slowing your internet down.
We will us a simple persistent ping command.
Before installing the Kibosh MT6000:
Open a command prompt on Windows, and Terminal on Linux.
Run: ping bing.com -t
Take a snapshot
Now install the Kibosh MT6000 (setup guide):
Reboot your PC
Open a command prompt on Windows, and Terminal on Linux.
Run: ping bing.com -t
Take a snapshot
Compare the two: time=24.xxx ms

Look on your Portal > Home and click Internet to see a speed chart.
How to Setup a TP-Link Deco Mesh System with your Kibosh
- A Mesh device is essentially a WiFi router, also called an Access Point, or Range Extender.
- Multiple Access Points broadcasting the same SSID = a Mesh Network.
- SSID = WiFi network name
All existing Mesh Systems & Range Extenders will work with your Kibosh.
TIP: for long physical connections (from house to barn for example) use a WiFi point-2-point Wireless Bridge. They are easy to setup and work very well even in inclement weather.
Example WiFi Bridge: TP-Link Omada Point 2 Point Outdoor Bridge ($120)
START HERE:
If you do not already have a TP-Link Deco Mesh System - any of them will work.
You already have TP-Link Deco mesh system:
-
- First, turn off your Deco Mesh APs, and then setup your Kibosh Router per this setup guide -
- DO NOT RENAME THE KIBOSH SSID (step 6 in setup guide)
- DO NOT RENAME THE TP-LINK MESH SSID
- Take the TP-Link Deco - Main AP and attach it to the Kibosh MT6000 - (Deco AP: WAN port to MT60000: LAN port)
- Put the TP-Link Deco - Main AP into Access Point Mode (see how)
- Power cycle both the MT6000 and TP-Link Deco - Main AP
- Wait until you see two WiFi: 1. Kibosh, 2. whatever your TP-Link Deco Mesh WiFi is
- From your PC - connect to the TP-Link Deco Mesh WiFi
- First, turn off your Deco Mesh APs, and then setup your Kibosh Router per this setup guide -

-
- NOTES:
- You can optionally turn off the Kibosh Router WiFi and use the TP-Link Deco WiFi exclusively
- All devices connected to your Kibosh via the TP-Link Deco System will show up as 'lan' devices
- NOTES:
Mesh Systems that work with Kibosh:
- TP-Link Deco in Access Point / Bridge Mode
- Search this FAQ for setup instructions
- Orbi in Access Point / Bridge Mode
- Known to work, but no setup guide yet (search web)
- Eero - search this FAQ for instructions
- Unifi in Access Point / Bridge Mode
- Known to work, but no setup guide yet (search web)
Wireless Range Extenders that do NOT support Access Point. /Bridge Mode:
- Google Mesh (because the Google Mesh does not support Access Point / Bridge Mode)
How to configure a TP-Link Deco - Main AP:
- Attach your Deco AP (example) to the Kibosh LAN via Ethernet cable
- power cycle both Deco & Kibosh
- Install the Deco app from App Store
- Follow the standard Deco setup guide to connect the app to the Deco AP
- Once you have the Deco working...
- From the app go to Advanced and set the following:
- Operation Mode: Access Point
- Smart DHCP: Disabled
- Fast Roaming: Disabled
- Beamforming: Disabled
- From the app go to Advanced and set the following:
Updated: 12-9-25
Kibosh will expose resident malware in a network - an anecdote
Kibosh is an Internet Security Service that has been in production for 15+ years, and it will block and expose any bad stuff resident on your network.
Which means, if you have any form of malware present on any of your devices, these will be blocked and exposed - usually by causing HTTPS browsing issues. Maybe best explained via an anecdote...
Issue:
Skylar installed a Kibosh Router and was very happy with the new internet overall.
However, on Sklyar's PC using the Chrome Browser, ever since Kibosh was installed accessing certain websites stopped working - always giving the annoying the 'Your connection is not private' error:

Skylar opened a Help Desk Ticket - asking why the Kibosh Router is blocking these sites? And included the URL of one of the sites that stopped working: htps://search.yahoo.com/search?fr=mcafee&type=E210US714G0&p=chem+made+clear
Resolution:
Skylar was asked to check Chrome to see what the default search engine was set to - and Skylar found that it been changed from Google to a shopping site - Skylar changed it back to Google, and then all the sites worked fine.
In other words, Skylar's Chrome had a browser-hijacker malware that Kibosh was now blocking - which was causing all the 'Your connection is not private' browsing errors.
Skylar was asked to install a second browser FireFox, and try to access those the same sites - and they all worked fine. More confirmation Chrome has been hijacked.
iCloud Private Relay (iPR)
Q: Why does Kibosh Block iPR by default?
A: Because any Apple device using iCloud will always use iPR by default when browsing the Internet. Thereby exposing the user to a raw internet, even with a Kibosh in place. Therefor, iPR must be blocked - but you can easily turn it back on, turn it off, or use a different browser to make the annoyance go away.
How to turn iCloud Private Relay off on your Apple device - so that A. Safari will stop being slow, and B. Apple will not see all your data:
On iPhone or iPad:
-
- Open the Settings app.
- Tap your Apple ID (your name) at the top.
- Select iCloud.
- Tap Private Relay.
- Toggle the switch to turn it off.
- Confirm by tapping Turn Off Private Relay.
How to selectively enable iPR on any device from your Kibosh Portal:
- Log into your Portal
- Go to Filters
- Choose your Apple device from the drop-down
- Select Other
- Scroll to bottom and select Enable Apple Private Relay
Updated: 11-20-25
Can Kibosh capture and display in log form search terms being used?
Question:
Are you planning on any future development of the kibosh system to capture searched terms such as the Gryphon Routers? I know that explicit content is blocking is great, but as a parent I would like to be aware of what they are search in order to facilitate healthy conversations.
Answer:
Scott: In regards to Gryphon - if they are truly capturing search terms that means something must be installed on each device (before that can happen). We do not do that - too much overhead for too little return.
On a Kibosh 3.0 internet:
A., one cannot use a bad term due to global SafeSearch enforcement, and
B., if a user tries to access a bad website directly, you'll know about it almost immediately (inside 15 min) via the Explicit Monitor.
Question:
How can I see the exact bad website blocked in the log?
Answer:
Scott: The Explicit Monitor will tell you when, and who tried to accesses a bad website. You'll know the exact website.
Question:
Also on a mobile device using the google search, I was able to return results for "porn" and it came back with articles and forums discussing the effects of it instead of rendering "no results' as advertised
Answer:
Scott: Google will allow a few terms like porn and sex for research reasons, but no porn is returned. They are blocked if you try to use them in combinations.
Updated: 7/7/25
How to Setup and Activate Kibosh Light:

Kibosh Light Server IP are listed in your Kibosh Portal under DNS.
Need some help? Go here for options.
Kibosh Light Setup:
Detailed Step-by-step DNS Setup:
- Phase 1: Install Kibosh DNS Server IP on your WiFi Router.
- Phase II: Install Browser-plugin, and then Activate.
- Phase III: (optional) Enable KiboshDNS status monitoring.
Chromebooks – How to secure with Kibosh DNS IP
Phase I: put Kibosh DNS Server IP on your WiFi Router –
Summary: You will need to find IP address of your WiFi router, and type this IP address into a browser which will open the Admin Panel for of your WiFi gateway router.
- How to find WiFi gateway router IP (in order of recommendation)
- Do a Google search for your ‘[router model] admin login’.
- Check underneath your router usually Gateway Admin IP address is listed there (and hopefully the password).
- Try the following defaults – most routers use one of these:
- type each one of these into your browser (ex: http://192.168.0.1)– if you get a login screen…that’s it:
- 192.168.0.1
- 192.168.1.1
- 192.168.1.254
- 10.0.10.1
- 10.0.0.1
- type each one of these into your browser (ex: http://192.168.0.1)– if you get a login screen…that’s it:
- Call your ISP support desk and ask for help
- Once you’ve logged into your existing WiFi Router –
- Locate Domain Name Server (DNS) Settings
- These are usually found under advanced settings, or advanced networking, or WAN config.
- Ask Google using “router model + change DNS“
- Locate Domain Name Server (DNS) Settings
- Enter Kibosh DNS Server IP and Save Changes (wait 5 -10 min).
- Now any device using this WiFi router will always have a Kibosh-Safe Internet.
- Go to test.kibosh.com – from any device to confirm.
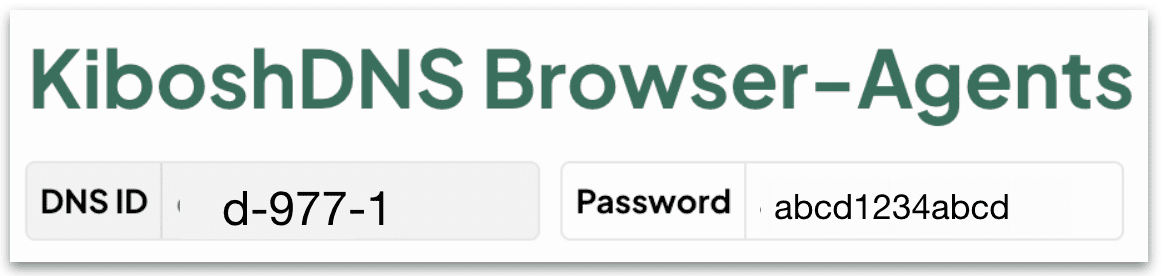
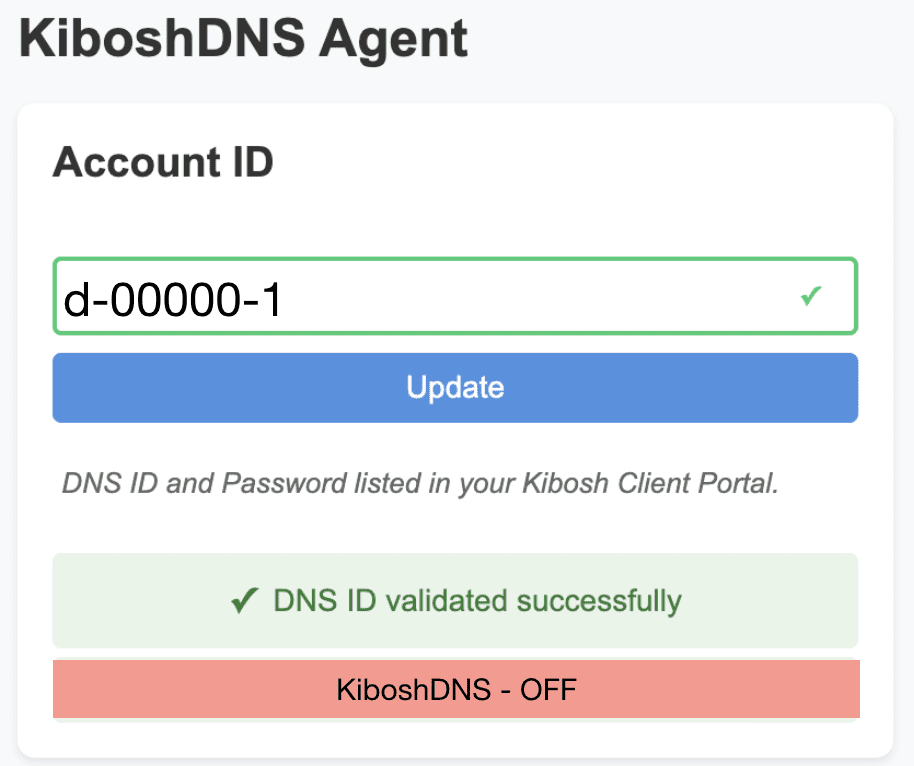
Phase II: Install KiboshDNS Browser-plugins & Validate
- Log into your DNS Client Portal (Kibosh.com/login) – on a PC that does not leave the home/office (ideally, but not necessary).
- Go to DNS > Agents Tab
- Select ‘Download Extension for this Browser and Install
- Chrome, FireFox, Brave, Edge
- Enter your DNS ID & Password as shown
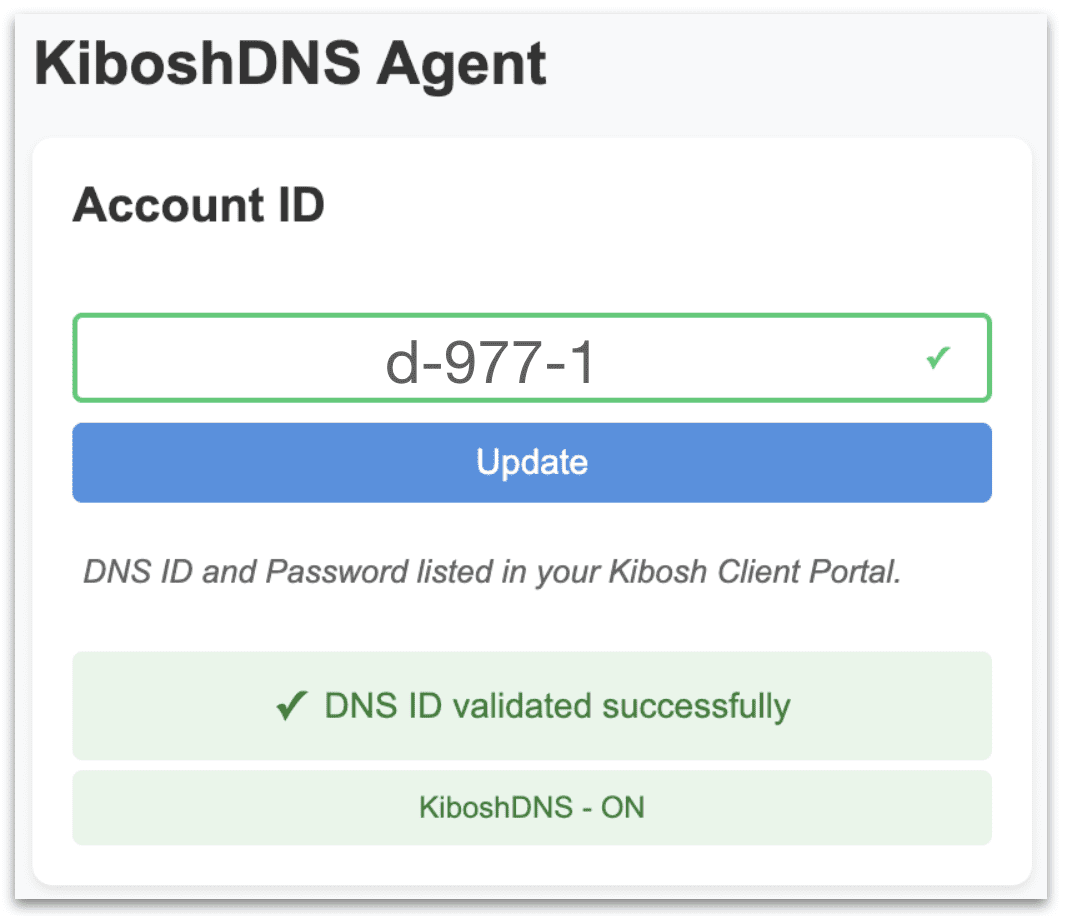
- Client Portal > DNS > Agents:
- Client Portal > DNS > Agents:
- Click Validate
- If validation is successful:
- If validation is successful:
Phase III: enable KiboshDNS status monitoring –
Access to KiboshDNS’s Internet Security Service is predicated on your WAN IP being registered with our servers. This is what the Browser Agent does – ensures your WAN IP is always registered.
If you would like to be alerted to any potential issues with your Browser Agent(s), you can setup alerts by:
- Log into your DNS Client Portal (kibosh.com/login)
- Go to DNS > Settings
- Enable Alerts
- Enter an email(s) to receive KiboshDNS status emails
- Save Changes
Now if your any of your KiboshDNS Browser Agents fail you will be notified.
When you log into your Kibosh Light Portal you see YourKiboshDNS is Unknown –
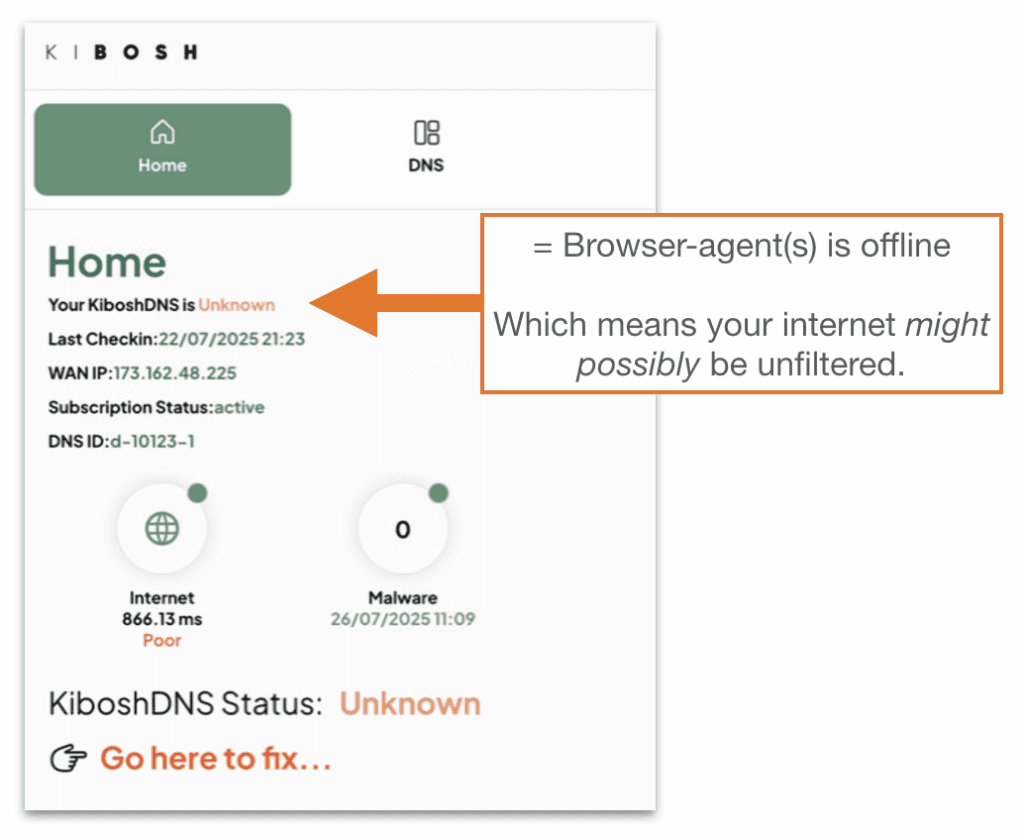
First- don’t panic this is just a warning, and it means that none of your browser-agents have updated in over 24 hours.
This does NOT mean filtering has stopped. In fact, it will be rare that Kibosh-filtering has stopped, but it is possible and thus the warning.
Solution: simply update one of your browser-agents – watch the Kibosh Light Setup video for visual guide.
How it works:
Once you have Kibosh DNS Server IP on your WiFi router, for Kibosh-internet content filtering to start working, Kibosh Light servers needs to know who you are – this is done by knowing your WAN IP.
Every internet connection on the planet has a unique WAN IP assigned to the gateway modem/router. You can see what yours is by going to WAN IP.info.
Your ISP manages the WAN IP for you. All of this is no problem BUT if your modem/router is power-cycled for any reason your assigned WAN IP sometimes changes.
This is what the Unknown warning is for – A. your browser-agent has not updated in over 24 hours, and so B. if your WAN IP has changed you might be exposed to a raw internet.
Ultimate Solution: call your ISP and get a Static IP – you would only need to install and activate a Kibosh Browser Agent 1 time.
Super Ultimate Solution: get a Kibosh Router and don’t worry about any of it anymore – use the coupon code dns2025 for 15% off.
My ISP provided WiFi router does not allow changing DNS Settings.
If your ISP equipment does not allow the changing of the DNS Server IP you have two options:
- Buy your own personal WiF router
- Purchase a Kibosh MT6000 WiFi router – use the coupon code dns2025 for 15% off.
When I go to test.kibosh.com = test failed
Double check these steps:
- Are you sure you’ve correctly configured your WiFi router with Kibosh Server IP?
- Did you also turn off IPV6 on your WiFi router?
- Reboot (power cycle) your WiFi router & your PC.
- Open a live chat at Kibosh.com and have your Remote Support ID ready and we will help.
Your Kibosh Browser Agent shows KiboshDNS – OFF
2 possible scenarios…
- The KiboshDNS Agent is on a PC connected to the WiFi router that you are trying to install Kibosh DNS on – this means you have not successfully completed Phase 1 above
- The KiboshDNS Agent is on a PC that is NOT connected to a Kibosh Light protected WiFi router…this is by design. Always check your DNS Client Portalor status.
- The KiboshDNS Agent is on a PC connected to the WiFi router that you are trying to install Kibosh DNS on – this means you have not successfully completed Phase 1 above
Chromebooks – How to secure with Kibosh Light
1. Open Google Chrome, navigate to chrome://flags in your address bar (omnibox). Find the flag you see below (“Experimental static ip configuration”), and enable it. If this flag is not present, skip to step 3.

2. Select the option that appears on the bottom of your screen to restart your device.

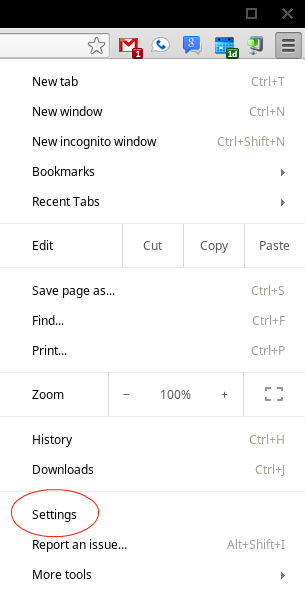
3. Select the menu button in the upper right-hand corner of your browser window, and click on Settings.
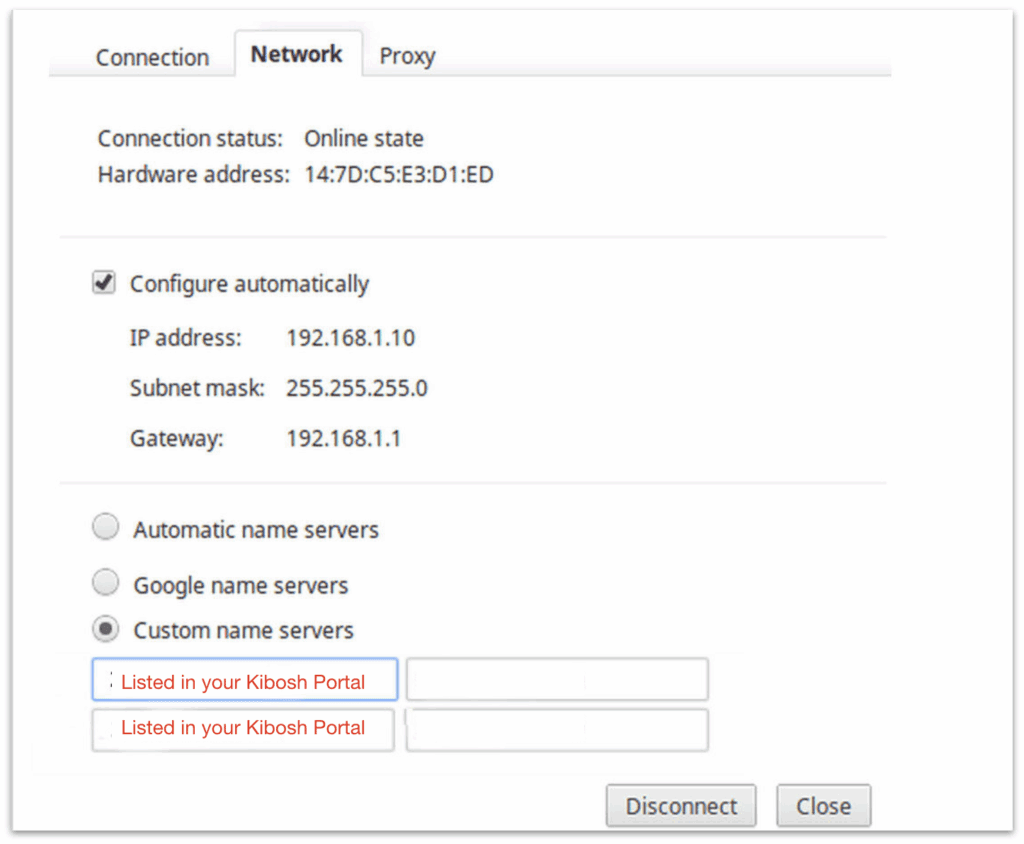
4. Under Internet connection, click on the name of your network. Then click the Network tab, select Custom name servers, and enter Kibosh DNS IP settings as shown:
Updated: 6/28/25
How to install and manage your KiboshVPN:
Step-by-step Instructions…
- Quick Links –
- How to access your VPNs
- How to Assign and Install your VPNs
- How to manage your VPNs
- iOS / Android KiboshVPN App
- Parental Controls
- Troubleshooting / FAQ
Kibosh Pro + VPN –
How to manage your mobile VPNs:
- Start here…
- Log into your Kibosh Client Portal (Kibosh.com/login)
- On your home page, if you have any VPN’s, they will be listed here:
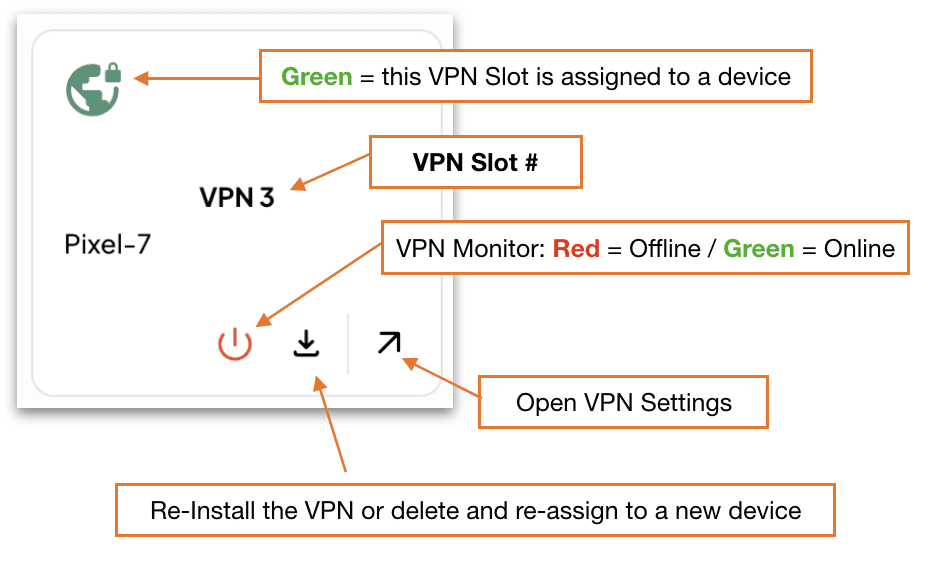
How to Assign and install a mobile VPN:
- 7 quick steps to install:
- First, assign a mobile device to an available VPN Slot
- Click on an un-assigned VPN Slot
- Pick a device from the drop-down
- NOTE: to Assign a device it (the device) must be / have been connected to the Kibosh Router, or it will not show up in the Device drop-down
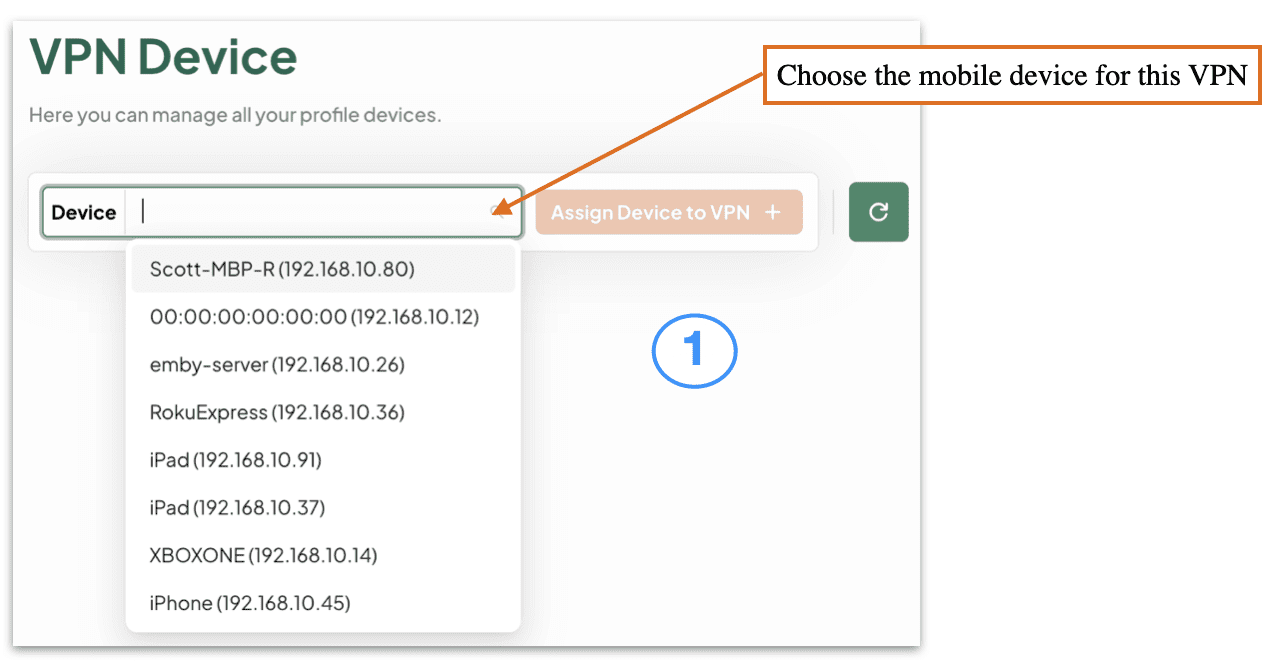
- Tap ‘Assign Device to VPN +’
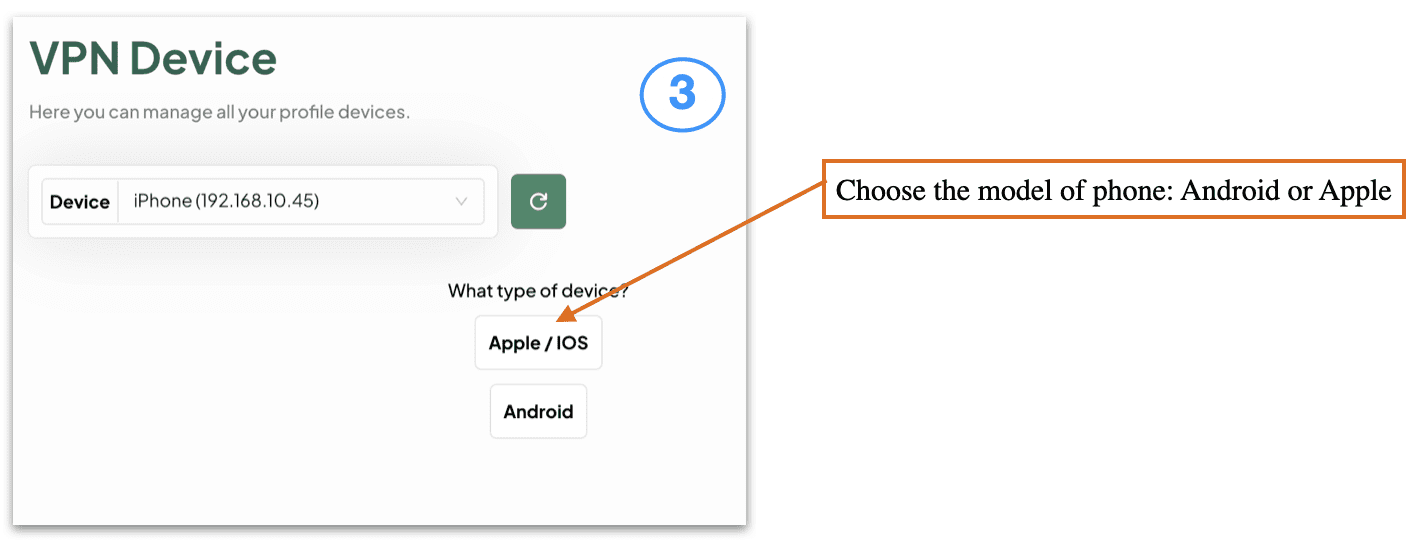
- Choose the type of mobile device to create the VPN profile
- Apple or Android –
- Apple or Android –
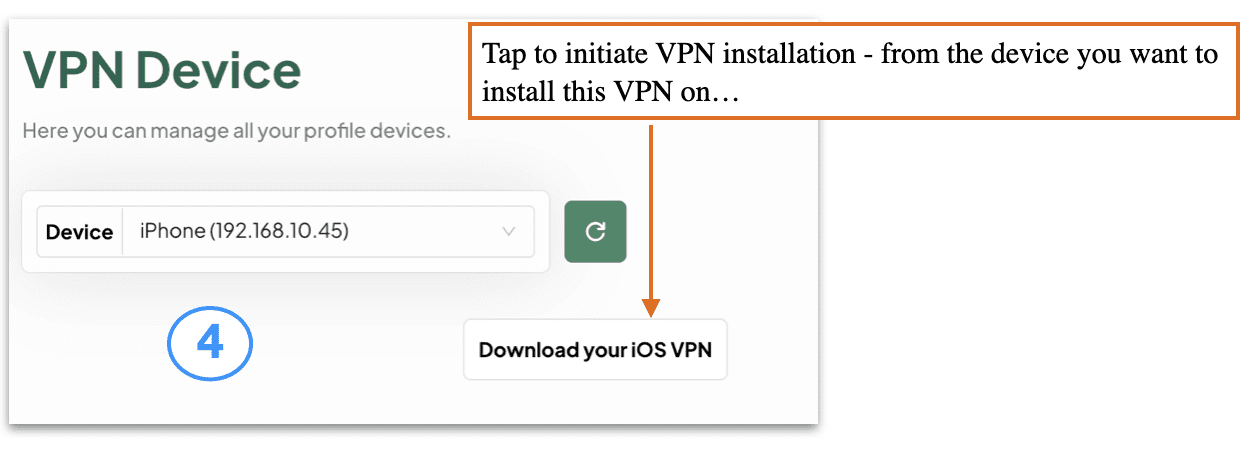
- Click ‘Download your iOS VPN’ on the mobile device
- NOTE: you must do this step from your Client Portal ON THE MOBILE DEVICE that you want to install this VPN on
- NOTE: you must do this step from your Client Portal ON THE MOBILE DEVICE that you want to install this VPN on
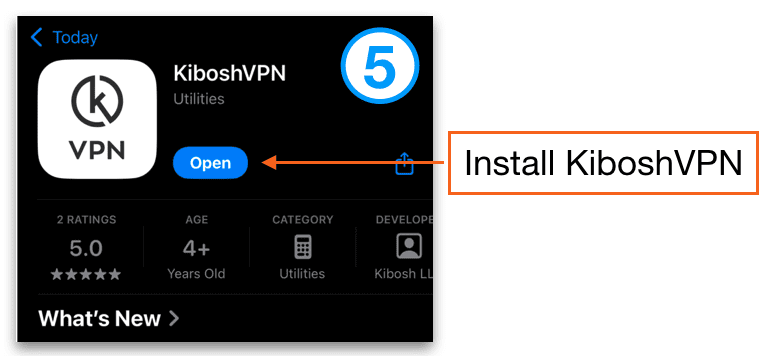
- Tap ‘Install’ the KiboshVPN from the App Store
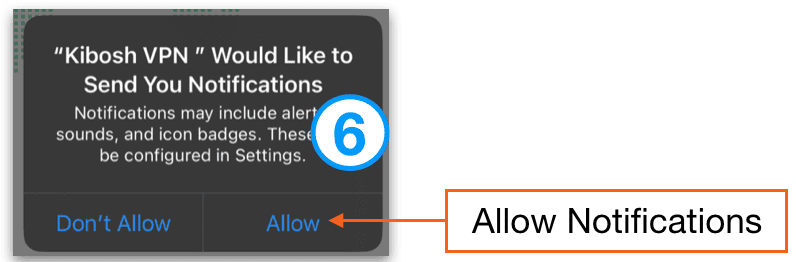
- Tap ‘Allow KiboshVPN Notifications’
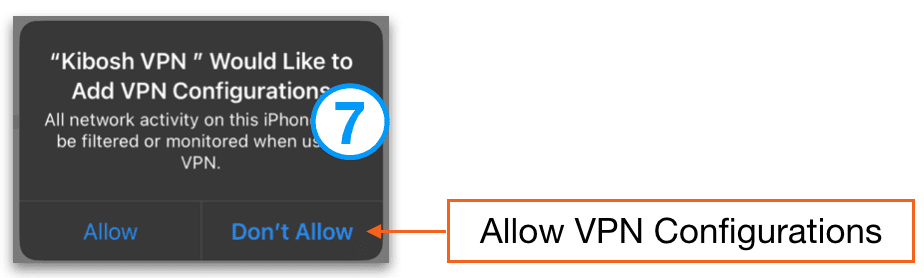
- Tap ‘Add VPN Configurations’
- Enter your passcode (if asked for one)
- You’re KiboshVPN is now Connected!
- Go to test.kibosh.com to verify.
- First, assign a mobile device to an available VPN Slot
How to manage your VPNs from the Client Portal:
- Log into your Kibosh Client Portal @ kibosh.com/login
- Go to VPNs…
How to manage VPN Settings:
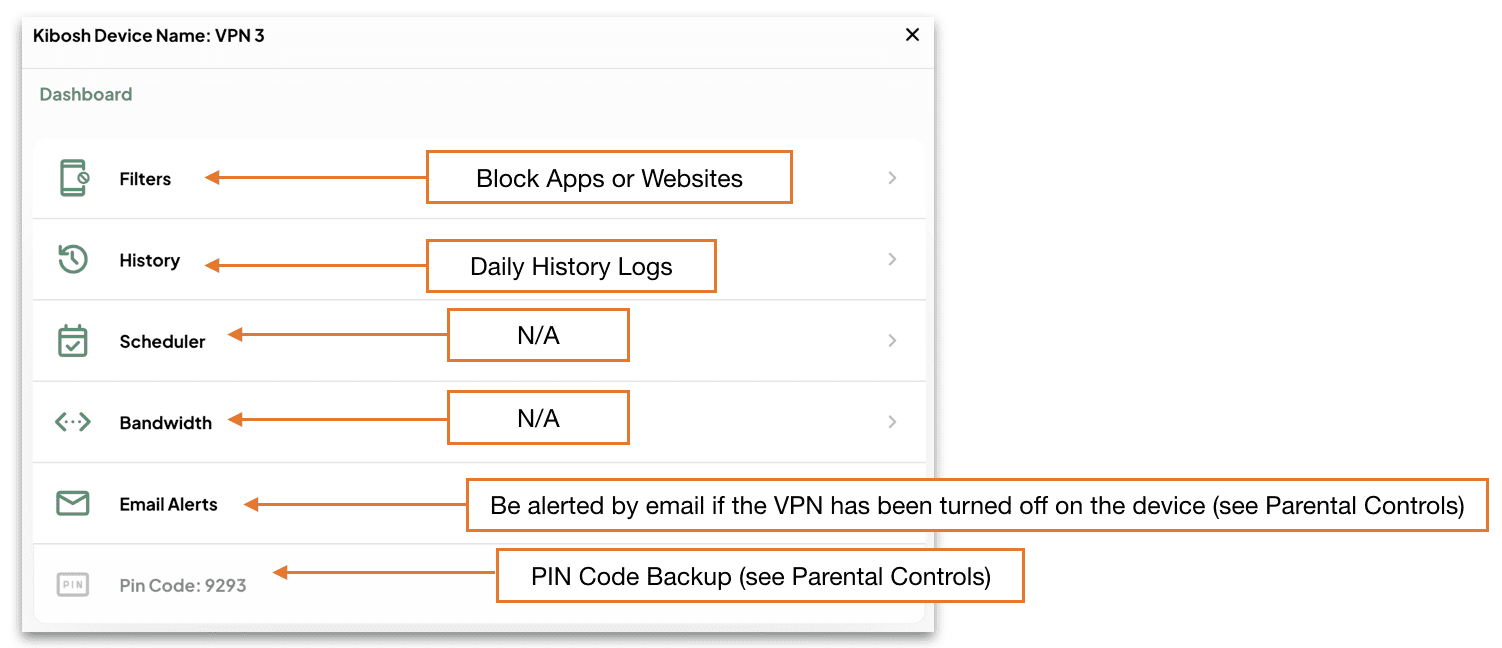
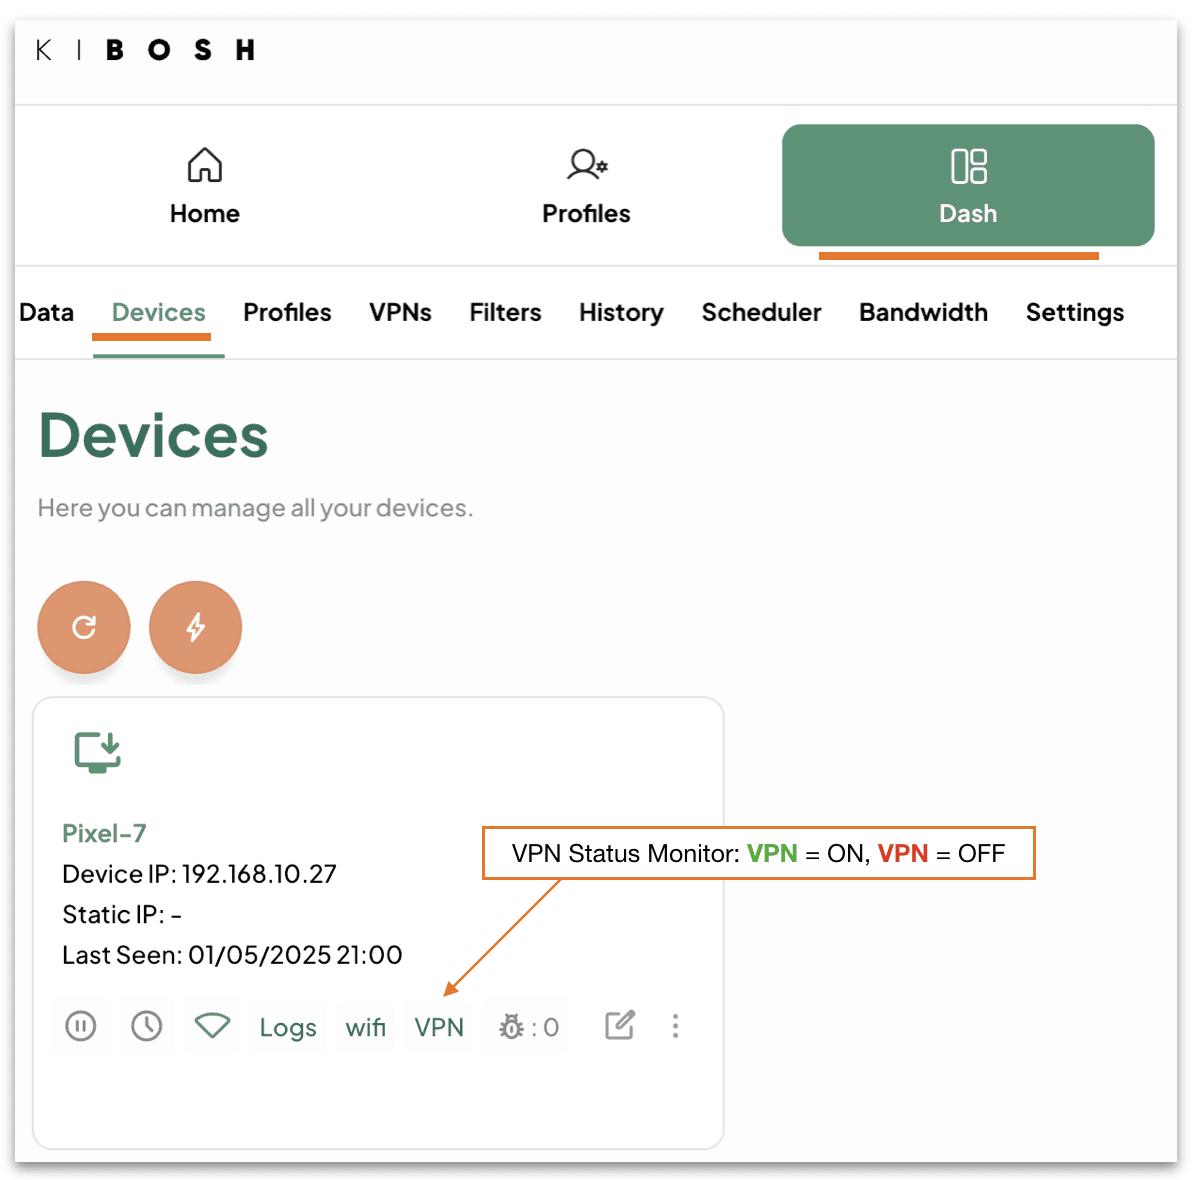
Monitor the VPN from Dash > Devices…
How to manage the KiboshVPN App on the mobile device:
Once the KiboshVPN app has been installed on your mobile device…
Go to Settings…
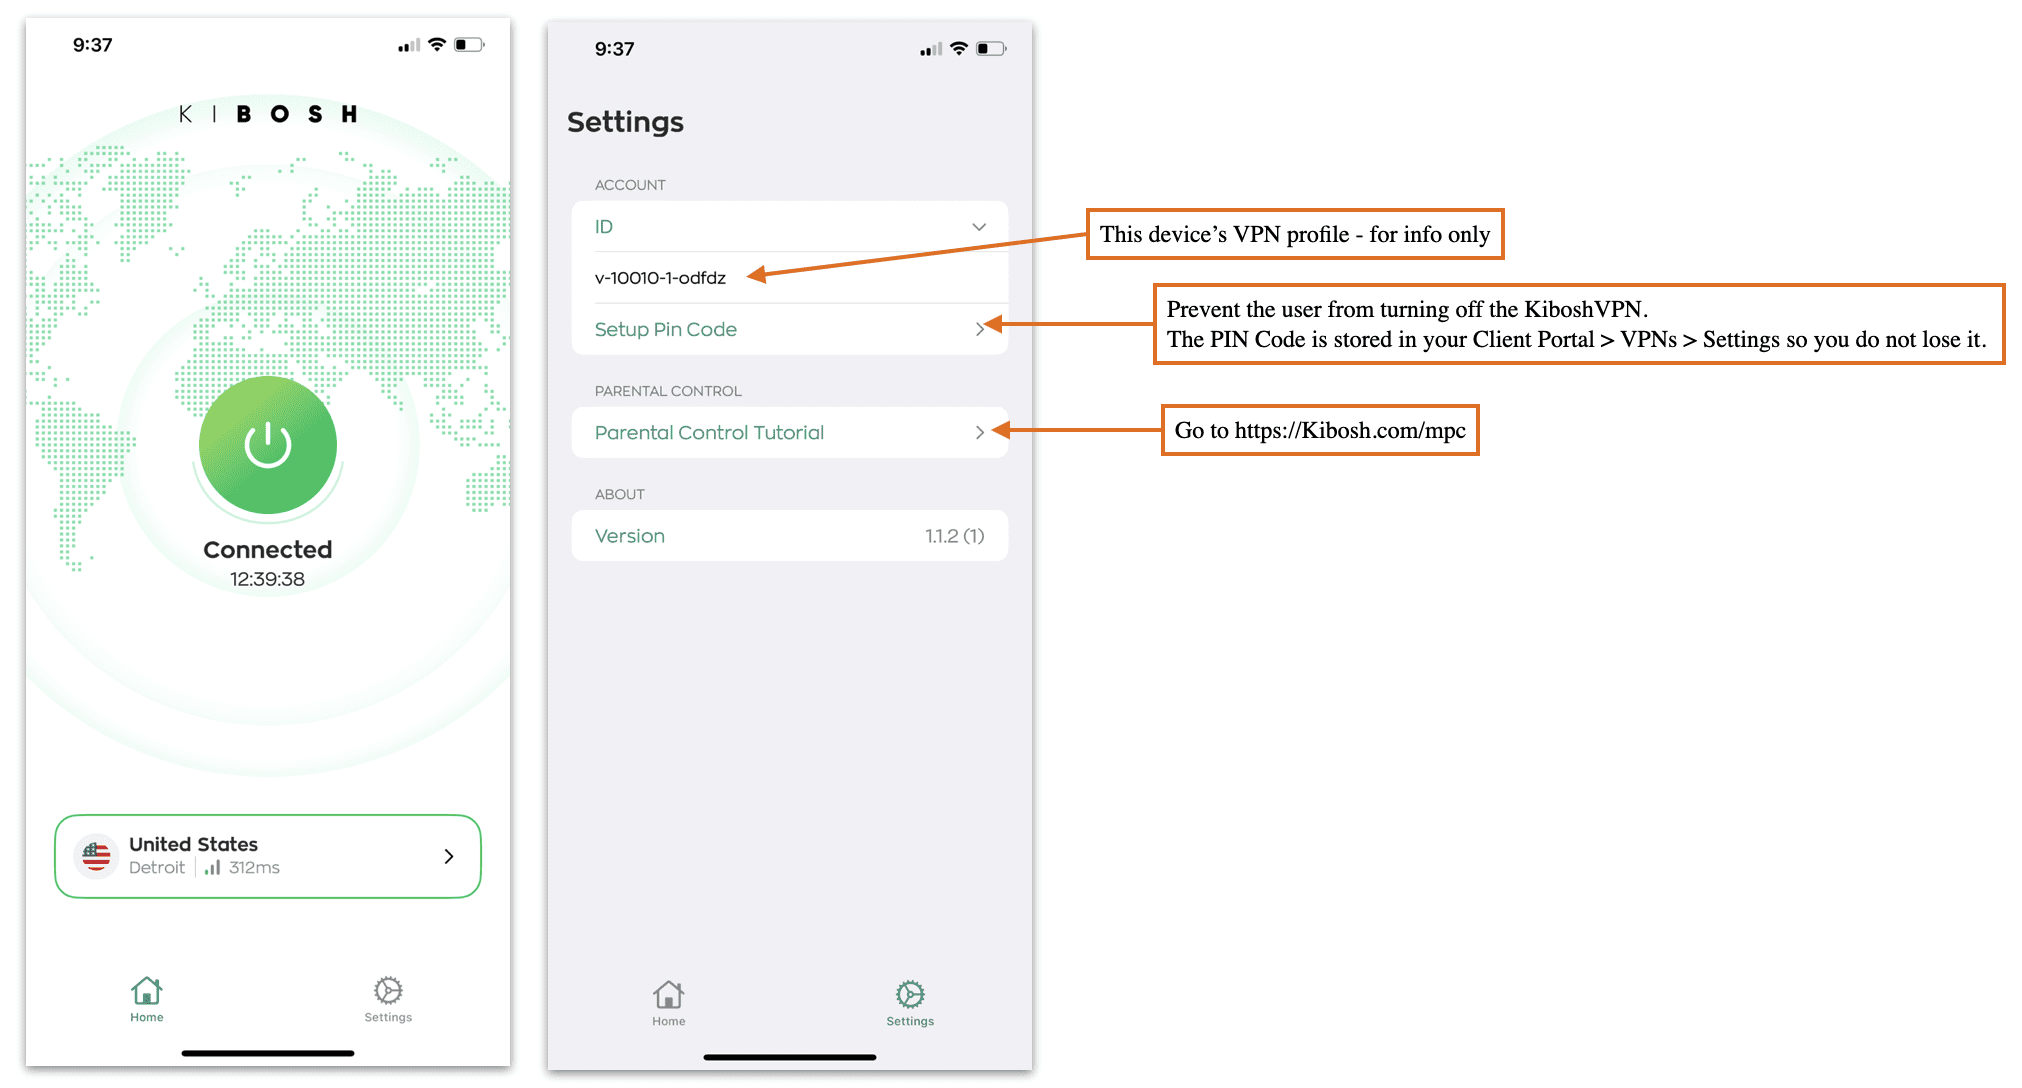
Parental Controls:
Once the KiboshVPN has been installed on a mobile device, the Internet is now family safe.
In addition to this protection you might want to layer on some Parental Controls.
Go to https://Kibosh.com/mpc for setup-by-step guide.
Troubleshooting / FAQs:
You can re-install a KiboshVPN onto the same device as many times as you need to: 1) log into your Client Portal on the mobile device, 2) open the VPN Slot assigned to this device, 3) tap Re-install and follow the prompts. Takes about 2 minutes.
The KiboshVPN is very light-weight and resilient – if you’re having issues related to the Internet…check your WiFi situation first – most of the time you will have a bad WiFi connection.
Bounce the VPN to resolve any latency or delays – bouncing simply means to try and turn off turn the VPN in Settings. This will cause the VPN tunnel to rebuild itself (assuming you have a good internet connection) which will resolve any connection issues.
Only 1 VPN per device – do NOT try to layer on VPNs…this is an un-supported setup and doesn’t make sense anyway. Do some research on what a VPN is (you only need one).
Updated: 6/13/25
Kibosh 3.0 Dual-Layer Malware Protection:
Your Kibosh Router blocks malware on the Internet before it can be downloaded + monitors your network for possible infections, 24/7 on every device:
Layer 1 = The Blocking of Malware from outside your network (aka the ‘WAN’).
Layer 2 = The Monitoring for Malware infections from inside your network (aka the ‘LAN’).
To block Malware we must first identify the malware – to this end we incorporate multiple channels for Malware detection & blocking (aka definitions):
- Spamhause
- GitHub
- Project Honey Pot
- Kibosh Honey Pot(s)
- Customer submissions
What is Malware?
Malware is a piece of code designed to cause harm in one of a few ways:
- Steal your personal data (passwords, CC #’s, etc).
- Destroy your data.
- Encrypt and hold your data for ransom.
How does one get infected with Malware?
There are 4 primary channels:
- A cleverly crafted email with a link to an infected website (aka phishing).
- Drive-bye download – you’re using the Internet and land on an infected website that tricks you into clicking something.
- You download and install an app that has malware inside.
- DNS hijacking – you think you’re on your normal banking website, but in fact your on a malware-infected clone.
Kibosh’s dual-layer Malware protects you from # 1 and #2 by blocking the bad sites before you can be infected (layer 1), and will tell you if #3 has happened on any device on your network (layer 2).
Due to the Kibosh infrastructures inherent privacy, #4 is impossible.
How Kibosh Malware Protection Works:
Kibosh blocks the Malware infected website before it can be downloaded (layer 1) – and then tells you about in in your DNS Portal HUD (layer 2).
Every 15 minutes your DNS Portal HUD will be updated with any Malware detections – which have all been blocked.
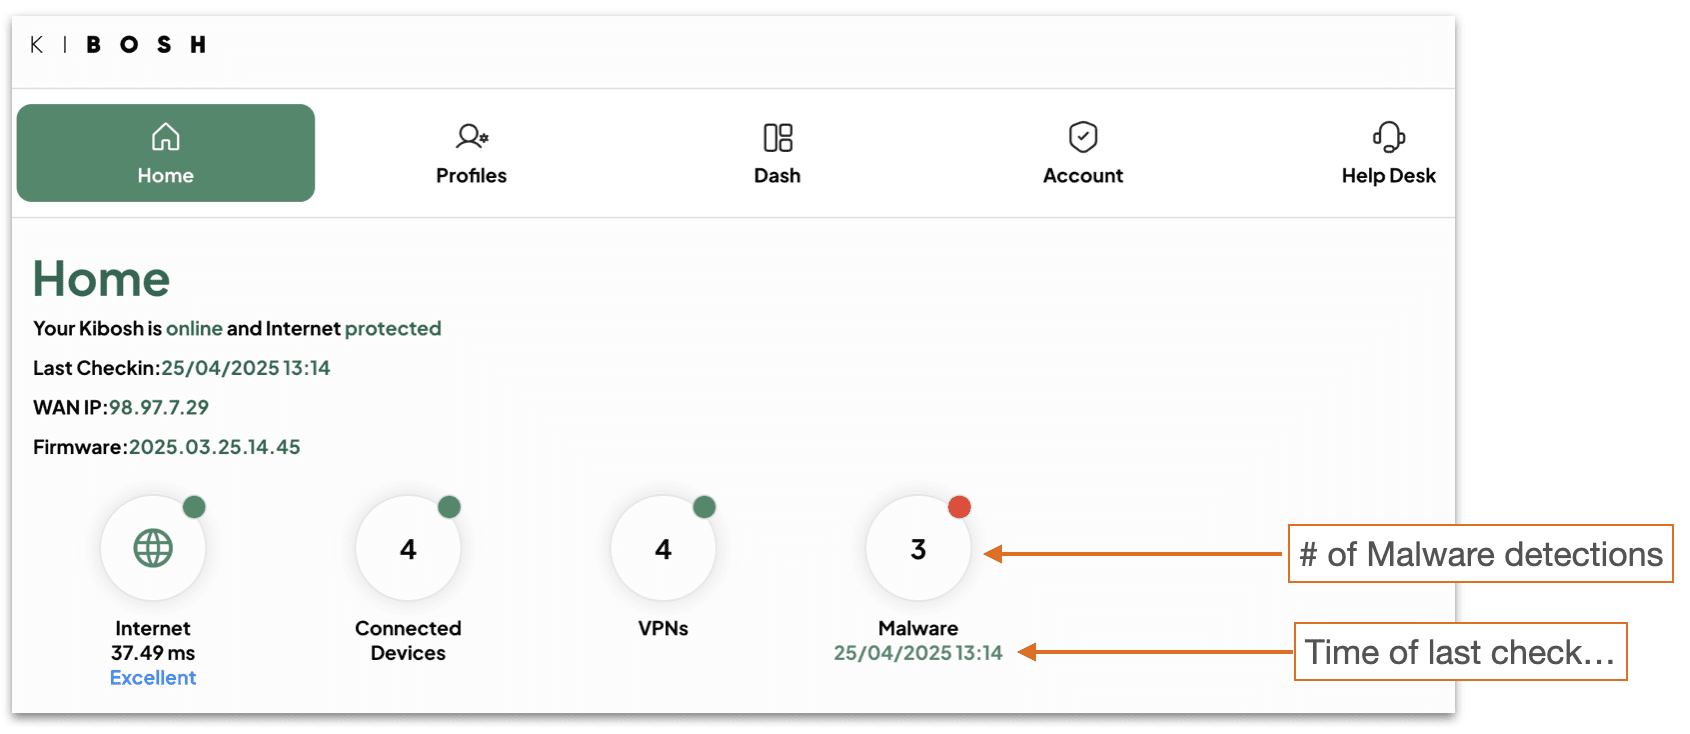
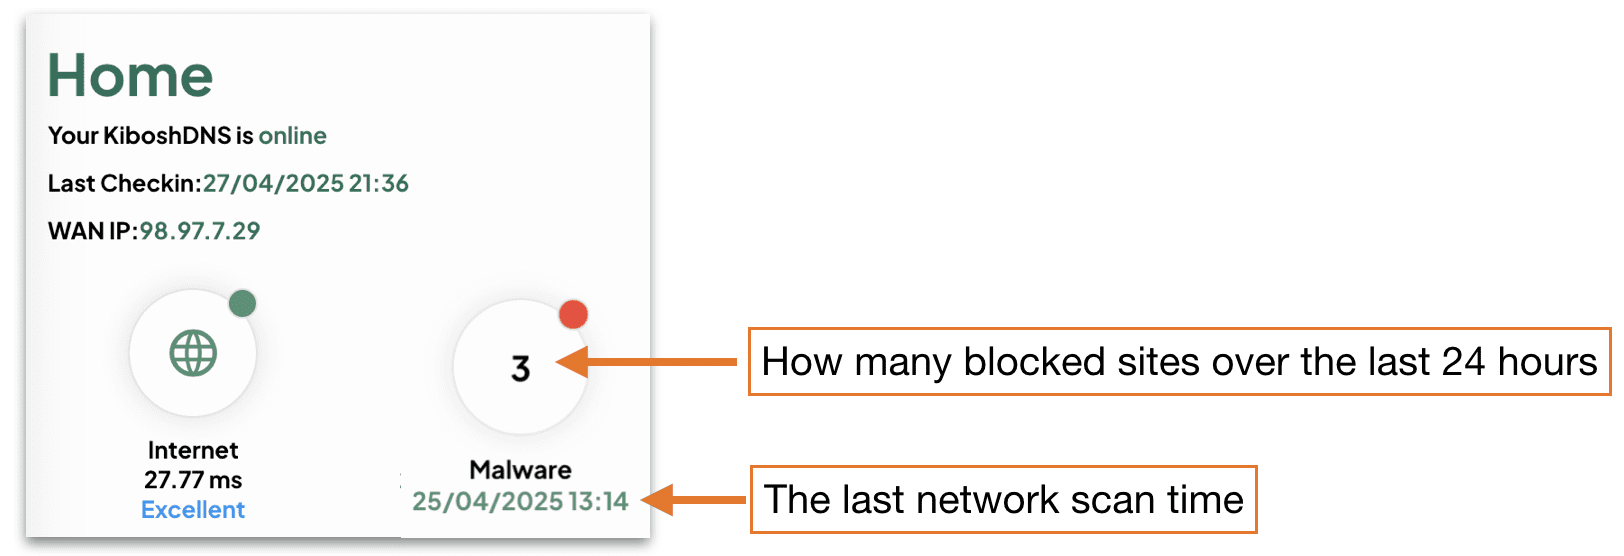
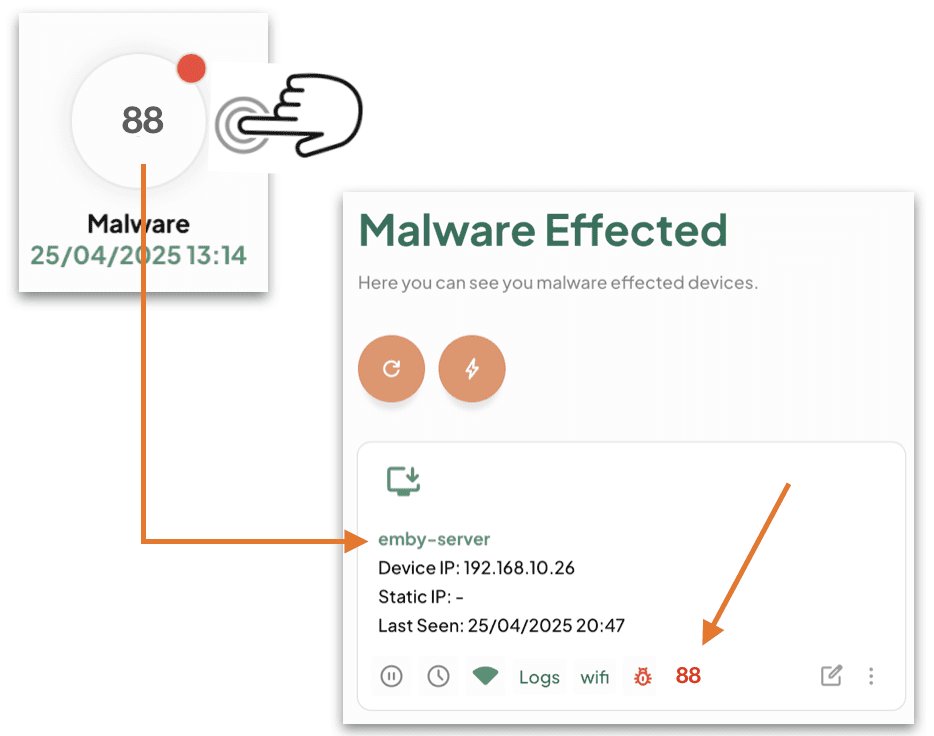
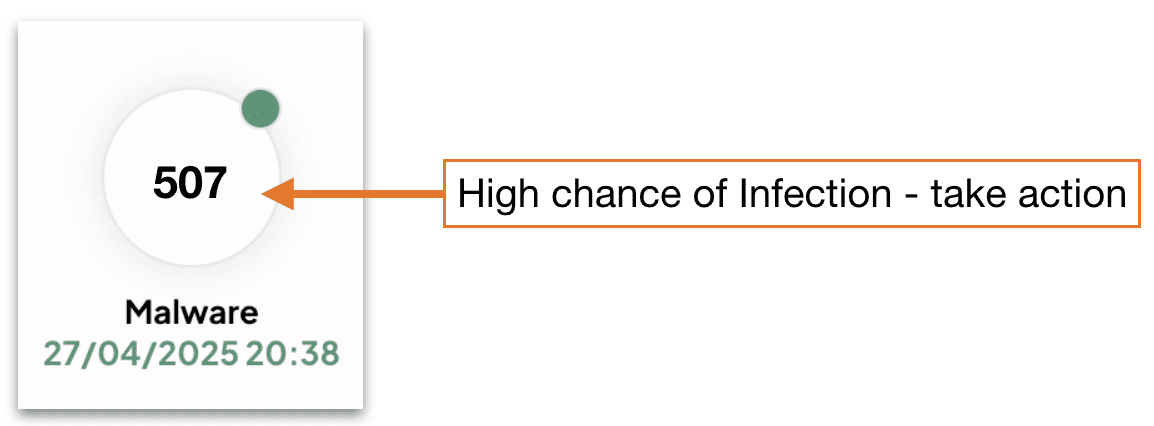
Tap / Click on the Malware HUD:
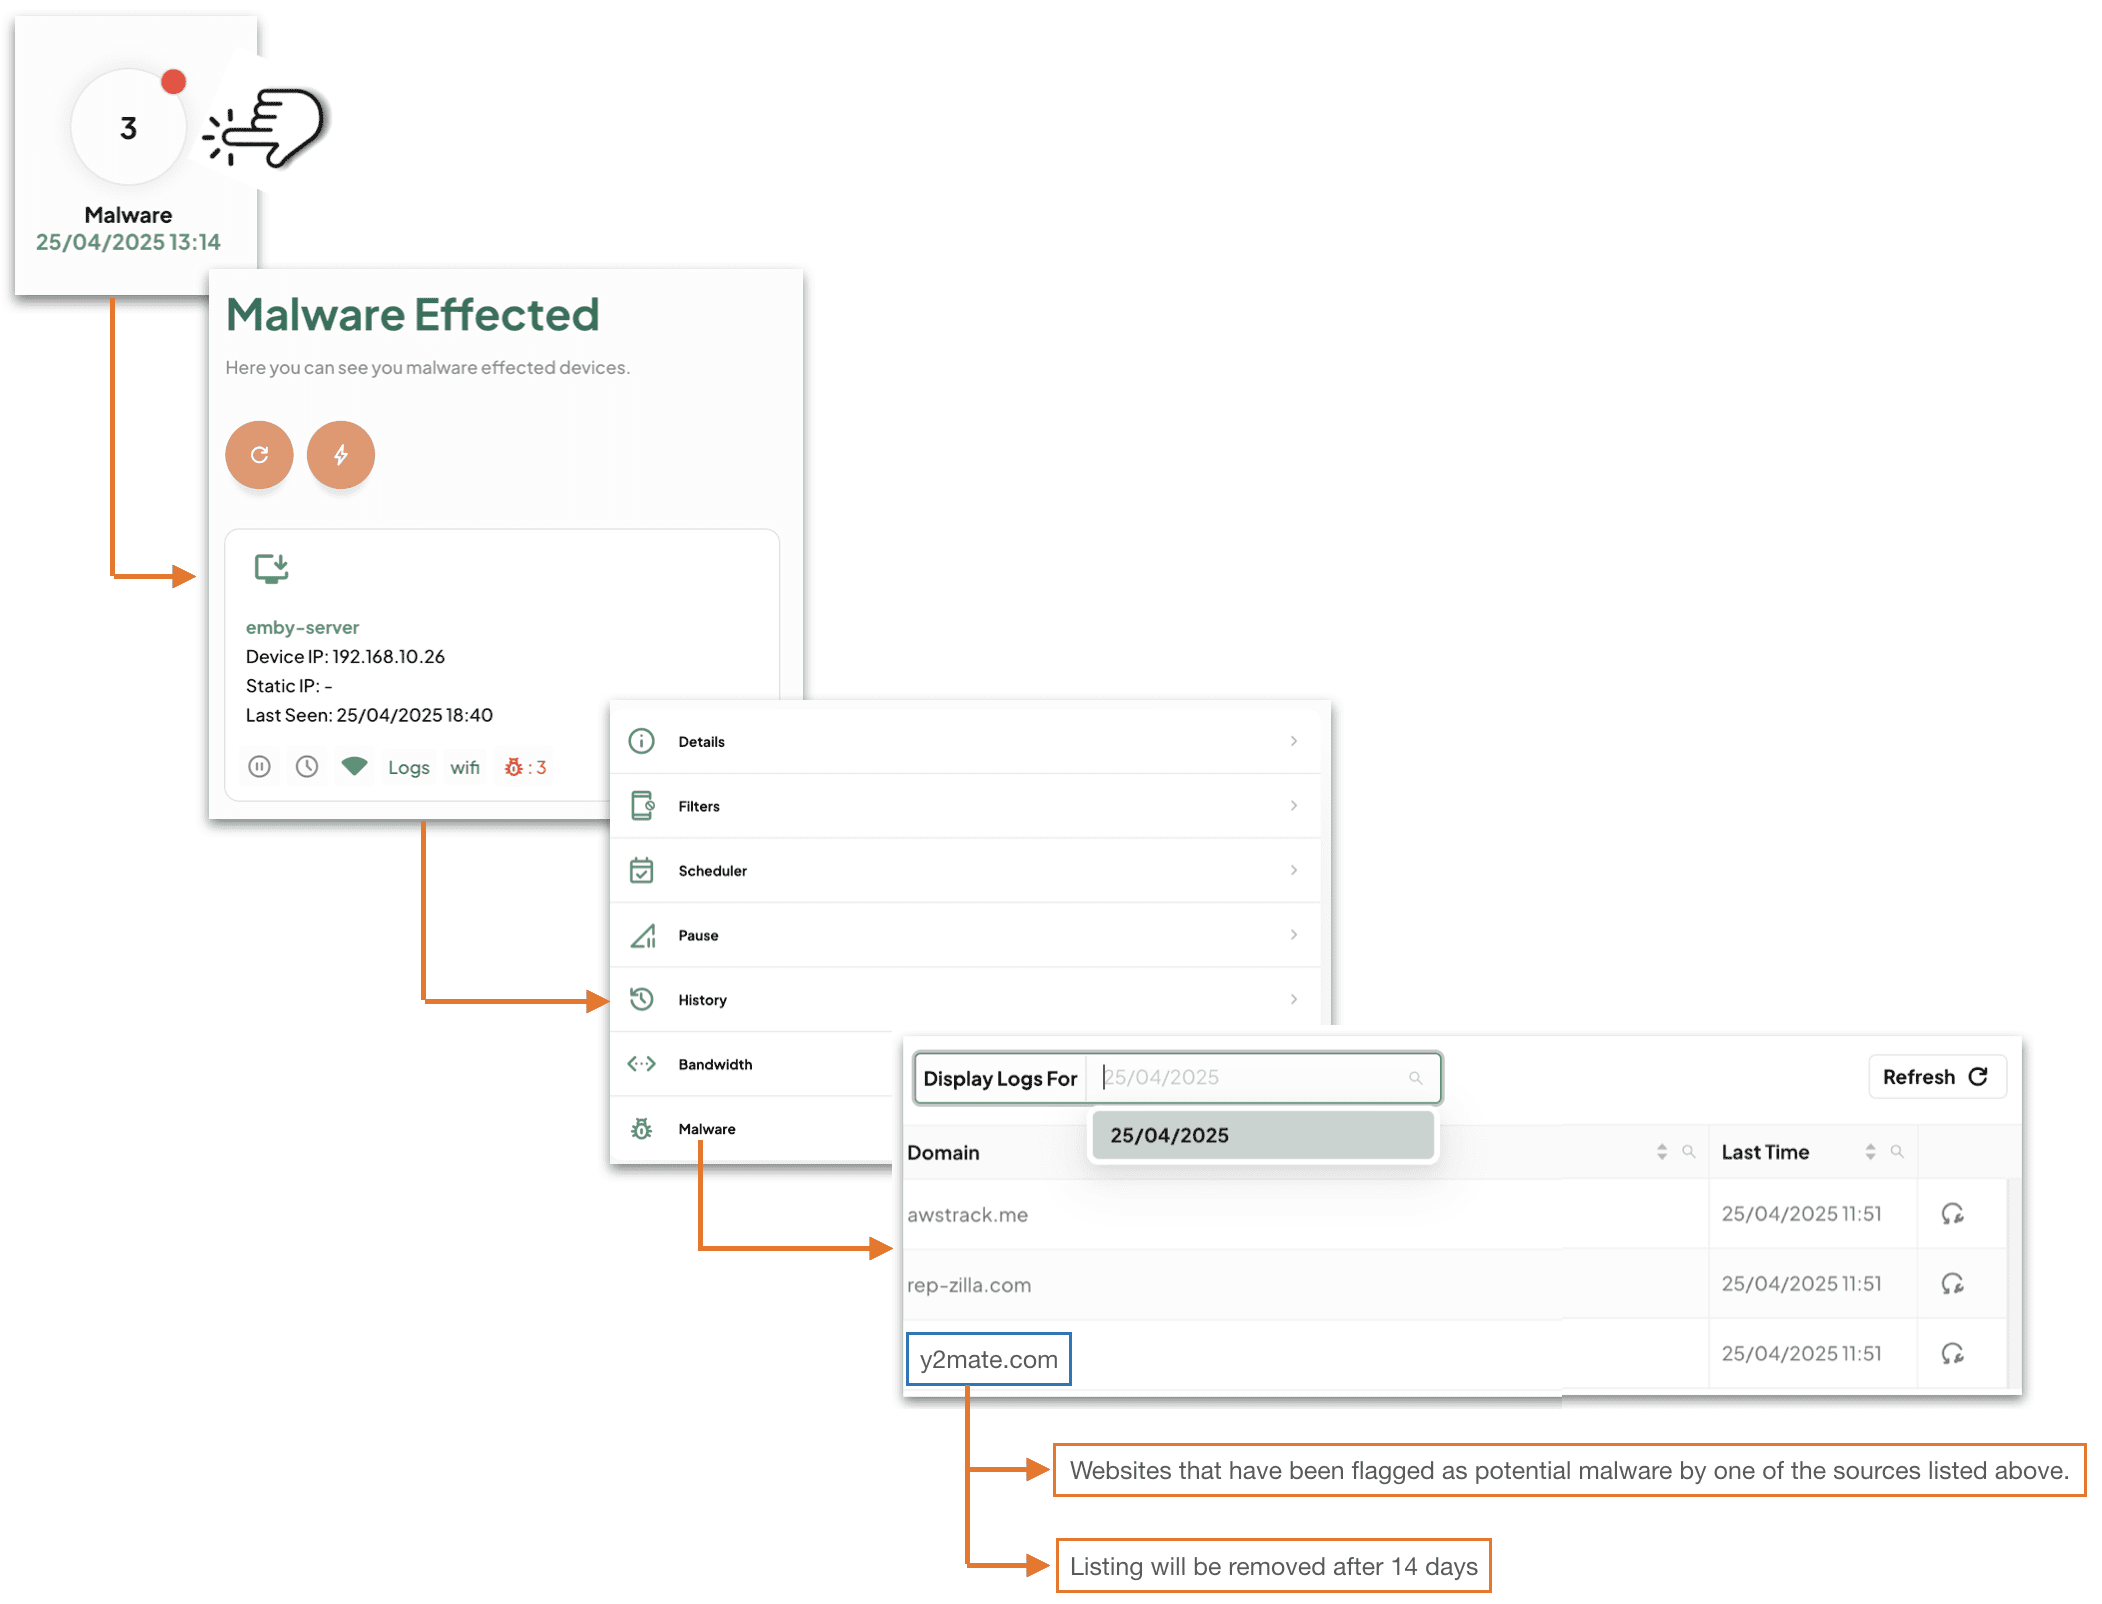
What your’re being told here is that this device (emby-server) is requesting a website that has been flagged as potential malware.
How to read your DNS Portal HUD:
Layer 1 will block the Malware by default – you need to do nothing.
Layer 2 will tell you that a Malware site has been blocked – you need to make a decision (action / no-action).
Glossary: ==========
- Hit = a single website blocked as malware related, that this device has tried to access.
- NOTE: usually unbeknownst to the user while opening other sites.
- Infection = many many hits on a single device.
- Detection = a website blocked as malware related.
You will need to decide to take action or not.
TIPS:
- If you see a few hits on this device, and few on that one – no worries this is normal.
- If you see many hits on a single device – then you should take a closer look.
- If you see hundreds of hits on a single device – there is little doubt this device is infected – isolate and troubleshoot.
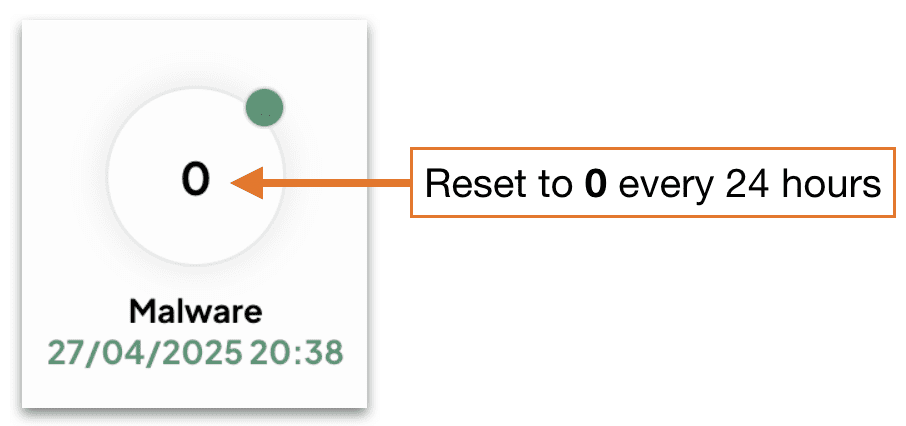
- After 24 hours the DNS Portal HUD reset to zero:
- Flagged hits are stored in History for up to two weeks on the device(s) so you can look and find patterns.
Malware Hits Action Log:
A malware hit from time to time is OK as most are ad / tracking related.
A device that is getting flagged daily with malware hits – this device might need closer inspection.
A device with many malware hits, like over 50, every day – this device has malware and you will need to deal with it asap (see How to Deal with Malware infection).
Troubleshooting Malware Infections:
Layer 1 will block the Malware site before it can load.
Layer 2 will inform you that a Malware site has been blocked and on what device(s).
TIPS:
- Always look at a malware hit (aka website) – look at the domain part as this will tell you what the website is, and you can do a little research on what the site does. In most scenarios it will be marketing / tracking related.
Most of the time you’ll have just a few hits on a device here and there. These are 99% of the time marketing and / or tracking related websites. In general, this is not indicative of a Malware infection.
If however, you have a device(s) with many Malware hits – then you most likely have a problem.
How to confirm Malware a infection:
- Check your Kibosh Client Portal > Dash > Devices > Malware logs.
- Go to Malware Bytes and install their Free Malware Scanner (macOS / Windows).
- Do not subscribe or give your CC info yet – for now you’re just scanning.
How to recover Malware infection (in order):
- Remove the infected device(s) from internet access
- Q: can I use filter rules to block inet access on this device?
- A: yes, but this will not protect all the devices on your LAN, so any device infected must be isolated from any network access.
- Now you need to clean:
- iPhone / Android – make a backup and reset to factory.
- macOS – backup your data and do a factory reset:
- Power down your Mac
- Power back on – holding down the R + COMMAND keys to initiate
- You will need to attach a physical Ethernet cable to the Kibosh LAN to complete this step.
- The macOS Utilities window will pop up:
- Choose Reinstall macOS
- Windows – unless you’ve turned on snapshot restore feature, you’ll need the Windows 10/11 install media.
- Boot off the install media, and re-install Windows.
Please catch us on live Chat or email support@kibosh.com if you’re still having issues.