Kibosh Support Center
Find Answers, Troubleshoot Issues,
Or Contact Our Support Team
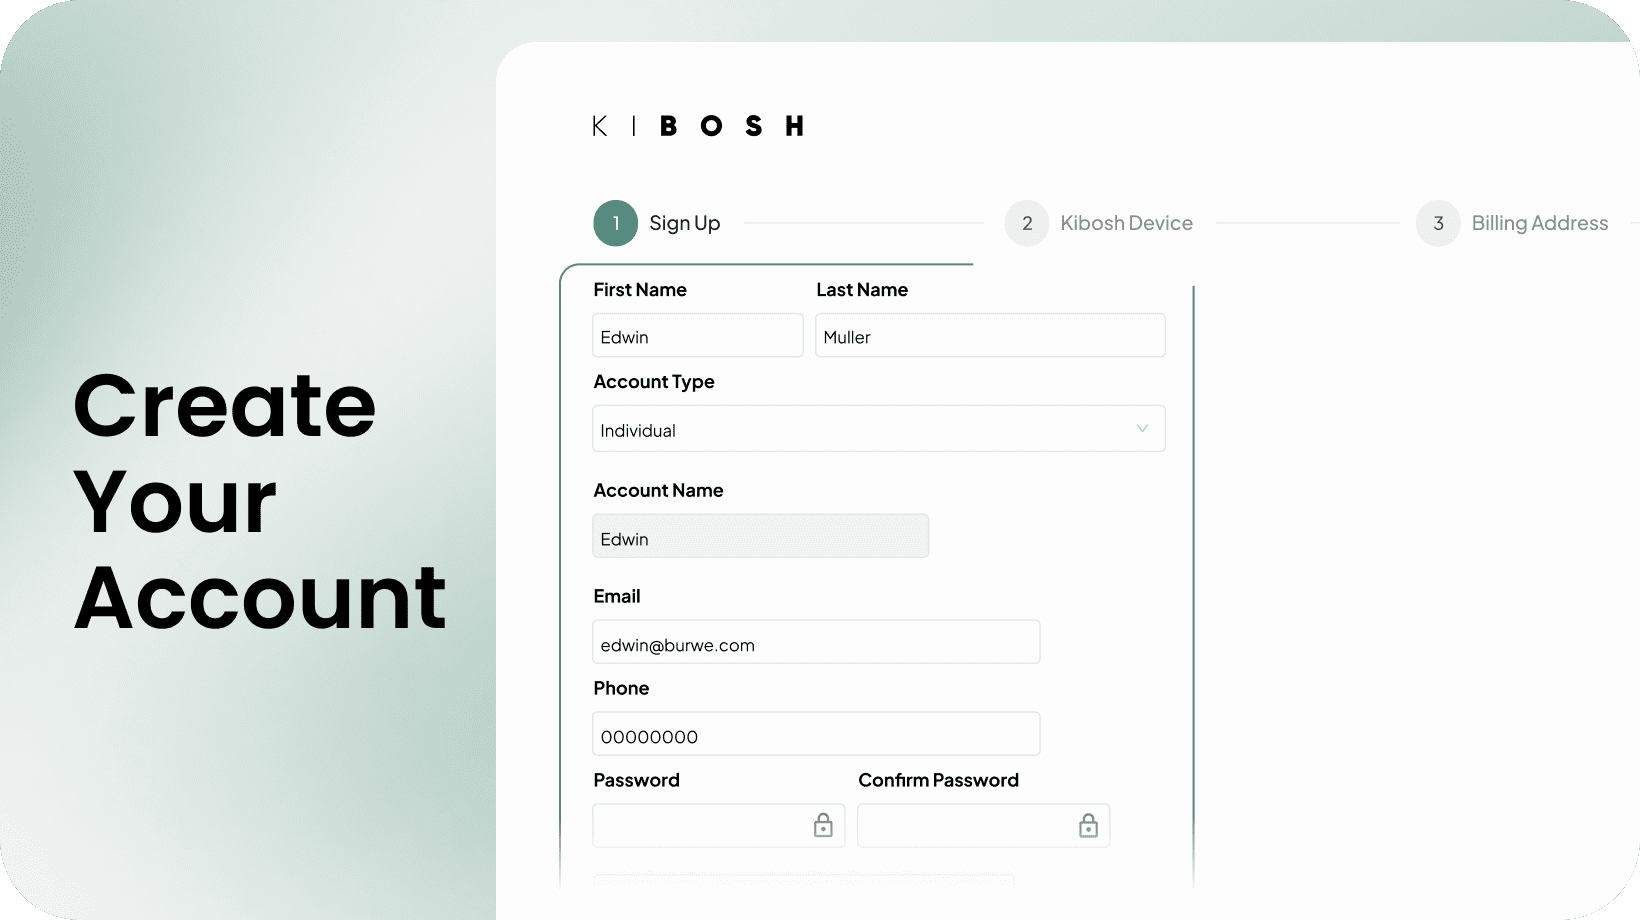
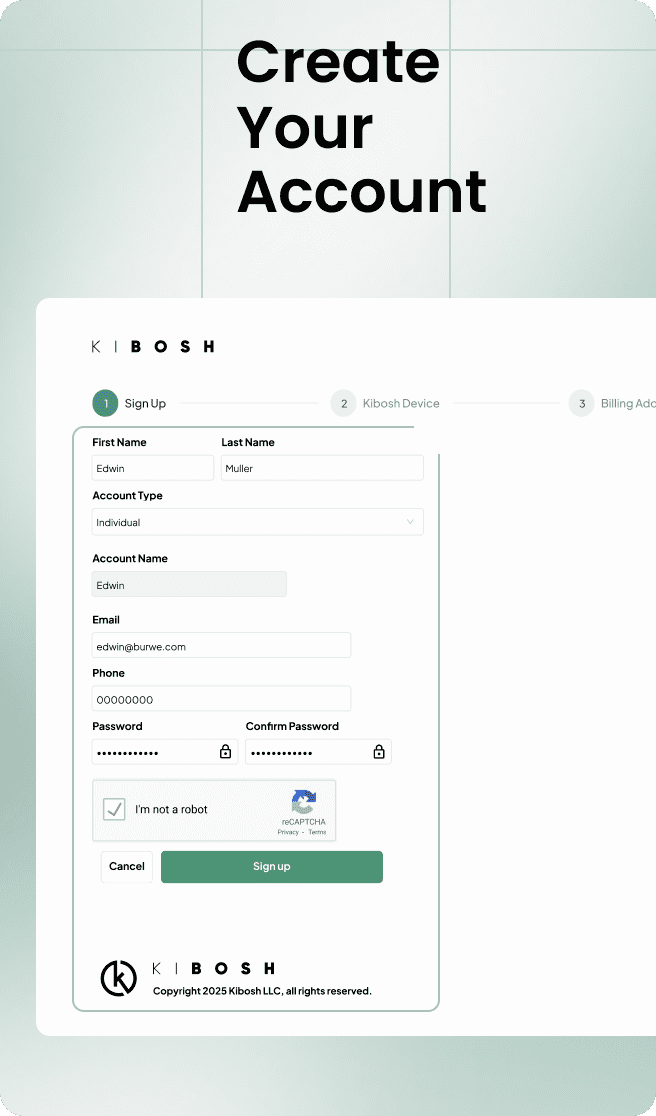
How to Activate your Kibosh Router (pre-setup):
Getting Started with your Kibosh Router (post-setup):


3-Steps to install your Kibosh MT6000 WiFi Router:
- Plug an Ethernet Cable into the MT6000 WAN port
- Plug the other end into your Internet Service Providers modem/router
- Reboot everything
Wait five minutes, and start going to test.kibosh.com
Basic Network Design to follow:
[PC]—> [WiFi |:Kibosh MT6000:|WAN port] —->[LAN Port:|Modem/Router]—>WWW
Detailed Installation & Troubleshooting Guide:
Start here if the Quick Setup above did not work for you.
Phase 1: Step-by-step general WiFi router setup
- Turn off all range extenders & extra wireless routers (if you have any)
- Unplug all Ethernet cables (to network devices) you may have connected into any of the Kibosh Router’s LAN ports (we’ll put them back later)
- Make sure there is only one Ethernet patch cable – one end plugged into Kibosh Router WAN port, the other end plugged into one of your Internet Service Providers (ISP) router/modem LAN ports.
- Power-cycle the modem/router & Kibosh Router (reboot them)
- Reboot the PCs you’re troubleshooting from
- Wait 5 minutes.
- You should now see the Kibosh Router’s WiFi – join this
- The default password is abcd0001
- You can manage this from your Client Portal
- Now, can you get to test.kibosh.com?
- Success! = you’re all set.
- No = please continue…
- Connect your PC to the Kibosh WiFi
- Open a browser (Chrome, FireFox, Brave, etc) and browse to 192.168.10.1 = your Kibosh MT6000 Status Page.
- ! If you cannot connect to 192.168.10.1 – you are NOT connected to the Kibosh Router. Double-check it’s powered on and that your PC is connected by LAN or WiFi.
- Log in at 192.168.10.1 using the exact same password you use to log into your Client Portal App (Kibosh.com/login).
- Once logged into your Kibosh Status Page you should see something like this:
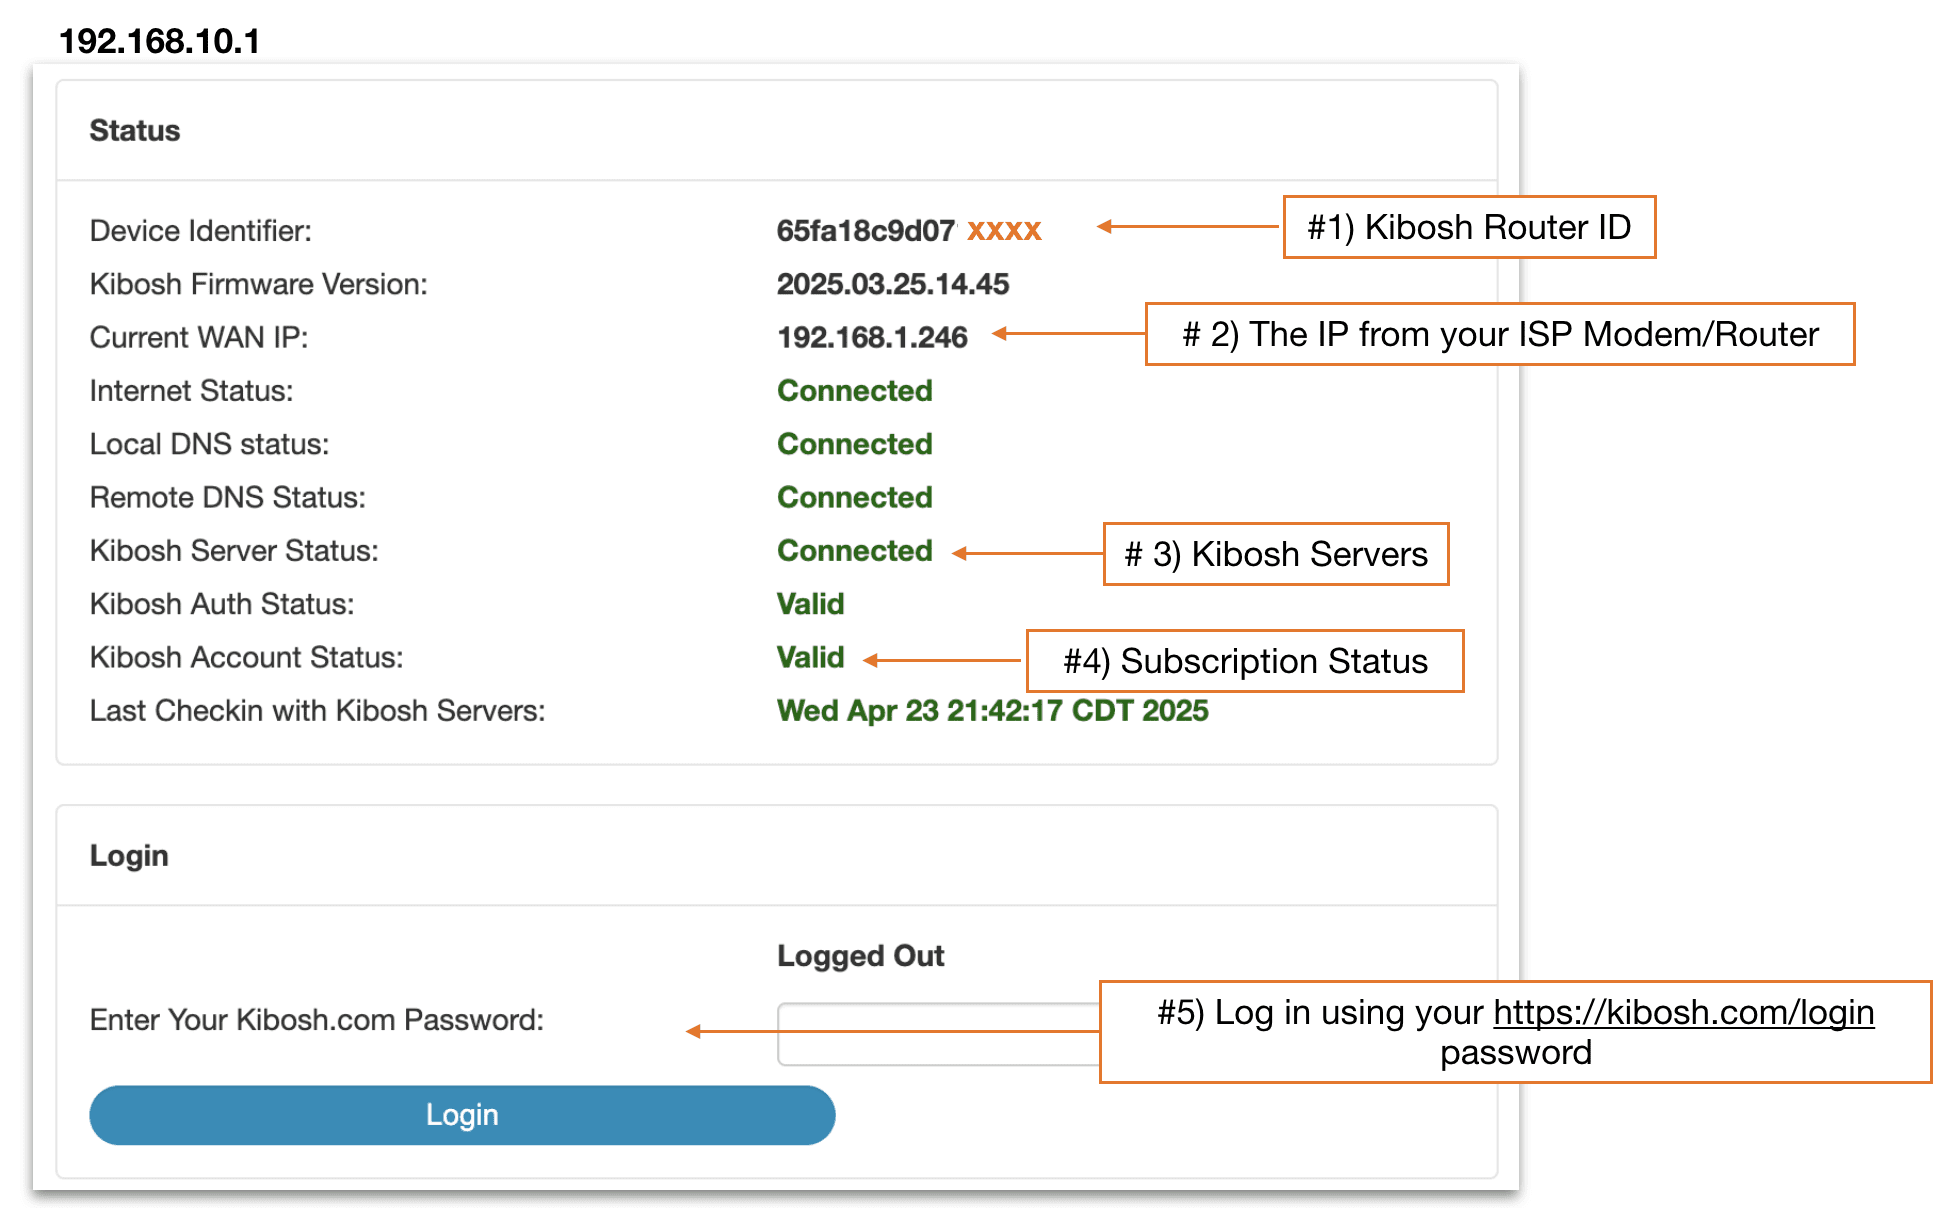

- #1 – this is your Kibosh Router ID, also listed under your MT6000 and in your Client Portal.
- #2 – this is the IP address given to your Kibosh MT6000 from your ISP modem/router.
- !! If there is no IP Address here – your Kibosh Router will not work.
- Repeat steps 1 – 8 above in Phase 1.
- #3 – this will tell you if Kibosh is working.
- #4 – your Internet Security and Parental Controls subscription. NOTE – the MT6000 router will still work if this is non-valid.
- #5 – for more advanced networking features log in using the same password you use to log in at Kibosh.com/login.
- If your WAN IP field is blank – the problem is between the Kibosh Router and ISP modem/router. Try another WiFi router and if it works either replace the ISP modem/router with one of your own, or consider switching to KiboshDNS.
- NOTE: when kids are involved we always recommend the Kibosh Router.
- Open a ticket in your Client Portal > Help Desk – drop a screenshot of your Kibosh Router’s Status Page (192.168.10.1).
Phase 2 : Still having issues?
Please complete Phase 1 first – it’s important to follow each step.
- Reboot MT6000 + Modem + PC (again)
- Double-check you have Ethernet cable fully plugged into correct Ethernet ports (modem LAN –> Kibosh WAN)
- Wait 3-5 minutes
- Connect to Kibosh WiFi
- Go to test.kibosh.com
- Success! = Enjoy, you’re all set.
- Still no internet?
- Reboot again, wait five minutes…
- Still no internet?
- Call your Internet Service Provider (ISP) (you’ll need your bill on hand) and ask them to ‘reset your modem’ which they will do remotely (do not ask them to help you troubleshoot or you’ll end up with more problems).
- Still no internet?
- Plug another Wi-Fi router in – if this works then the issue is again with your ISP equipment not talking to the MT6000 for some reason.
- Solution 1: purchase your own modem (and save money each month) to replace your ISP modem
- Solution 2: switch to KiboshDNS
- NOTE: We do not recommend KiboshDNS if kids are involved – the Kibosh Router’s security and parental controls is what you want).
- Open a Help Desk ticket with Kibosh Support.
- Still no internet?
- Call your Internet Service Provider (ISP) (you’ll need your bill on hand) and ask them to ‘reset your modem’ which they will do remotely (do not ask them to help you troubleshoot or you’ll end up with more problems).
Phase 3: intermittent problems you can’t put your finger on – some devices work fine, some are slow, some websites work, some do not, etc.
- NOTE: there should be only three internet devices in play right now:
- your ISP Modem/router
- Kibosh MT6000 WiFi router
- The PC device(s) you’re testing from
- Turn off all range extenders & extra wireless routers (if you have any)
- Reboot your PC
- Wait 5 min
- Ensure your PC is connected to Kibosh WiFi
- Log into your Client Portal app
- Go to Dash > Settings > Firmware Upgrade
- Choose Reset to Factory Clearing All Settings
- Wait 5 min and reconnect to Kibosh WiFi
- Go to test.kibosh.com – you should be all set.
Advanced Troubleshooting:
Start here:
- Reboot everything including your PC devices.
- Unplug all networking devices except the MT6000 and your ISP modem/router (and your PC).
- Always run your internet tests from multiple devices.
- How to confirm Kibosh is online from any device, go to: test.kibosh.com
- Patience when rebooting hardware…give the devices time to link up.
Specific Issues –
#1) Speed / performance issues:
The MT6000 WiFi router is one of the most powerful WiFi routers available today – with 2.5GB WAN / LAN ports for high-speed fiber.
Kibosh Pro produces the family safe internet and is literally powered by cloud-servers, and has been protecting schools, libraries, churches and homes around the world for over 10 years.
If you’re experiencing unusual slowness A) this is not normal and therefor can be resolved, and B) it’s most likely a bad link between your Kibosh and ISP equipment.
Did you know you can replace your ISP modem with your own? Yes you can, plus you will save money each month because your ISP is charging you for the use of that Modem.
In many scenarios upgrading your modem will improve your overall Internet speeds and Kibosh Router compatibility.
SPEED / LATENCY TROUBLESHOOTING:
- Reboot EVERYTHING: your PC, Kibosh, Modem – there should be no other routers.
- Wait 3-5 minutes and let everything link up (post reboot).
Remember, you are introducing a new gateway router to all your devices – but they will want to keep checking for the old gateway router.
That’s why rebooting everything, post Kibosh Router install, is so important – a reboot forces a PC to re-connect to the gateway router.
Usually after a few minutes speed / latency issues clear up.
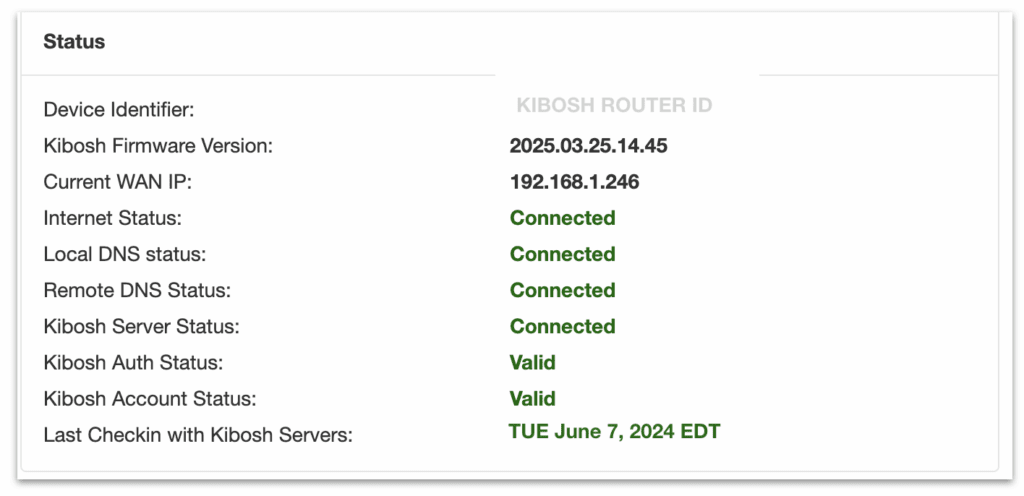
- Log into your Kibosh locally at 192.168.10.1 – ensure everything is GREEN:
- Double-check the Ethernet cable is A) in the correct port, and B) is clicked all the way in (fully seated).
- Now, browse the web.
- Still having speed issues?
- Log into your Kibosh Client Portal > Dash > Settings > Firmware Upgrade > Reset to Factory Clearing All Settings
- Also reboot your Modem
- Wait about 3 minutes
- Now, browse the web.
- Do your speed issues persist?
- Call your ISP and tell them you’ve installed a new WiFi router and ask them to reset the Modem – they will know what to do.
- This will be more common with Fiber links.
- Now, browse the web.
- Still having speed issues?
- Switch to Kibosh Light (14 day free trial, easy cancel) and use your old WiFi router.
- Still having speed issues?
- Unfortunately Kibosh might not work in your area. Please let us know as this would be rare.
#2) Some devices are able to connect to the Internet and some are not –
- On a PC/Server that is not connecting to the internet…
- Check Ethernet cable is seated properly and / or ensure it’s connected to the Kibosh WiFi
- Reboot PC
- Still no internet?
- Can you browse to 192.168.10.1 on this PC?
- Yes = check your Client Portal policies because you’ve created a rule that is blocking
- You can re-confirm this by going to Dash > Settings > Raw Internet.
- No = the issue is on this PC/Server and related to the Network Interface (NIC).
- Yes = check your Client Portal policies because you’ve created a rule that is blocking
- Can you browse to 192.168.10.1 on this PC?
#3) Some devices are filtered and some are not:
NOTE: it’s technically impossible for any device to be connected to the Kibosh and NOT be filtered.
- On a PC/Server that is not being filtered…
- Ensure it is connected to the Kibosh WiFi or directly via Ethernet port
- Reboot the device
- Remove all VPN, or “Safe Browser” apps like McAfee
- Check Dash > Settings > Raw Internet – make sure you did not exclude this device and forget about it.
- Now go to 192.168.10.1 — Kibosh Auth Status should say Valid
- Now go to test.kibosh.com — if Success you’re all set.
- Ensure it is connected to the Kibosh WiFi or directly via Ethernet port
- Still having issues? Open a live chat session at Kibosh.com and / or open a Help Desk ticket from your Client Portal
#4) 192.168.10.1 > Kibosh Auth Status = Failed
If your Kibosh Client Portal is showing no activity, browse to http://192.168.10.1 – this is your MT6000 Advanced Admin:
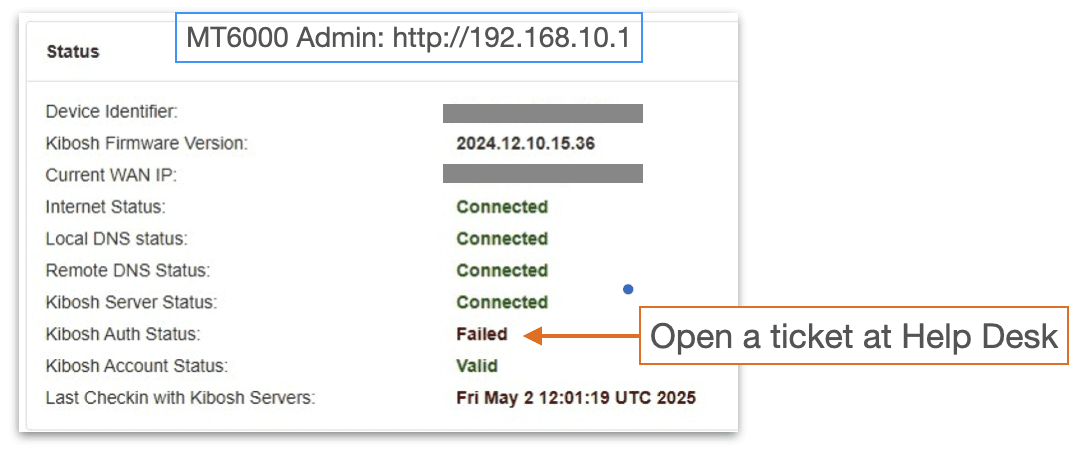
Kibosh Auth Status can only be resolved by Kibosh Support > Help Desk ticket – it’s a quick fix (on our side).
Updated: 6/25/25
How to install and manage your KiboshVPN:
Step-by-step Instructions…
- Quick Links –
- How to access your VPNs
- How to Assign and Install your VPNs
- How to manage your VPNs
- iOS / Android KiboshVPN App
- Parental Controls
- Troubleshooting / FAQ
Kibosh Pro + VPN –
How to manage your mobile VPNs:
- Start here…
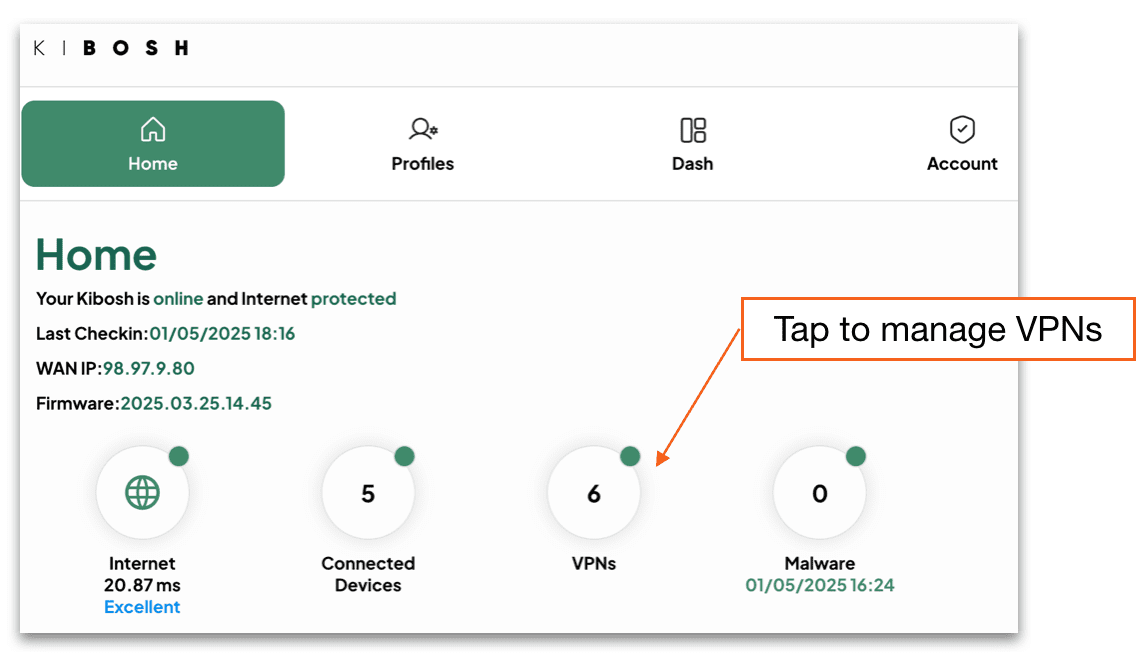
- Log into your Kibosh Client Portal (Kibosh.com/login)
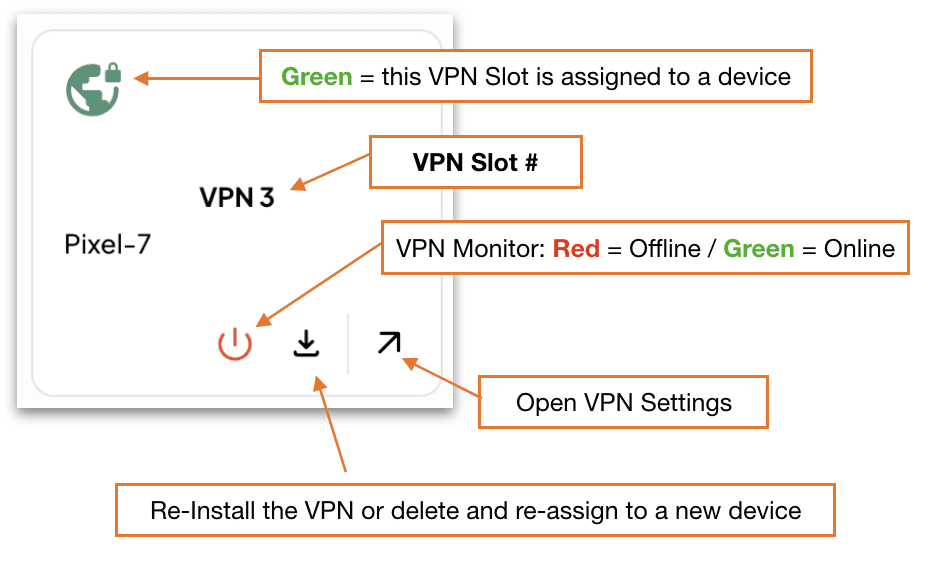
- On your home page, if you have any VPN’s, they will be listed here:
How to Assign and install a mobile VPN:
- 7 quick steps to install:
- First, assign a mobile device to an available VPN Slot
- Click on an un-assigned VPN Slot
- Pick a device from the drop-down
- NOTE: to Assign a device it (the device) must be / have been connected to the Kibosh Router, or it will not show up in the Device drop-down
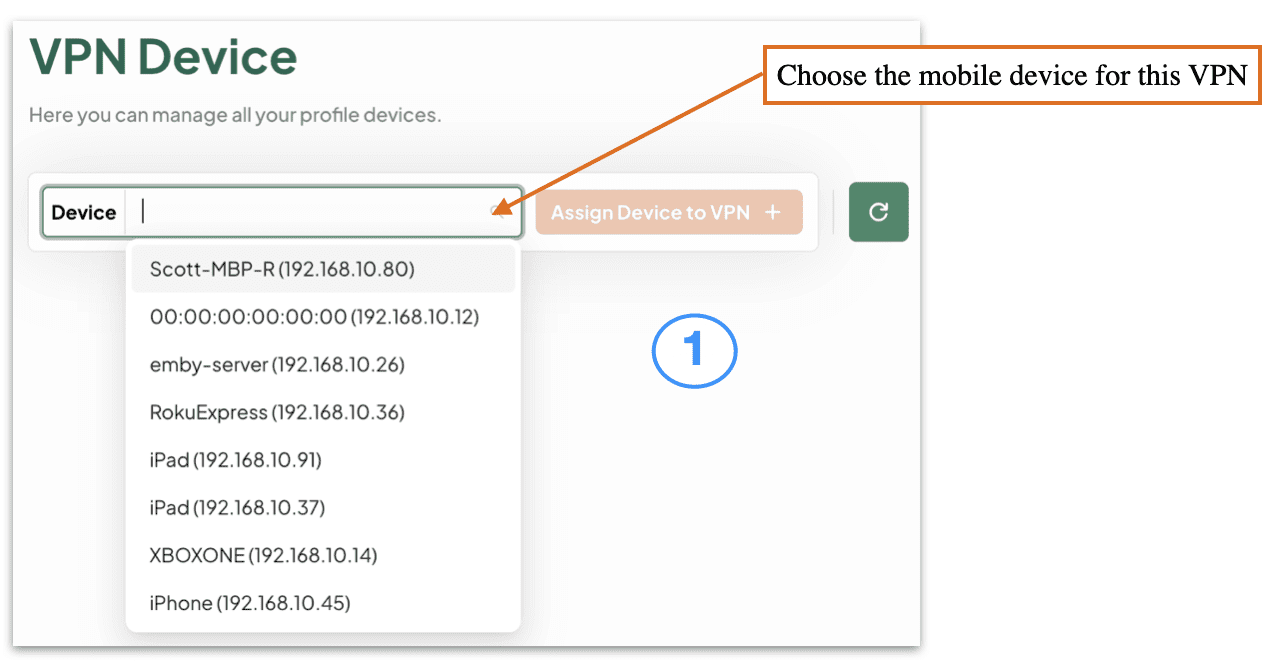

- Tap ‘Assign Device to VPN +’
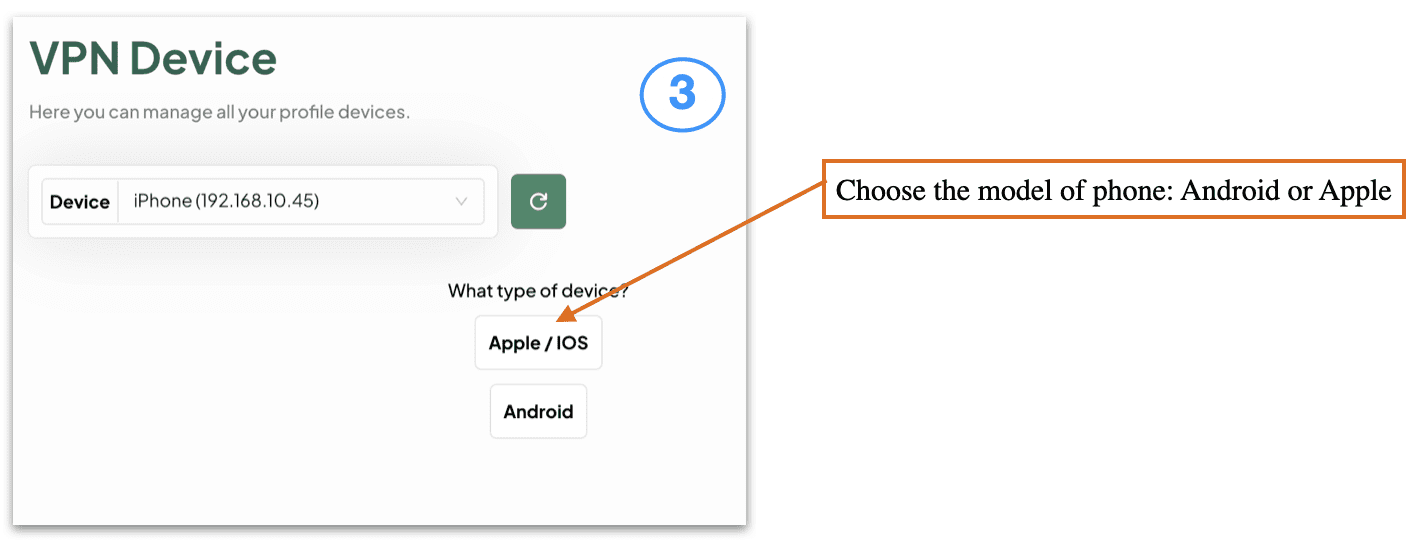
- Choose the type of mobile device to create the VPN profile
- Apple or Android –
- Apple or Android –
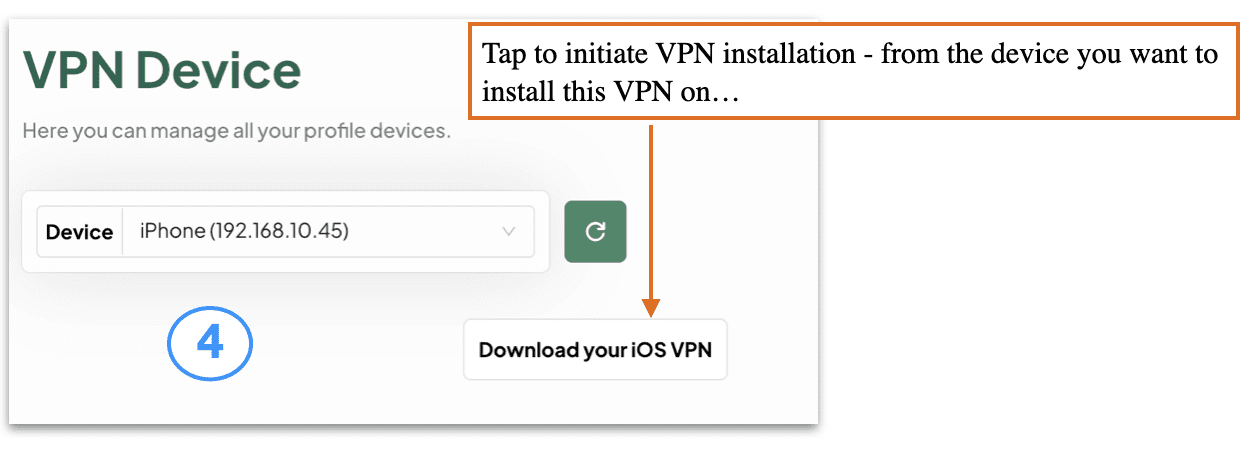
- Click ‘Download your iOS VPN’ on the mobile device
- NOTE: you must do this step from your Client Portal ON THE MOBILE DEVICE that you want to install this VPN on
- NOTE: you must do this step from your Client Portal ON THE MOBILE DEVICE that you want to install this VPN on
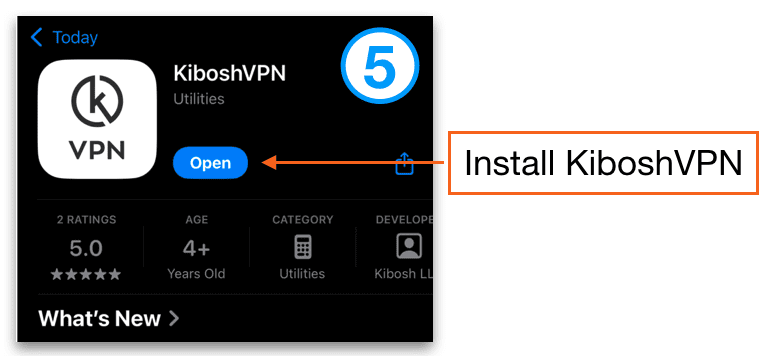
- Tap ‘Install’ the KiboshVPN from the App Store
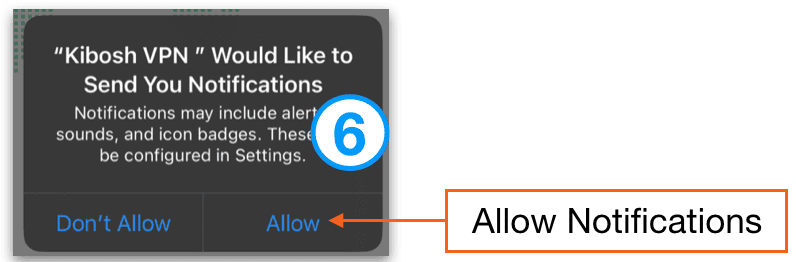
- Tap ‘Allow KiboshVPN Notifications’
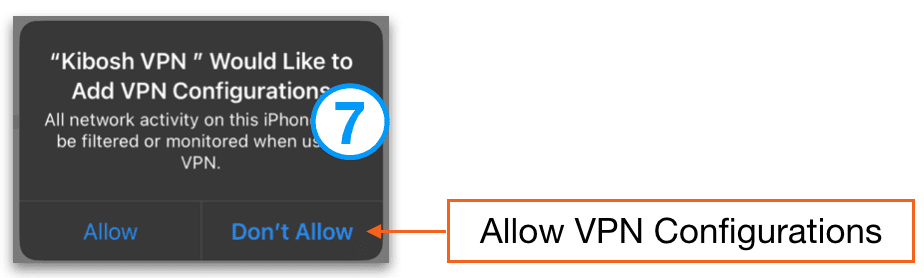
- Tap ‘Add VPN Configurations’
- Enter your passcode (if asked for one)
- You’re KiboshVPN is now Connected!
- Go to test.kibosh.com to verify.
- First, assign a mobile device to an available VPN Slot
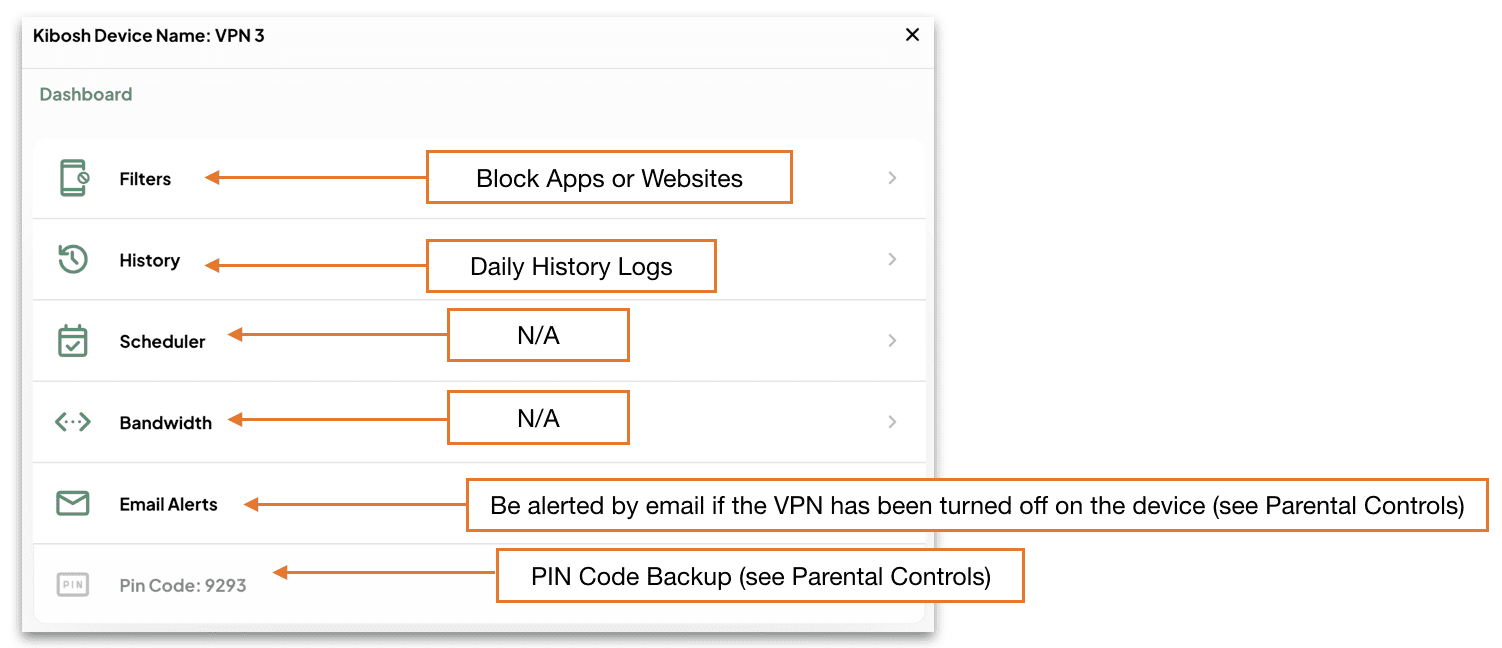
How to manage your VPNs from the Client Portal:
- Log into your Kibosh Client Portal @ kibosh.com/login
- Go to VPNs…
How to manage VPN Settings:
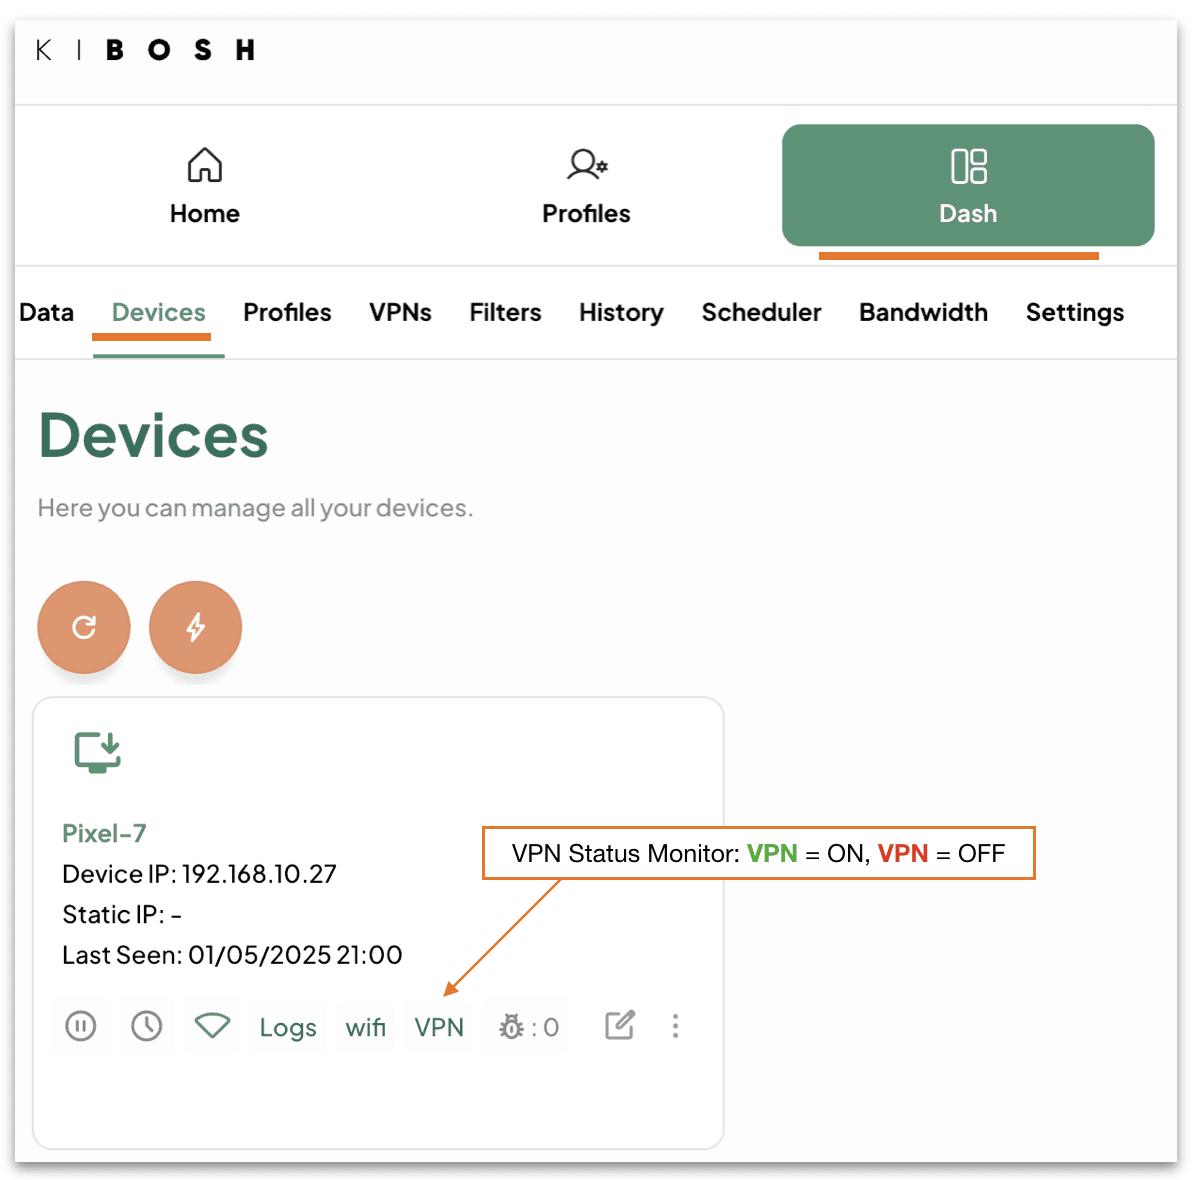
Monitor the VPN from Dash > Devices…
How to manage the KiboshVPN App on the mobile device:
Once the KiboshVPN app has been installed on your mobile device…
Go to Settings…
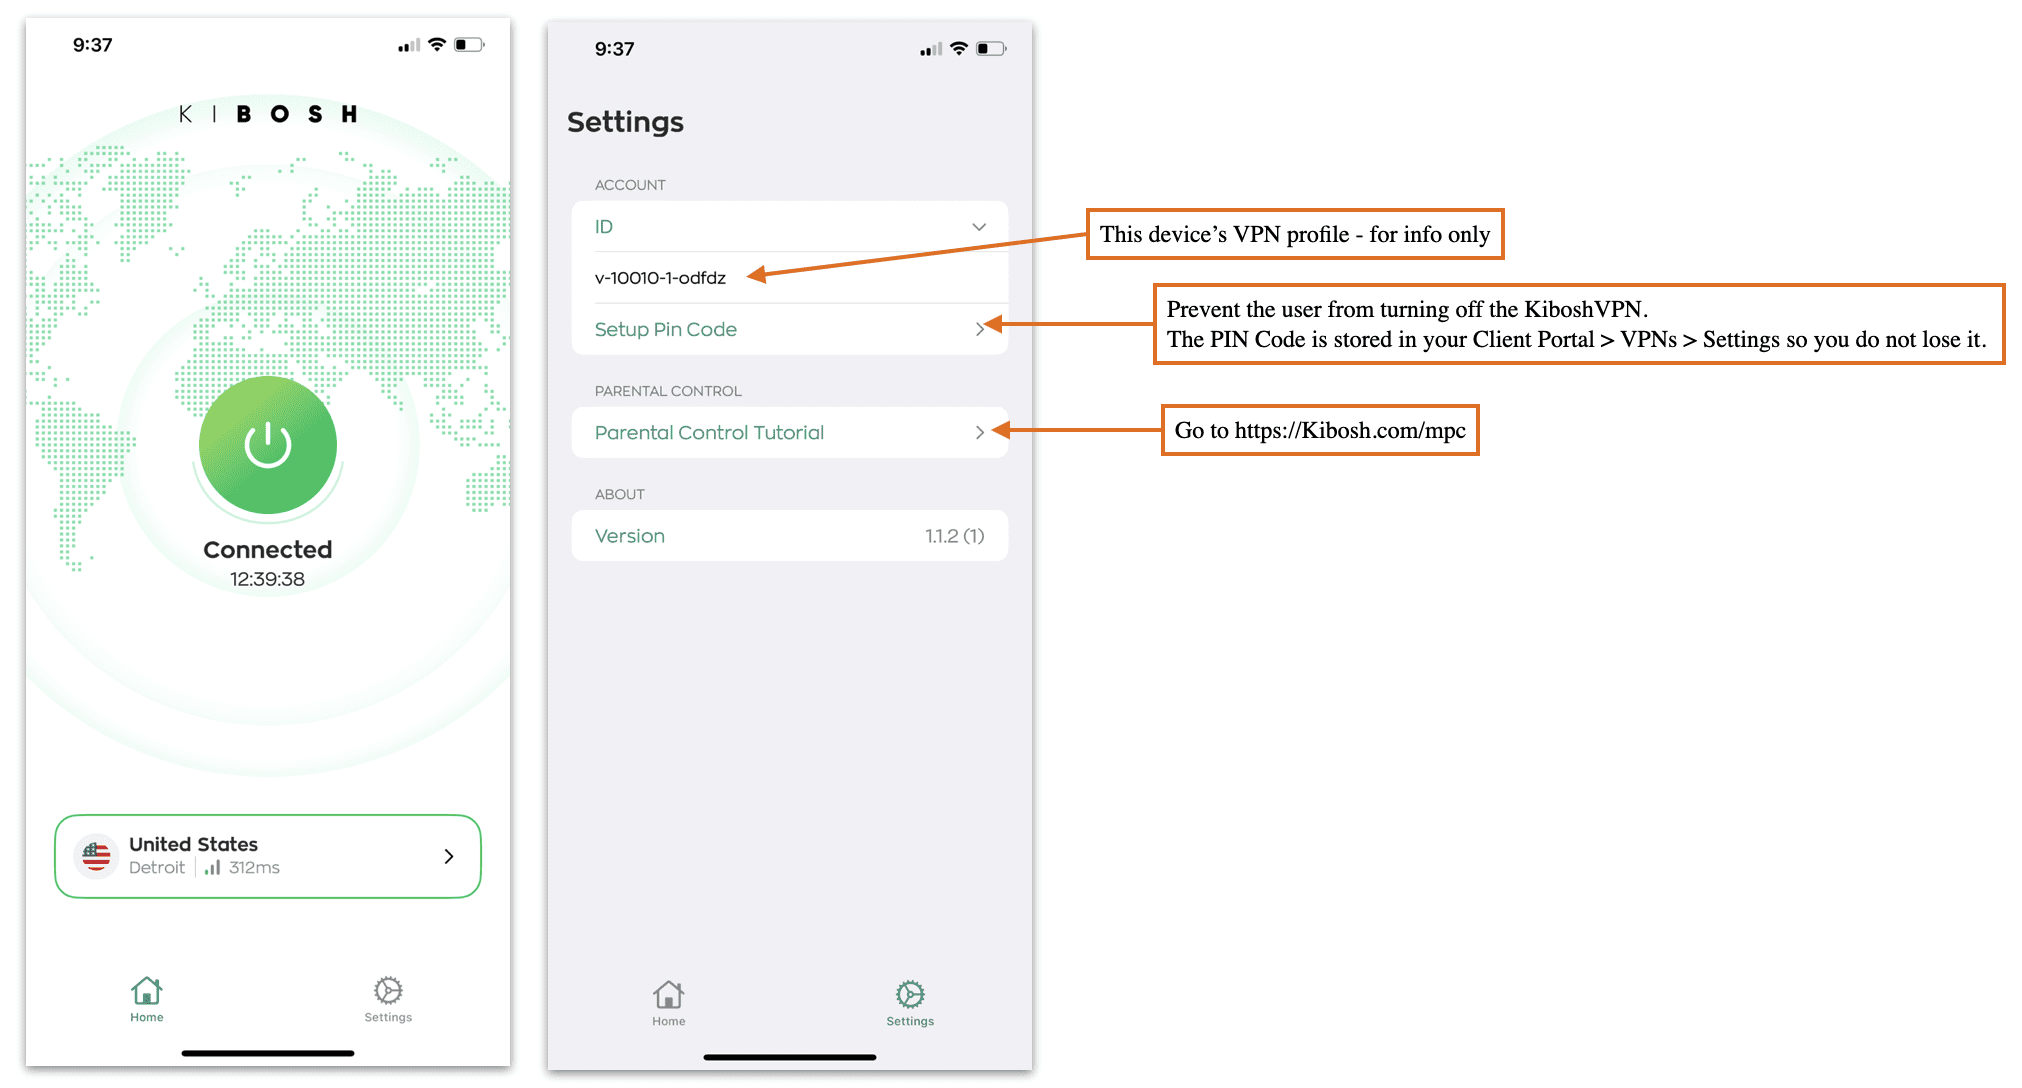
Parental Controls:
Once the KiboshVPN has been installed on a mobile device, the Internet is now family safe.
In addition to this protection you might want to layer on some Parental Controls.
Go to https://Kibosh.com/mpc for setup-by-step guide.
Troubleshooting / FAQs:
You can re-install a KiboshVPN onto the same device as many times as you need to: 1) log into your Client Portal on the mobile device, 2) open the VPN Slot assigned to this device, 3) tap Re-install and follow the prompts. Takes about 2 minutes.
The KiboshVPN is very light-weight and resilient – if you’re having issues related to the Internet…check your WiFi situation first – most of the time you will have a bad WiFi connection.
Bounce the VPN to resolve any latency or delays – bouncing simply means to try and turn off turn the VPN in Settings. This will cause the VPN tunnel to rebuild itself (assuming you have a good internet connection) which will resolve any connection issues.
Only 1 VPN per device – do NOT try to layer on VPNs…this is an un-supported setup and doesn’t make sense anyway. Do some research on what a VPN is (you only need one).
Updated: 6/13/25
How to setup and manage Kibosh Light:

How to sign up for a 14 day trial:
- Go to Kibosh.com/Activate
- Create an Account & Validate your email
- Choose the Kibosh Product: Kibosh Light (DNS+VPN ready)
- Complete check-out
- You will be immediately taken to your Kibosh Client Portal
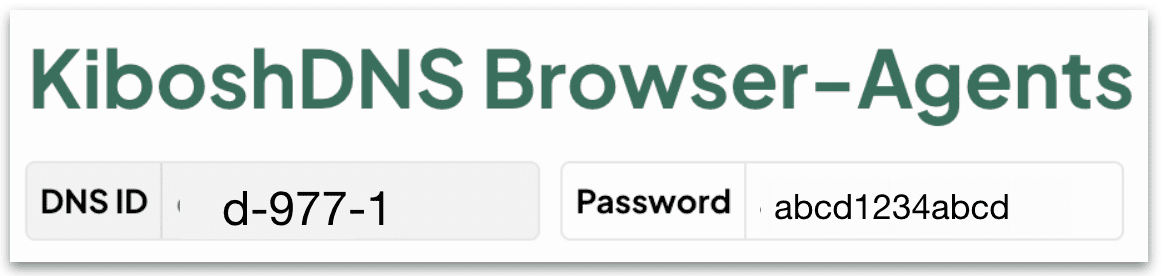
- Go to DNS > Agents
- Make note of your DNS ID and Password
- Follow the installation guide (as noted below)
Kibosh DNS Server IP:
- 209.124.51.246
- 209.124.51.245
**NOTE: Kibosh Internet Filtering (i.e., using Kibosh DNS IP) will only work with a valid Kibosh Account – (sign up for 14 day free trial).
Start Setup here:
Phase 1: How to install Kibosh Server IP on your WiFi Router.
Phase 2: How to install the KiboshDNS Browser-plugin, and then Activate.
Phase 3: Enable KiboshDNS status monitoring.
Unknown – What does this mean?
Chromebooks – How to secure with Kibosh DNS IP
Phase 1: Install Kibosh DNS Server IP on your WiFi Router –
- To do this you will need to find IP address of the WiFi router you’re using now, and type this IP into a browser (chrome, firefox, edge, etc), which will open the Admin Login of your WiFi gateway router – this is where you set Kibosh Server IP.
- How to find WiFi gateway router IP (in order of recommendation)
- Check underneath your router usually Gateway Admin IP address is listed there (and hopefully the password).
- Try the following defaults – most routers use one of these:
- type each one of these into your browser (http://192.168.0.1)– if you get a login screen that’s it:
- 192.168.0.1
- 192.168.1.1
- 192.168.1.254
- 10.0.10.1
- 10.0.0.1
- If you still haven’t found your modem/router login, do a Google search for your ‘[router model] admin login’.
- How to find WiFi gateway router IP (in order of recommendation)
- Once you’ve logged into your existing WiFi Router –
- Locate Domain Name Server Settings
- These are usually found under advanced settings, or advanced networking, or WAN config.
- Ask Google using “router model + change DNS“
- Locate Domain Name Server Settings
- Enter Kibosh DNS Server IP and Save Changes (wait 5 -10 min).
- How to verify Kibosh is working to go test.k
ibosh.com
from any device.
Phase 2: Install KiboshDNS Browser-plugin, and then Activate –
- Log into your DNS Client Portal (Kibosh.com/login) – on a PC that does not leave the home/office (ideally, but not necessary).
- Go to DNS > Agents Tab
- Select ‘Download Extension for this Browser and Install
- Chrome, FireFox, Brave, Edge
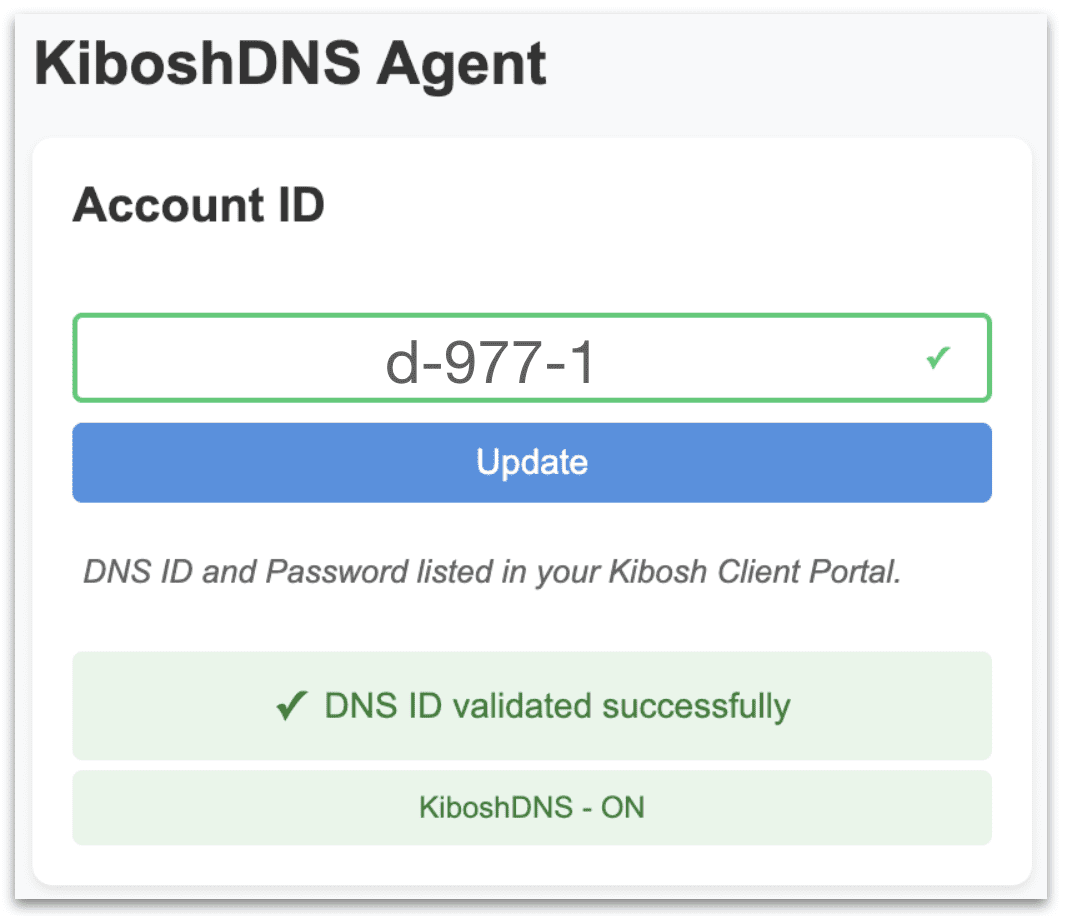
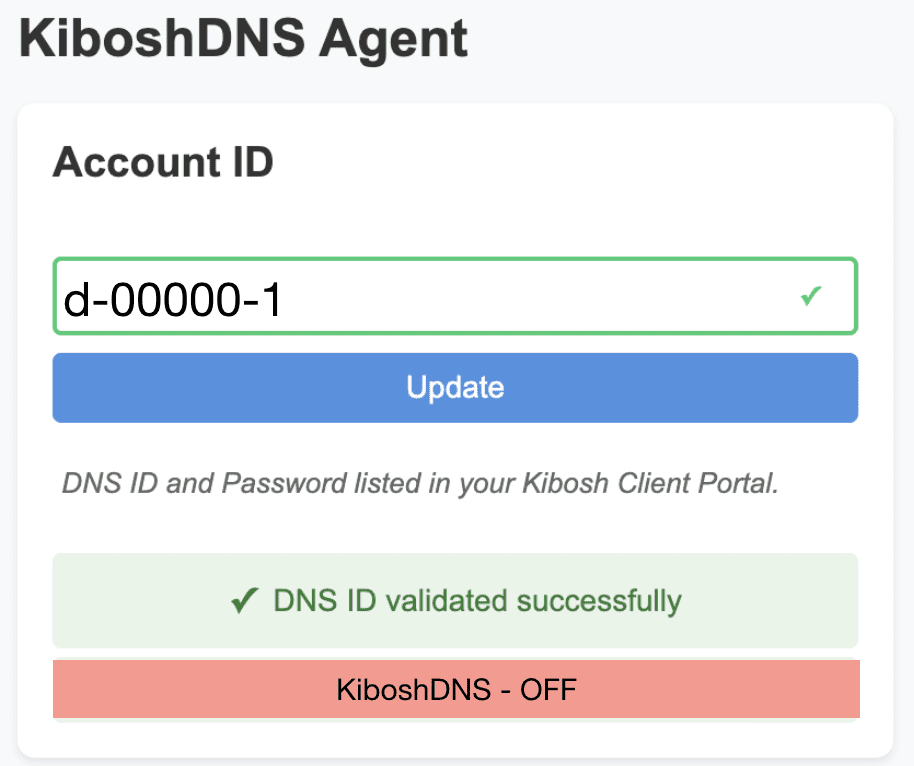
- Enter your DNS ID & Password as shown
- Client Portal > DNS > Agents:
- Client Portal > DNS > Agents:
- Click Validate
- If validation is successful:
- If validation is successful:
Phase 3: Enable KiboshDNS status monitoring –
Access to KiboshDNS’s Internet Security Service is predicated on your WAN IP being registered with our servers. This is what the Browser Agent does – ensures your WAN IP is always registered.
If you would like to be alerted to any potential issues with your Browser Agent(s), you can setup alerts by:
- Log into your DNS Client Portal (kibosh.com/login)
- Go to DNS > Settings
- Enable Alerts
- Enter an email(s) to receive KiboshDNS status emails
- Save Changes
Now if your any of your KiboshDNS Browser Agents fail you will be notified.
If your DNS Client Portal shows Unknown –
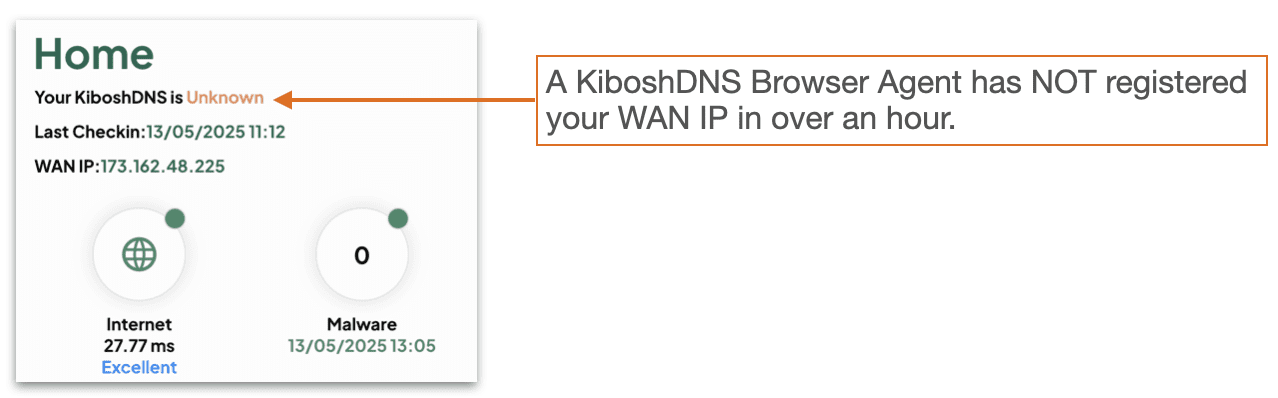
This means that none of your installed KiboshDNS Browser Agent(s) have registered your WAN IP in over an hour.
NOTE: This does NOT mean filtering has stopped.
However, if your KiboshDNS Browser Agent(s) do not register your WAN IP, there is a chance your WAN IP has changed, inside that hour (a very low chance), which would then lead to a non-filtering Internet scenario.
How to resolve: EASY: simply install / re-install the KiboshDNS Browser Agent on PC(s) that never (or rarely) leave the home/office.
NOTE: the goal here is to ensure that if / when your WAN IP changes – your KiboshDNS Client Portal knows about it. For it is your WAN IP that grants you access to Kibosh’s Internet Security Service.
Ultimate Solution: call your ISP and get a Static IP – you would only need to install a KiboshDNS Browser Agent 1 time, activate it one time, and after that you’ll never have to worry about it again.
Super Ultimate Solution: get a Kibosh Router and don’t worry about any of it anymore – use the coupon code dns2025 for 15% off.
Preface: DNS is the phonebook for the internet and every router in the world requires DNS to work.
Most WiFi routers allow you to change these DNS numbers, BUT…if your ISP equipment does not allow the changing of the DNS Server IP you have two options:
- Replace the ISP router with your own personal router.
- Return the ISP equipment and reduce your monthly ISP bill.
- Purchase the Kibosh MT6000 WiFi router – use the coupon code dns2025 for 15% off.
- Replace the ISP router with your own personal router.
When I go to test.kibosh.com = test failed
Kibosh Lights DNS-layer filtering will always work if these three things are in place:
- You have valid Kibosh Account
- You have successfully installed Kibosh Server IP on your WiFi router
- You have installed and activated a KiboshDNS Browser Agent
If you continue to get the test-failed page – go through phase 1-3 again, and maybe try a different WiFi router.
Your Kibosh Browser Agent shows KiboshDNS – OFF
2 possible scenarios…
- The KiboshDNS Agent is on a PC connected to the WiFi router that you are trying to install Kibosh DNS on – this means you have not successfully completed Phase 1 above
- The KiboshDNS Agent is on a PC that is NOT connected to a Kibosh Light protected WiFi router…this is by design. Always check your DNS Client Portalor status.
- The KiboshDNS Agent is on a PC connected to the WiFi router that you are trying to install Kibosh DNS on – this means you have not successfully completed Phase 1 above
Chromebooks – How to secure with Kibosh DNS IP
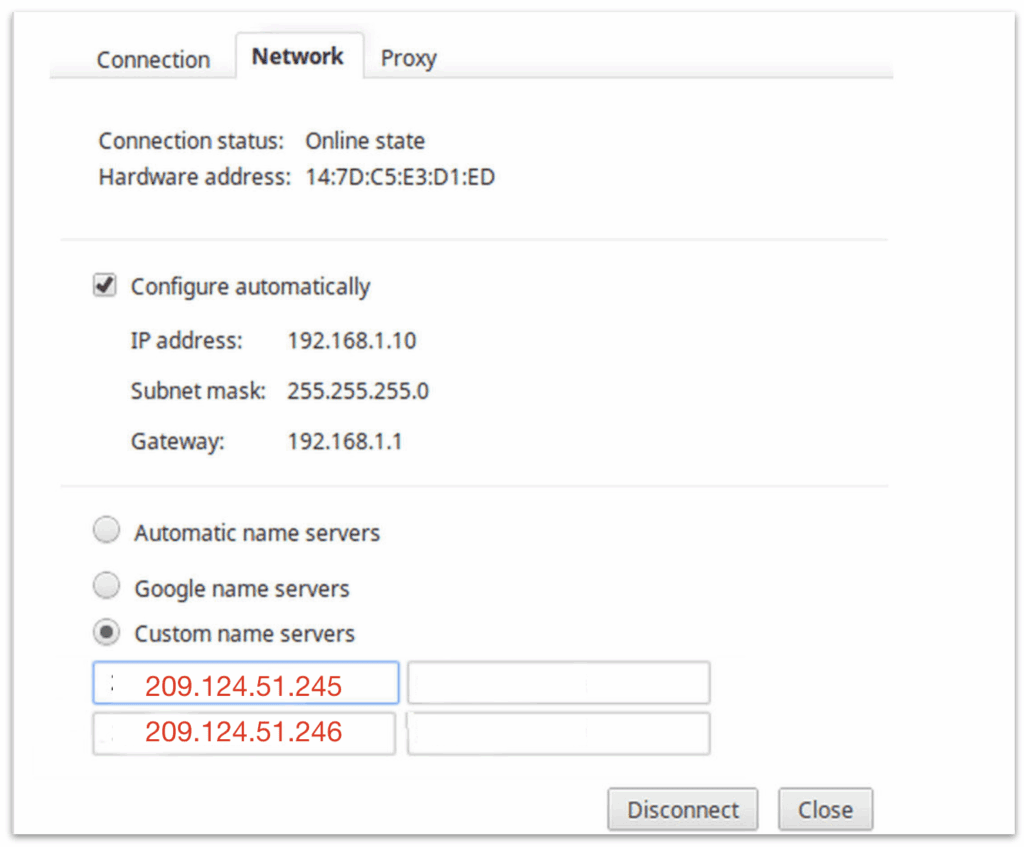
1. Open Google Chrome, navigate to chrome://flags in your address bar (omnibox). Find the flag you see below (“Experimental static ip configuration”), and enable it. If this flag is not present, skip to step 3.

2. Select the option that appears on the bottom of your screen to restart your device.

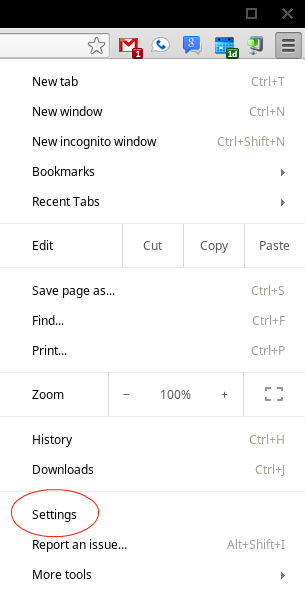
3. Select the menu button in the upper right-hand corner of your browser window, and click on Settings.
4. Under Internet connection, click on the name of your network. Then click the Network tab, select Custom name servers, and enter Kibosh DNS IP settings as shown:
Updated: 6/28/25
Kibosh 3.0 Dual-Layer Malware Protection:
Your Kibosh Router blocks malware on the Internet before it can be downloaded + monitors your network for possible infections, 24/7 on every device:
Layer 1 = The Blocking of Malware from outside your network (aka the ‘WAN’).
Layer 2 = The Monitoring for Malware infections from inside your network (aka the ‘LAN’).
To block Malware we must first identify the malware – to this end we incorporate multiple channels for Malware detection & blocking (aka definitions):
- Spamhause
- GitHub
- Project Honey Pot
- Kibosh Honey Pot(s)
- Customer submissions
What is Malware?
Malware is a piece of code designed to cause harm in one of a few ways:
- Steal your personal data (passwords, CC #’s, etc).
- Destroy your data.
- Encrypt and hold your data for ransom.
How does one get infected with Malware?
There are 4 primary channels:
- A cleverly crafted email with a link to an infected website (aka phishing).
- Drive-bye download – you’re using the Internet and land on an infected website that tricks you into clicking something.
- You download and install an app that has malware inside.
- DNS hijacking – you think you’re on your normal banking website, but in fact your on a malware-infected clone.
Kibosh’s dual-layer Malware protects you from # 1 and #2 by blocking the bad sites before you can be infected (layer 1), and will tell you if #3 has happened on any device on your network (layer 2).
Due to the Kibosh infrastructures inherent privacy, #4 is impossible.
How Kibosh Malware Protection Works:
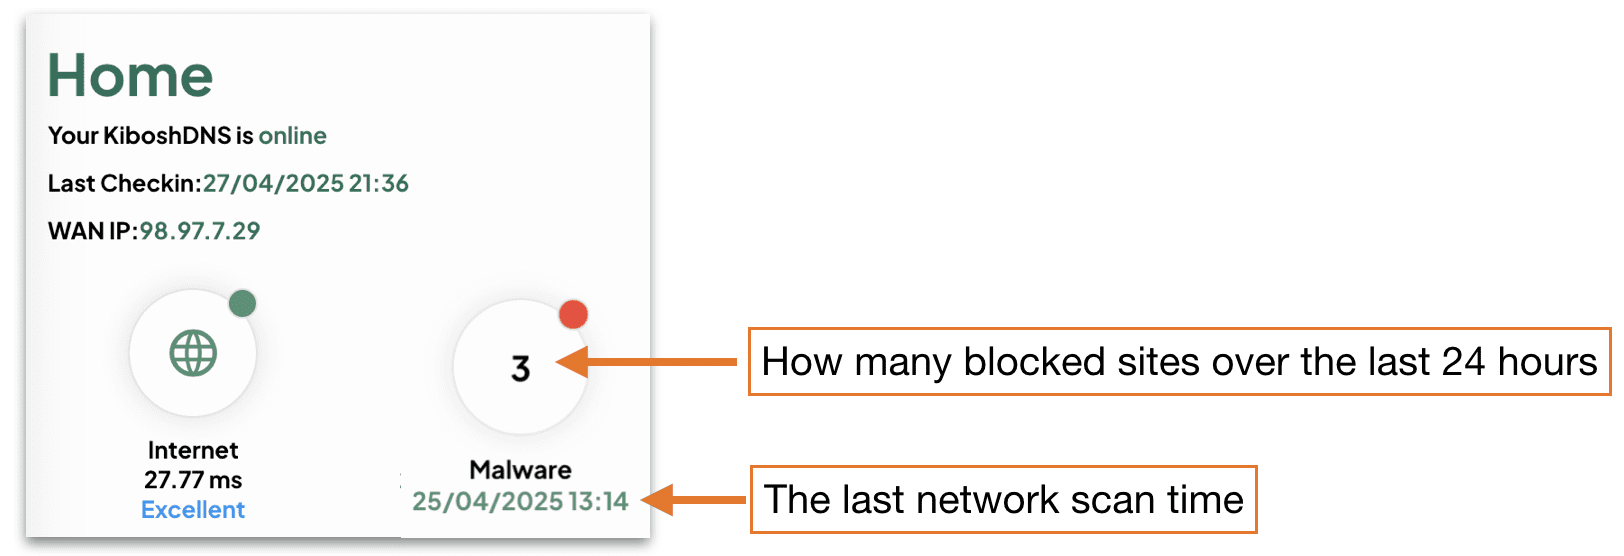
Kibosh blocks the Malware infected website before it can be downloaded (layer 1) – and then tells you about in in your DNS Portal HUD (layer 2).
Every 15 minutes your DNS Portal HUD will be updated with any Malware detections – which have all been blocked.
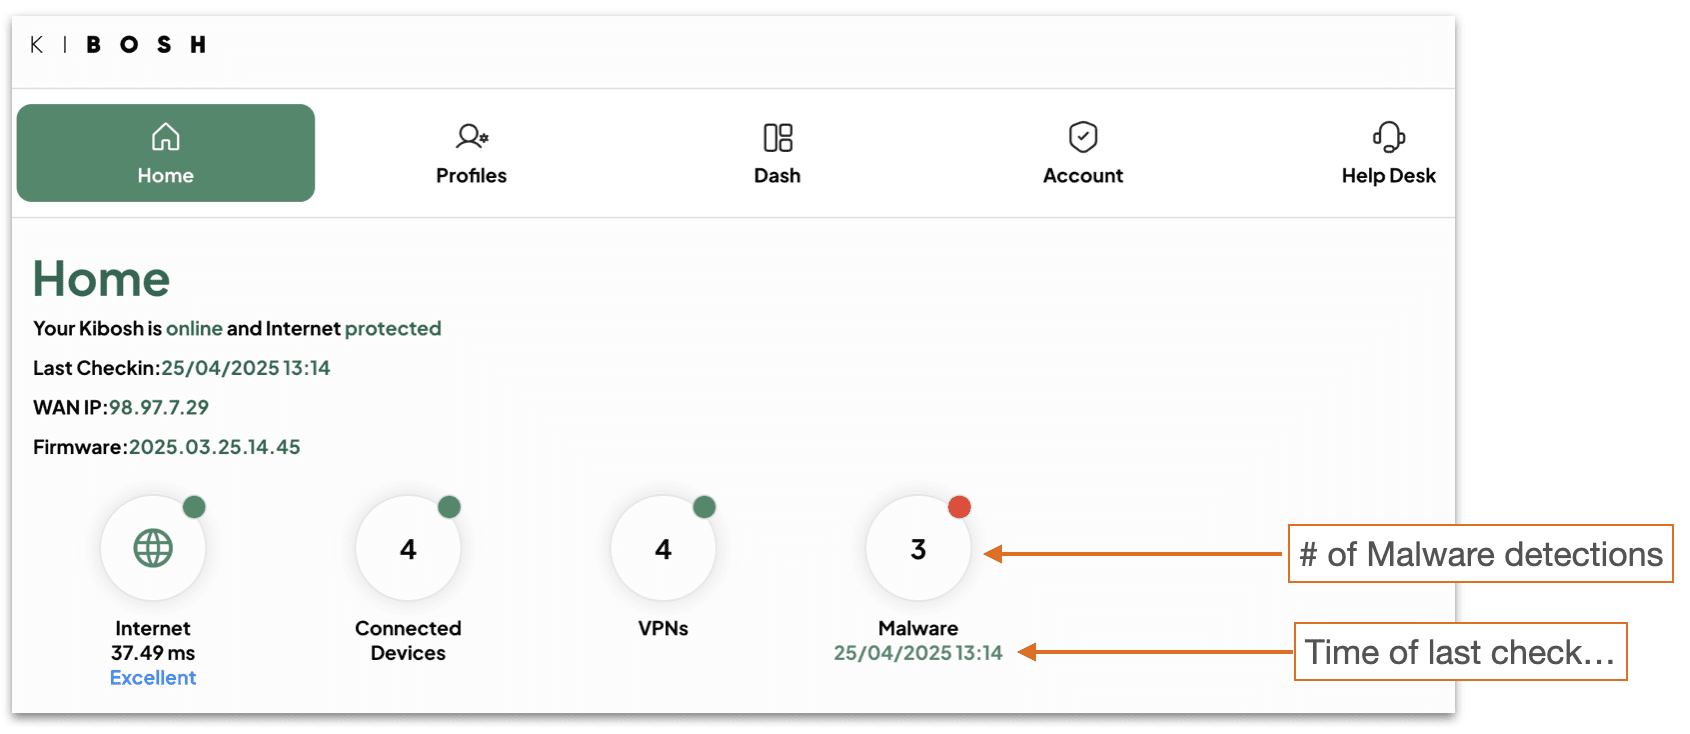
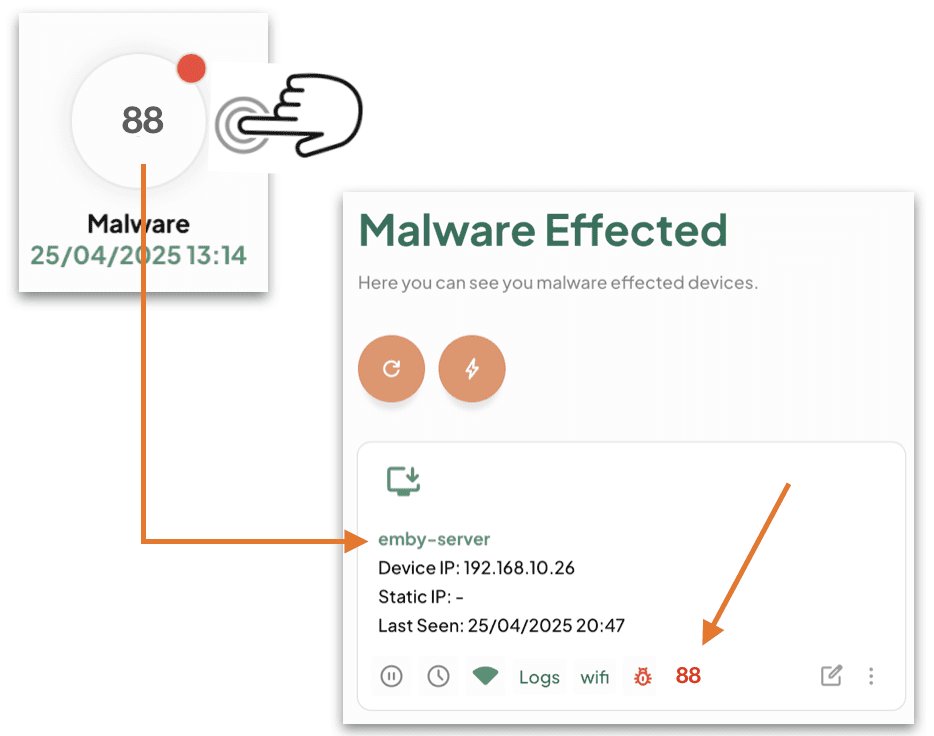
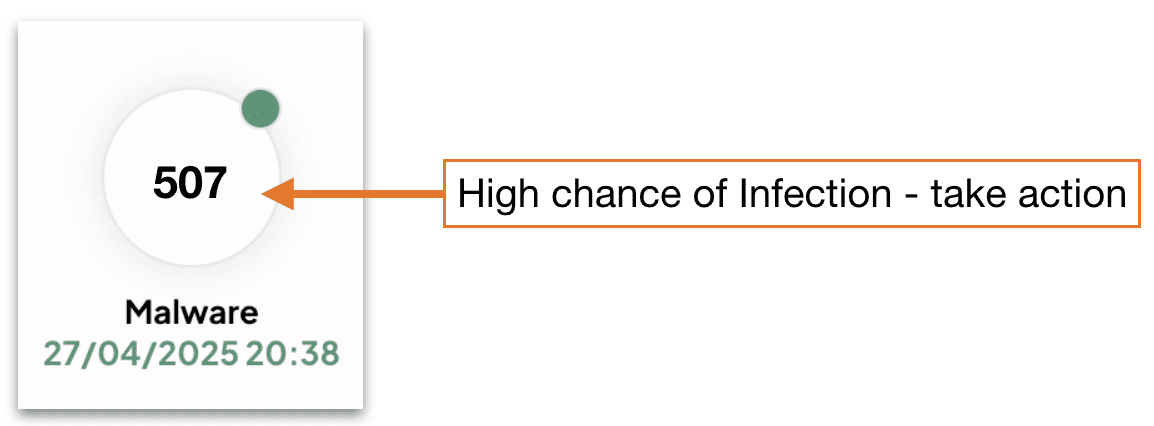
Tap / Click on the Malware HUD:
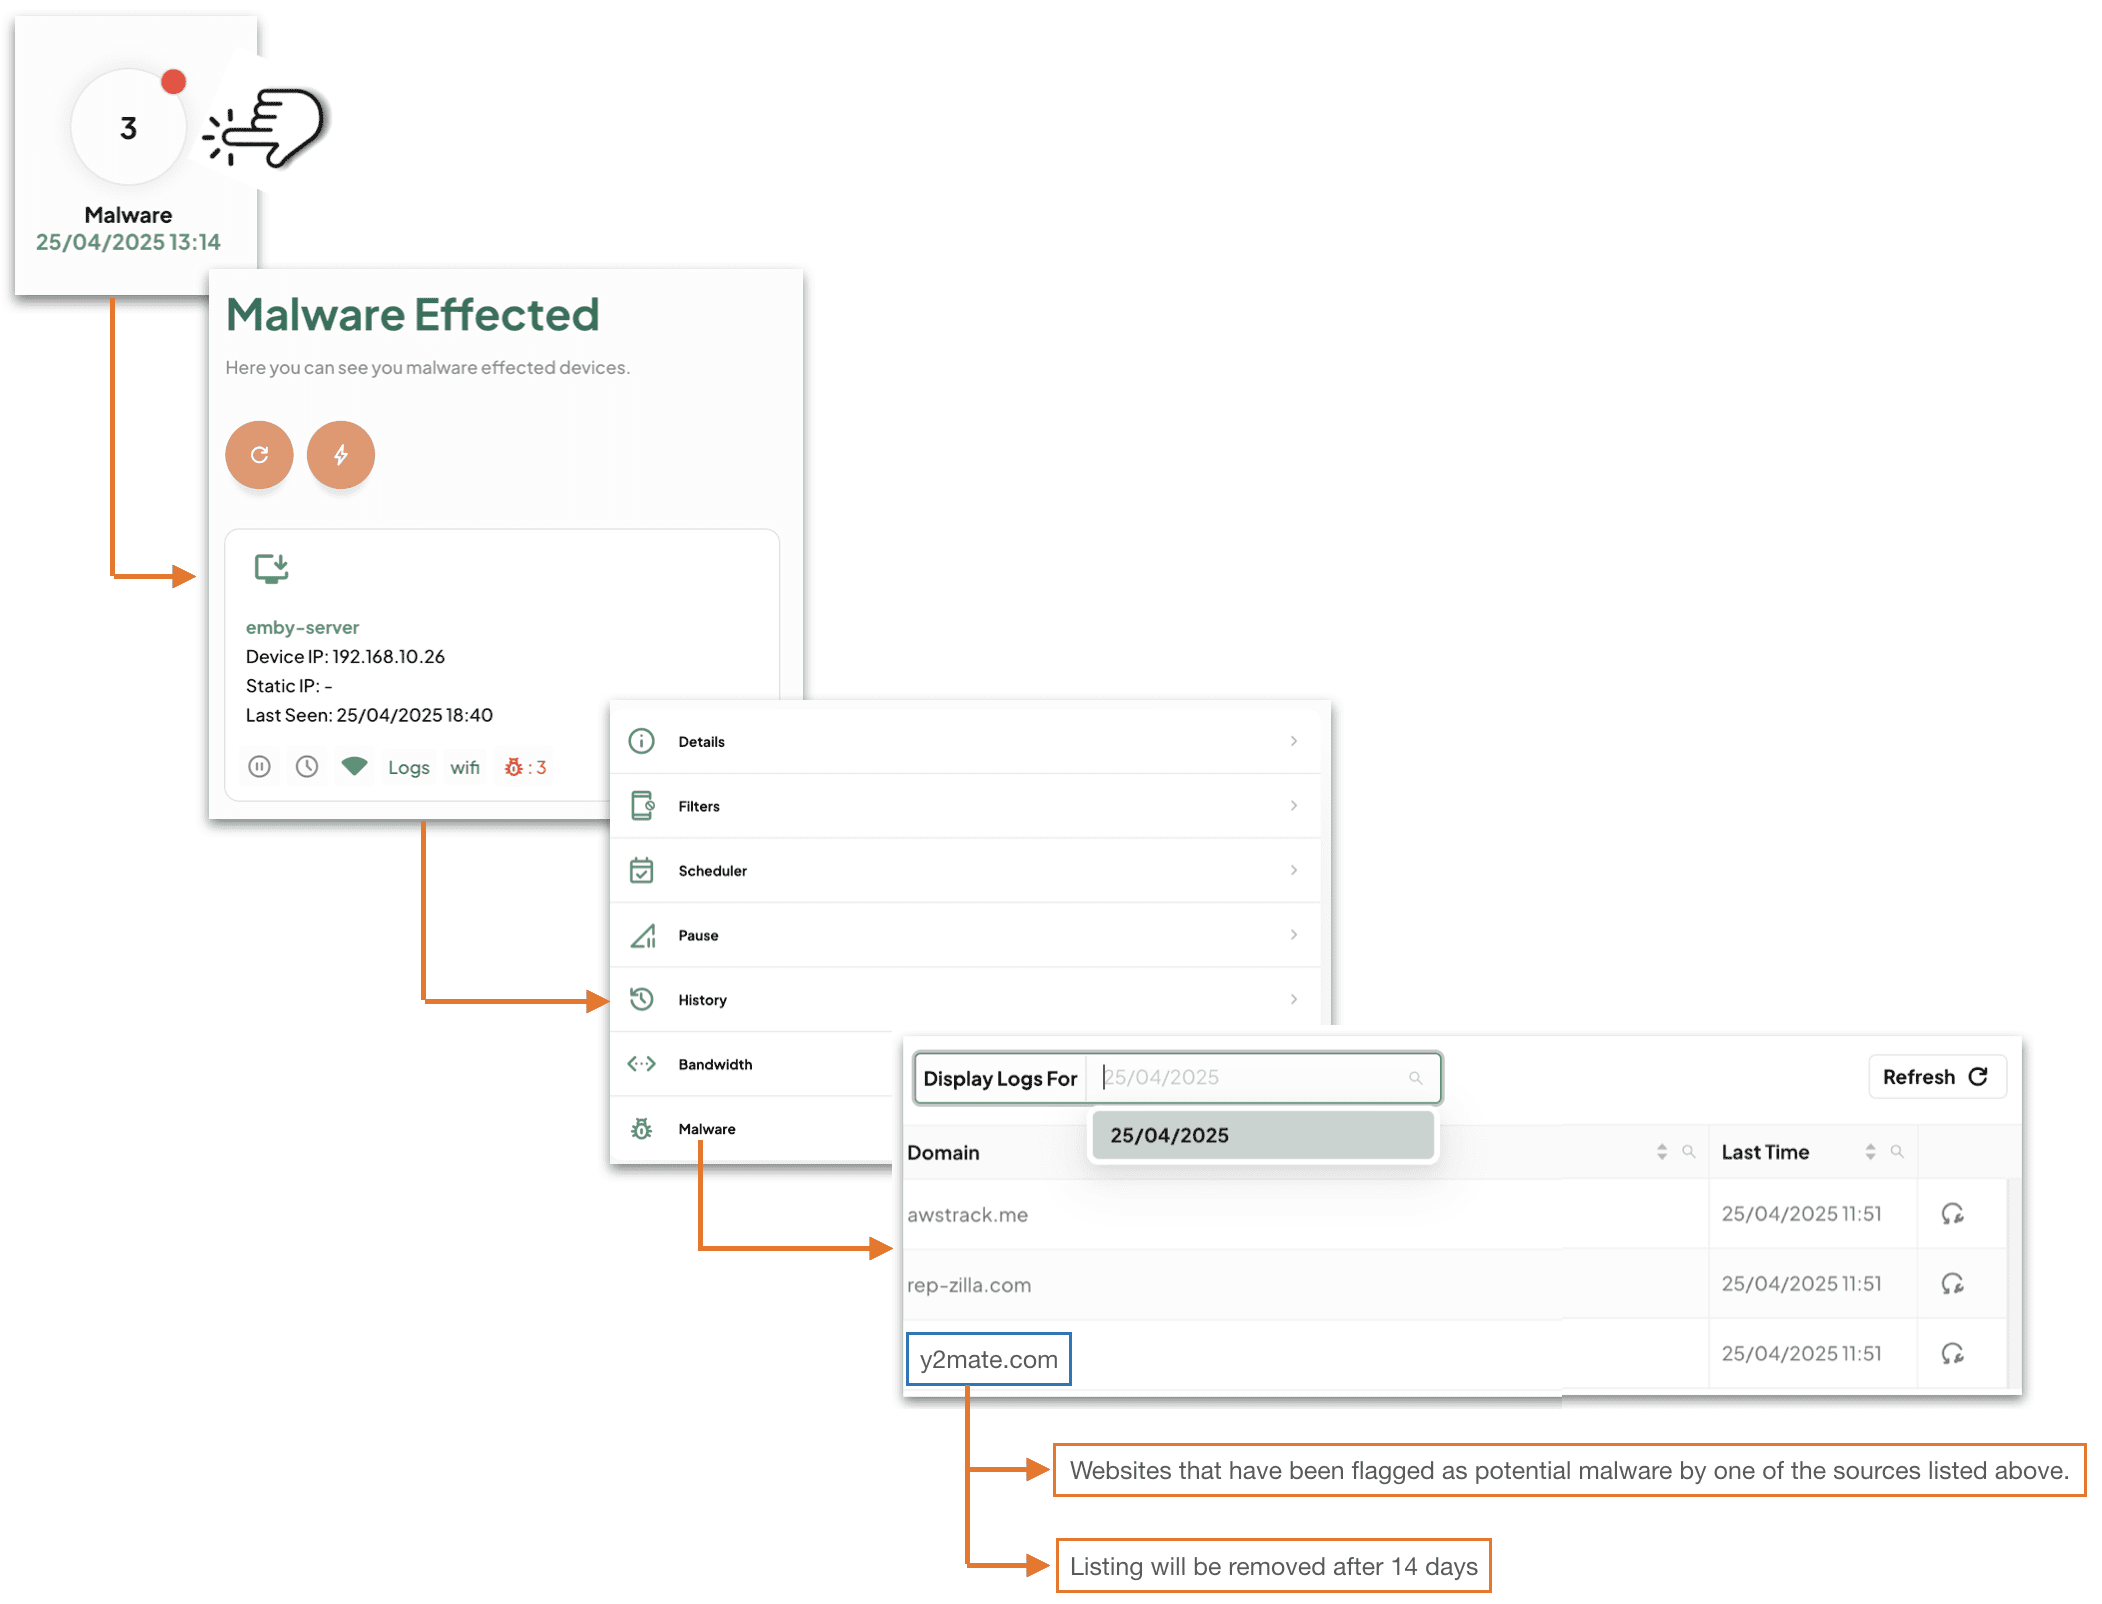
What your’re being told here is that this device (emby-server) is requesting a website that has been flagged as potential malware.
How to read your DNS Portal HUD:
Layer 1 will block the Malware by default – you need to do nothing.
Layer 2 will tell you that a Malware site has been blocked – you need to make a decision (action / no-action).
Glossary: ==========
- Hit = a single website blocked as malware related, that this device has tried to access.
- NOTE: usually unbeknownst to the user while opening other sites.
- Infection = many many hits on a single device.
- Detection = a website blocked as malware related.
You will need to decide to take action or not.
TIPS:
- If you see a few hits on this device, and few on that one – no worries this is normal.
- If you see many hits on a single device – then you should take a closer look.
- If you see hundreds of hits on a single device – there is little doubt this device is infected – isolate and troubleshoot.
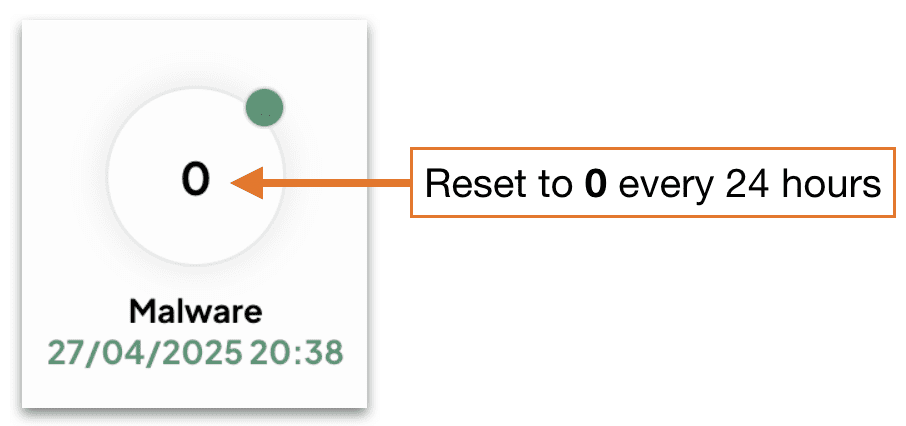
- After 24 hours the DNS Portal HUD reset to zero:
- Flagged hits are stored in History for up to two weeks on the device(s) so you can look and find patterns.
Malware Hits Action Log:
A malware hit from time to time is OK as most are ad / tracking related.
A device that is getting flagged daily with malware hits – this device might need closer inspection.
A device with many malware hits, like over 50, every day – this device has malware and you will need to deal with it asap (see How to Deal with Malware infection).
Troubleshooting Malware Infections:
Layer 1 will block the Malware site before it can load.
Layer 2 will inform you that a Malware site has been blocked and on what device(s).
TIPS:
- Always look at a malware hit (aka website) – look at the domain part as this will tell you what the website is, and you can do a little research on what the site does. In most scenarios it will be marketing / tracking related.
Most of the time you’ll have just a few hits on a device here and there. These are 99% of the time marketing and / or tracking related websites. In general, this is not indicative of a Malware infection.
If however, you have a device(s) with many Malware hits – then you most likely have a problem.
How to confirm Malware a infection:
- Check your Kibosh Client Portal > Dash > Devices > Malware logs.
- Go to Malware Bytes and install their Free Malware Scanner (macOS / Windows).
- Do not subscribe or give your CC info yet – for now you’re just scanning.
How to recover Malware infection (in order):
- Remove the infected device(s) from internet access
- Q: can I use filter rules to block inet access on this device?
- A: yes, but this will not protect all the devices on your LAN, so any device infected must be isolated from any network access.
- Now you need to clean:
- iPhone / Android – make a backup and reset to factory.
- macOS – backup your data and do a factory reset:
- Power down your Mac
- Power back on – holding down the R + COMMAND keys to initiate
- You will need to attach a physical Ethernet cable to the Kibosh LAN to complete this step.
- The macOS Utilities window will pop up:
- Choose Reinstall macOS
- Windows – unless you’ve turned on snapshot restore feature, you’ll need the Windows 10/11 install media.
- Boot off the install media, and re-install Windows.
Please catch us on live Chat or email support@kibosh.com if you’re still having issues.